

Introduction
The reality of modern ransomware response
Picture this: It’s 2 AM. Your on-call engineer gets an alert about suspicious activity. By the time they log in, investigate, and start containment procedures, the attackers have already pivoted through three critical servers and begun encrypting your file shares. Sound familiar?
This scenario plays out in organizations worldwide every week. The traditional detect-alert-investigate-respond cycle simply can’t keep pace with modern attack velocities. Human-operated ransomware groups know they have a window—typically 1-3 hours—before security teams mobilize effectively. They exploit this gap ruthlessly.
This is where Microsoft’s Attack Disruption fundamentally changes the game.
After implementing Attack Disruption across dozens of enterprise environments over the past two years, I’ve seen firsthand how it transforms incident response from a frantic race against time into a controlled, methodical process. When configured correctly, it reduces attacker dwell time from hours to minutes—automatically containing threats while your team sleeps.
But here’s the catch: getting it right requires meticulous attention to detail across multiple Microsoft Defender products. One misconfiguration, one outdated agent, one missing integration point, and you’re back to manual firefighting.
In this guide, I’ll walk you through I ran into from my previous deployments—the configurations that work, the pitfalls to avoid, and the validation steps that ensure your Attack Disruption capability is battle-ready when you need it most.
Understanding Attack Disruption’s threat coverage
Attack Disruption isn’t a silver bullet—it’s a precision tool designed for specific high-impact attack patterns. Understanding exactly what it protects against helps set appropriate expectations and complementary defenses.
Primary attack vectors addressed
The system excels at disrupting these specific attack types:
Adversary-in-the-middle (AiTM) attacks – These sophisticated session hijacking attacks bypass MFA by stealing authentication cookies. Attack Disruption identifies the anomalous authentication patterns and immediately suspends compromised accounts. Microsoft has specifically enhanced this capability following recent FIDO downgrade attacks discovered in 2025.
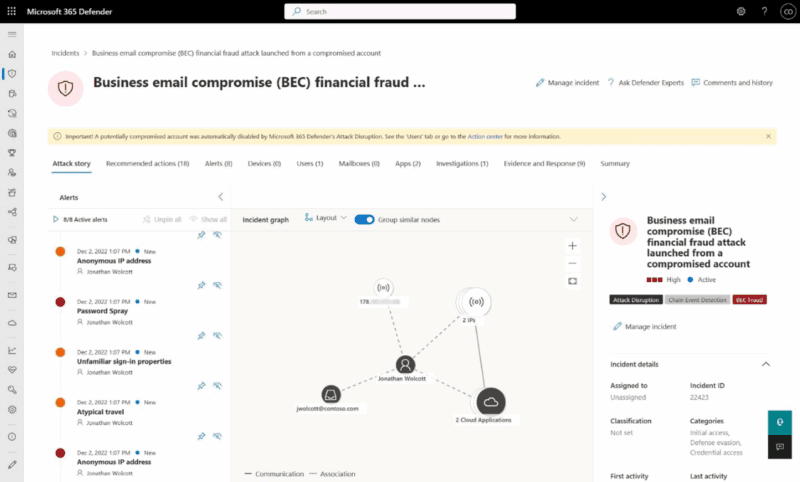
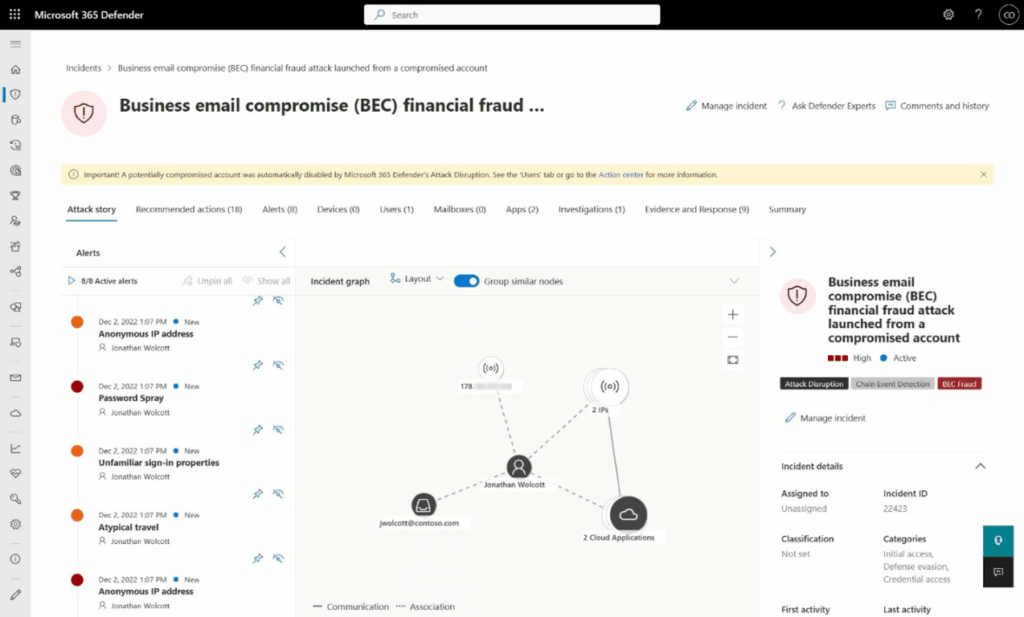
Business Email Compromise (BEC) – Financial fraud attempts through compromised email accounts trigger rapid containment based on unusual mailbox behavior and suspicious financial communications. With mail bombing attacks now detectable as of June 2025, the system can identify DDoS attempts that often precede BEC attacks.
Example flow of a attack disruption in a BEC attack:

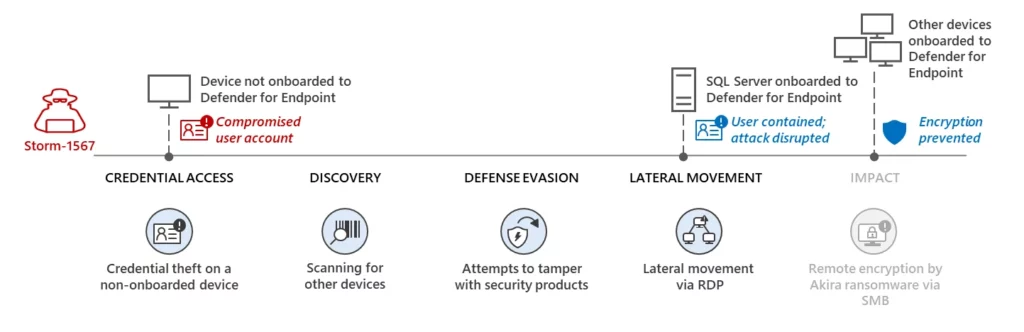
Human-operated ransomware – The bread and butter of Attack Disruption. It recognizes hands-on-keyboard patterns, lateral movement attempts, and pre-encryption behaviors, automatically containing affected systems before encryption begins.
Example flow of a attack disruption in STORM-1567:
Credential theft and privilege escalation – When attackers compromise domain admin accounts or attempt privilege escalation, the system responds with immediate account suspension and device isolation.
Multi-stage phishing campaigns – Complex attack chains targeting high-value assets trigger coordinated responses across email, endpoint, and identity planes.
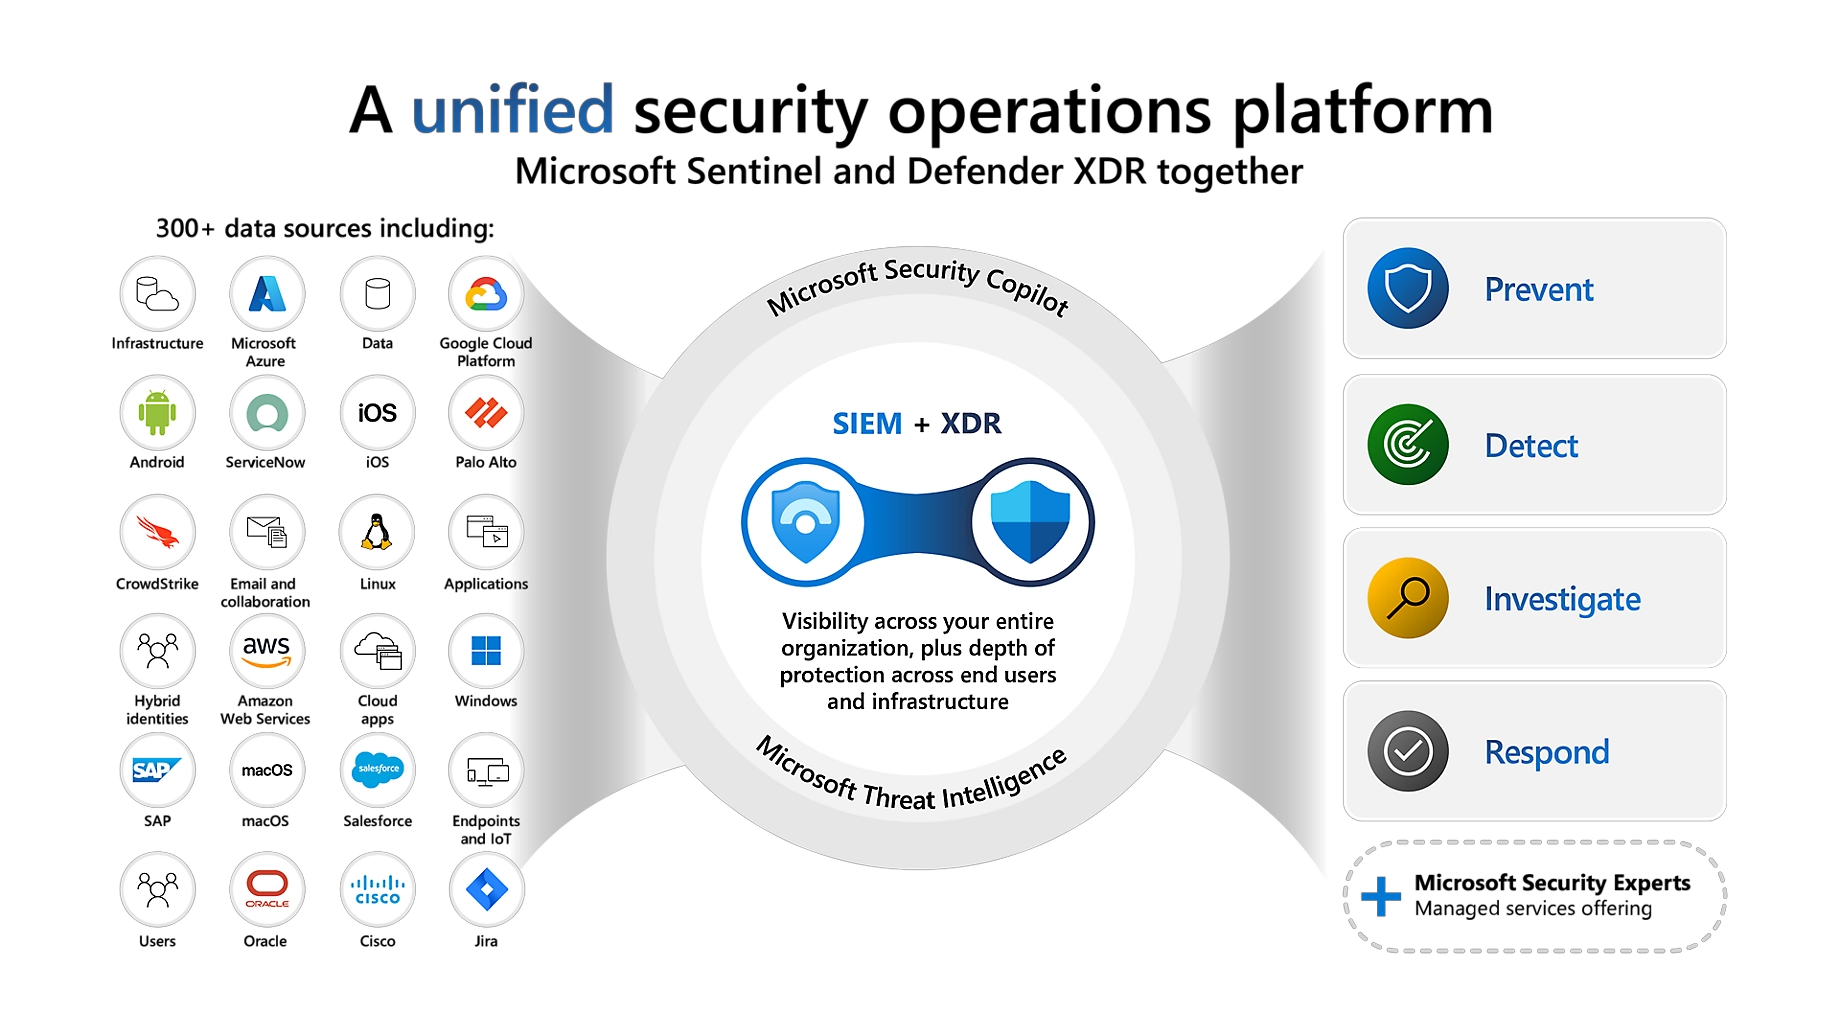
The three-stage defense architecture
Attack Disruption operates through a sophisticated correlation engine that processes signals in three distinct stages:
Stage 1: Multi-vector signal correlation
The system continuously ingests and correlates telemetry from all deployed Defender products—endpoint behavioral analytics, identity anomalies, email security indicators, and cloud application activity. This cross-product visibility is crucial; isolated signals that seem benign become critical when correlated across domains.
Stage 2: Compromised asset identification
Once high-confidence attack patterns emerge, the system maps the attack’s progression across your environment. It identifies not just currently compromised assets but also likely next targets based on lateral movement patterns and attacker TTPs (Tactics, Techniques, and Procedures).
Stage 3: Automated response execution
Based on the threat scope and your configured automation levels, the system executes appropriate containment actions while preserving forensic evidence. These aren’t random isolations—they’re surgical strikes designed to break the attack chain while minimizing business disruption.
Automated response actions in practice
The platform can execute four primary response actions, each serving a specific defensive purpose:
- Device containment isolates compromised endpoints from network communications while maintaining a forensic channel to the Defender portal. I’ve seen this stop ransomware spread in its tracks during active attacks.
- User account suspension immediately disables compromised accounts in both Active Directory and Microsoft Entra ID (formerly Azure AD). This is particularly effective against BEC attacks where every minute counts.
- User containment provides temporary identity-based blocking that prevents lateral movement without fully disabling accounts—perfect for investigating suspicious but unconfirmed activity.
- IP address containment blocks malicious IP addresses associated with command-and-control infrastructure or compromised unmanaged devices attempting network access.
High-confidence decision making
What sets Attack Disruption apart from basic automated response tools is its sophisticated decision-making framework:
- Multi-vector convergent analysis requires corroborating evidence from multiple security domains before taking action
- Threat intelligence integration leverages Microsoft’s visibility into thousands of real-world incidents daily
- Advanced AI models trained on confirmed attack patterns, not just anomalies
- Temporal and contextual correlation understands that certain behaviors together in sequence indicate attacks
This multi-layered approach maintains exceptionally low false positive rates—critical for maintaining trust in automation.
Licensing requirements and architecture
License requirements
Full Attack Disruption functionality requires one of these licensing combinations:
| Subscription Type | Coverage | Best for |
|---|---|---|
| Microsoft 365 E5 | Complete | Most organizations – best value |
| Microsoft 365 A5 | Complete | Educational institutions |
| Microsoft 365 E3 + E5 Security | Complete | Organizations with existing E3 |
| Microsoft 365 A3 + A5 Security | Complete | Educational alternative |
Partial coverage options (requiring additional products):
- Windows 10/11 Enterprise E5
- EMS E5
- Office 365 E5
Essential product dependencies
These four products must all be deployed for complete Attack Disruption coverage:
- Microsoft Defender for Endpoint Plan 2 – Provides device containment and behavioral analytics
- Microsoft Defender for Identity – Enables Active Directory and Entra ID account suspension
- Microsoft Defender for Cloud Apps – Supplies cloud application signals and OAuth app governance
- Microsoft Defender for Office 365 Plan 2 – Delivers email security signals and SafeLinks protection
Missing any component creates coverage gaps that sophisticated attackers will exploit. I don’t dive into how to configure MDE/MDI/MDCA/MDO, below I have added the steps that are often forgotten. Make sure to check them! And again: the wider the deployment, the greater the protection coverage is
Permission configuration
Proper role assignment ensures your team can manage Attack Disruption effectively:
| Role | Purpose |
|---|---|
| Global Administrator | Full configuration access |
| Security Administrator | Manage Attack Disruption settings |
| Security Reader | View actions and incidents |
| Security Operator | Approve/reject pending actions |
Microsoft Defender for Endpoint configuration (important for HumOR and AiTM)
Agent version requirements
When you have deployed Microsoft Defender for Endpoint (MDE), you must verify the minimum Sense Agent version for full functionality is 10.8470. This version enables the critical “Contain User” action essential for stopping human-operated attacks. Running older versions severely limits your defensive capabilities.
Validate your current deployment with this KQL query:
// Identify devices with outdated agent versions
DeviceInfo
| where Timestamp > ago(1d)
| where OnboardingStatus == "Onboarded"
| summarize arg_max(Timestamp, *) by DeviceId
| extend AgentVersionNumber = toint(substring(ClientVersion, 0, indexof(ClientVersion, ".")))
| where AgentVersionNumber < 10 or (AgentVersionNumber == 10 and
    toint(substring(ClientVersion, indexof(ClientVersion, ".") + 1)) < 8470)
| project DeviceName, ClientVersion, OnboardingStatus, OSPlatform
| sort by DeviceName asc
Local verification:
# Check agent version locally
Get-ItemProperty -Path 'Registry::HKEY_LOCAL_MACHINE\SOFTWARE\Microsoft\Windows Advanced Threat Protection\Status' -Name "MsSenseDllVersion"
Device Group automation strategy
Device groups control automation levels across your environment. Strategic configuration balances security effectiveness with business continuity.
Manual configuration steps:
- Navigate to the Microsoft Defender portal (https://security.microsoft.com)
- Go to Settings > Endpoints > Permissions > Device groups
- Click + Add device group
- Configure the following settings:
- Name and description – Use clear, function-based naming (e.g., “Production Servers – Semi-Auto”)
- Automation level – Choose based on device criticality:
| Automation level | Description | When actions are taken |
|---|---|---|
| Full – remediate threats automatically | Recommended setting | Malicious verdicts = automatic remediation |
| Semi – require approval for any remediation | All actions need approval | All verdicts require manual approval |
| Semi – require approval for core folders remediation | Core system folders protected | Malicious in system folders = approval needed; elsewhere = automatic |
| Semi – require approval for non-temp folders remediation | Temp folders automated | Temp folders = automatic; other locations = approval needed |
| Semi – require approval for all folders | Investigation only | All remediation requires approval |
| No automated response | Not recommended | No automated investigation or remediation |

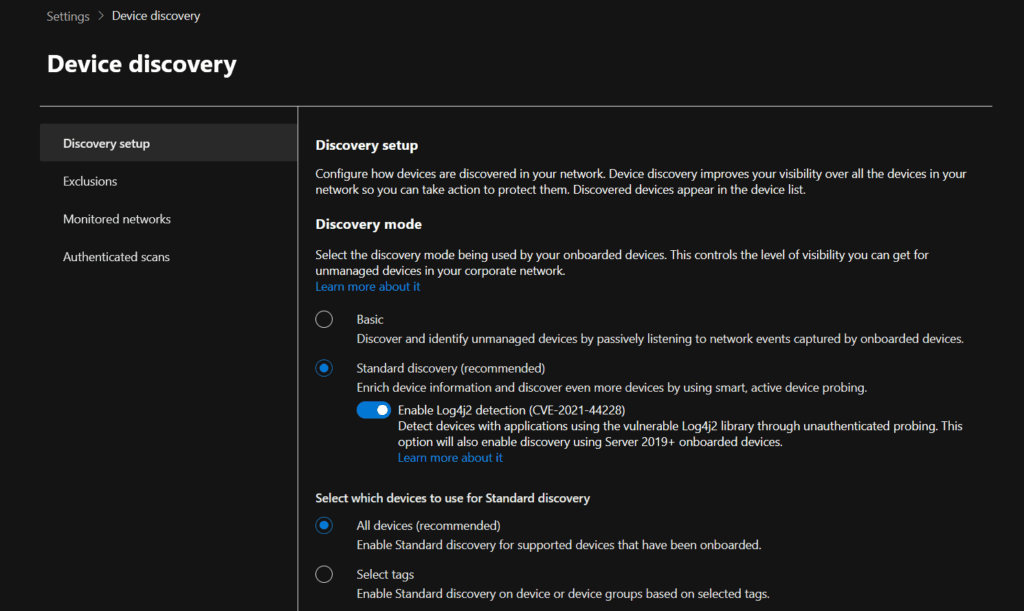
Device Discovery configuration
Standard discovery mode is essential for Attack Disruption to identify and respond to unmanaged devices attempting network access.
Configuration steps:
- In the Microsoft Defender portal, go to Settings > Device discovery
- Ensure Standard discovery is enabled (not Basic)
- Configure monitored networks as needed
- Save changes
Monitor discovery of devices after a bit of time:
// Check for devices that should be onboarded
DeviceInfo
| summarize arg_max(Timestamp, *) by DeviceId
| where isempty(MergedToDeviceId)
| where OnboardingStatus == "Can be onboarded"
| project DeviceName, OnboardingStatus, LastSeen = Timestamp, OSPlatform
Microsoft Defender for Identity configuration (important for hybrid users)
Domain Controller audit requirements
Proper audit policies enable Defender for Identity to detect and respond to credential-based attacks. See my extensive guide on Defender for Identity, below the important things to keep in mind.
Manual audit configuration via Group Policy:
- Open Group Policy Management Console on a domain controller
- Navigate to Computer Configuration > Policies > Windows Settings > Security Settings > Advanced Audit Policy Configuration > Audit Policies
- Configure the following audit subcategories for Success and Failure:
- Account Logon > Audit Credential Validation
- Account Management > Audit Computer Account Management
- Account Management > Audit Distribution Group Management
- Account Management > Audit Security Group Management
- Account Management > Audit User Account Management
- DS Access > Audit Directory Service Changes
- DS Access > Audit Directory Service Access
- System > Audit Security System Extension
- Apply the GPO to all domain controllers
- Verify with PowerShell:
# Install the Defender for Identity PowerShell module
Install-Module -Name DefenderForIdentity

# Set all required audit configurations
Set-MDIConfiguration -Mode Domain -Configuration All

# Test if all configurations are correct
Test-MDIConfiguration -Mode Domain -Configuration All

# View current configuration status
Get-MDIConfiguration -Mode Domain -Configuration All
Action account configuration
Defender for Identity uses the LocalSystem account on domain controllers for automated responses by default. The sensor must be deployed on the DC where Active Directory accounts will be disabled.
Important considerations:
- Validate that no automation conflicts exist that might re-enable disabled accounts
- Ensure the LocalSystem account maintains proper permissions
- Test account suspension in a controlled environment first
Verify sensor deployment:
# Check Defender for Identity sensor service
Get-Service -Name "AATPSensor"

# Verify sensor deployment on domain controllers
Get-WmiObject -Class Win32_Service -Filter "Name='AATPSensor'" | Select-Object Name, State, StartMode
Entra ID integration
With the rebranding from Azure AD to Microsoft Entra ID, it’s important to understand how Attack Disruption handles different account types:
For hybrid accounts (synced from AD):
- Defender for Identity disables the on-premises AD account
- Attack Disruption also disables the Entra ID synced account
For cloud-only accounts (Entra ID native):
- Attack Disruption disables the account directly in Entra ID
- This doesn’t require Defender for Identity deployment
Microsoft Defender for Cloud Apps integration (important for BEC detections)
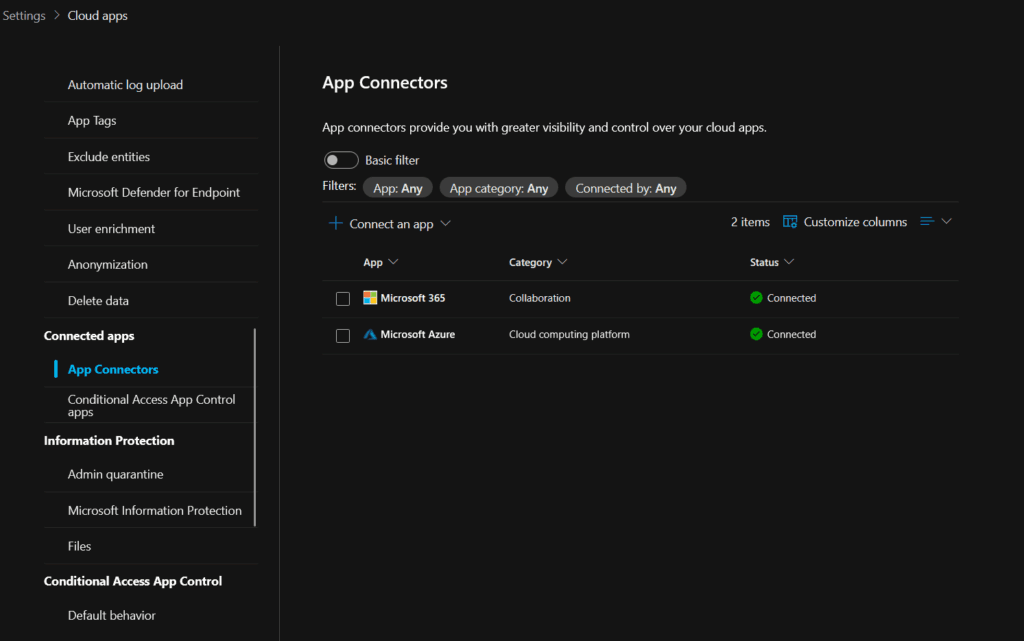
Office 365 Connector configuration
The Office 365 connector provides essential visibility for detecting for example BEC attacks and suspicious OAuth applications.
Detailed setup process:
- Navigate to the Microsoft Defender portal (https://security.microsoft.com)
- Go to Settings > Cloud Apps > Connected apps > App connectors
- Click Connect an app and select Office 365
- In the connection wizard, grant the following permissions:
- Microsoft Entra Users and groups
- Microsoft Entra ID Management events
- Microsoft Entra ID Sign-in events
- Microsoft Entra ID Apps
- Microsoft 365 activities
- Microsoft 365 files
- Review and accept the permission consent
- Verify connection status shows “Connected”
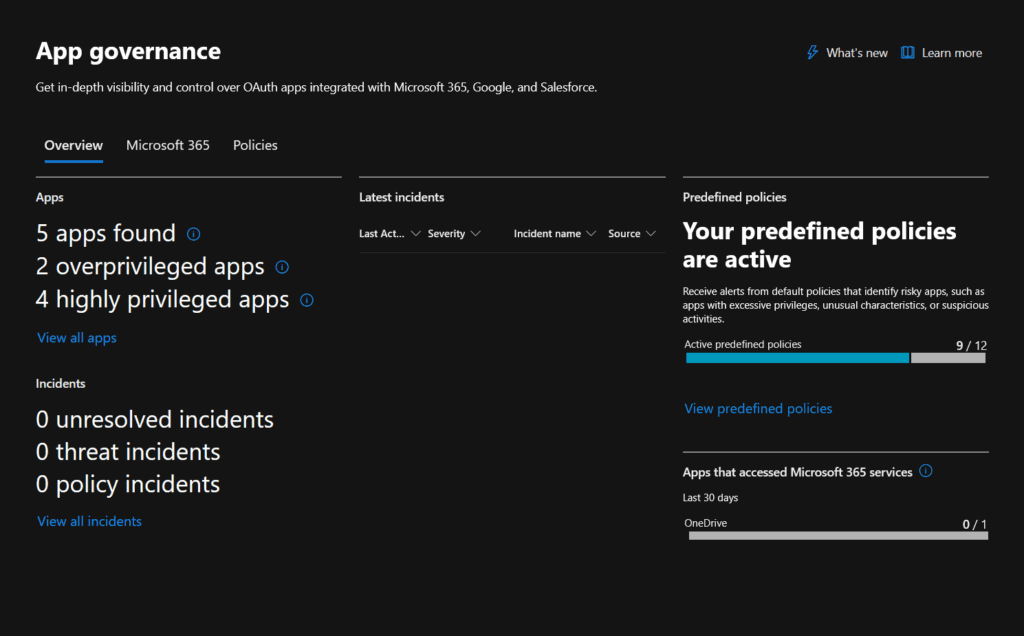
App Governance configuration
App Governance provides critical OAuth application visibility to detect malicious apps used in attacks. Also for this, check my blogpost which I created before, below the short steps to enable it.
Enablement steps:
- In Microsoft Defender portal, navigate to Cloud Apps > App governance
- If not activated, click Get started to enable App Governance
- Accept the terms and conditions
- Wait for initial discovery (can take 1-2 hours)
- Configure OAuth app policies:
- Go to Policies > Create policy
- Select OAuth app anomaly detection
- Configure thresholds for suspicious app behavior
- Enable automatic remediation where appropriate
Network requirements update (critical)
Important: Microsoft has announced critical network requirement changes for Defender for Cloud Apps:
For commercial tenants (by April 29, 2025):
- Update firewall configurations to allow the new Azure service tags
- Add AzureFrontDoor.MicrosoftSecurity tag to allowlist
- Configure outbound traffic on port 443
For GCC/Government Tenants (by August 25, 2025):
- Allow outbound traffic on port 443 to specified IP ranges
- Add Azure Gov service tag AzureFrontDoor.MicrosoftSecurity
Failure to update these configurations will result in service disruption.
Microsoft Defender for Office 365 configuration (important for AiTM)
Mailbox auditing
Enable auditing for all mailboxes to detect attack patterns. The following events must be audited at minimum:
- MailItemsAccessed (tracks email access patterns)
- UpdateInboxRules (detects malicious rule creation)
- MoveToDeletedItems (monitors email manipulation)
- SoftDelete (tracks email deletion)
- HardDelete (tracks permanent deletion)
Complete PowerShell configuration:
# Connect to Exchange Online
Connect-ExchangeOnline

# Step 1: Enable unified audit log ingestion (for admin actions)
Get-AdminAuditLogConfig | Format-List UnifiedAuditLogIngestionEnabled

# If False, enable it:
Set-AdminAuditLogConfig -UnifiedAuditLogIngestionEnabled $true

# Step 2: Enable mailbox auditing by default (for mailbox actions)
Get-OrganizationConfig | Format-List AuditDisabled

# If True (auditing is disabled), enable it:
Set-OrganizationConfig -AuditDisabled $false

# Step 3: Configure specific audit events for all mailboxes
$AuditEvents = @("MailItemsAccessed","UpdateInboxRules","MoveToDeletedItems","SoftDelete","HardDelete")

Get-Mailbox -ResultSize Unlimited -Filter "RecipientTypeDetails -eq 'UserMailbox'" |
    ForEach-Object {
        Set-Mailbox -Identity $_.Identity `
            -AuditEnabled $true `
            -AuditLogAgeLimit 90 `
            -AuditAdmin ($AuditEvents -join ",") `
            -AuditDelegate ($AuditEvents -join ",") `
            -AuditOwner ($AuditEvents -join ",")
    }

# Verify configuration
Get-Mailbox -ResultSize 10 | Format-List Name, AuditEnabled, AuditLogAgeLimit
SafeLinks policy configuration
At least one active SafeLinks policy must be configured for Attack Disruption email threat detection.
Manual Configuration Steps:
- Navigate to Microsoft 365 Defender portal (https://security.microsoft.com)
- Go to Email & collaboration > Policies & rules > Threat policies > Safe Links
- Click Create to add a new policy
- Configure policy settings:
- Name: “Custom – SafeLinks Policy”
- URL scanning: Enable “On: Safe Links checks a list of known, malicious links”
- Real-time scanning: Enable “Apply real-time URL scanning for suspicious links”
- Wait for scanning: Enable “Wait for URL scanning to complete before delivering”
- Internal emails: Enable “Apply Safe Links to email messages sent within the organization”
- Click protection: Enable “Track user clicks”
- User override: Disable “Do not let users click through to original URL”
- Configure app protection:
- Enable Safe Links for Office 365 applications
- Enable Safe Links for Microsoft Teams
- Apply to recipients:
- Condition: The recipient domain is
- Value: Select all accepted domains
- Set priority to 0 (highest)
- Review and Save
Configuration and verification via PowerShell:
# Connect to Security & Compliance PowerShell
Connect-IPPSSession

# Create a new SafeLinks policy
New-SafeLinksPolicy -Name "Custom - SafeLinks Policy" `
    -EnableSafeLinksForEmail $true `
    -EnableSafeLinksForOffice $true `
    -EnableSafeLinksForTeams $true `
    -ScanUrls $true `
    -DeliverMessageAfterScan $true `
    -EnableForInternalSenders $true `
    -AllowClickThrough $false `
    -TrackUserClicks $true

# Create and apply the SafeLinks rule
New-SafeLinksRule -Name "Custom - SafeLinks Policy" `
    -SafeLinksPolicy "Custom - SafeLinks Policy" `
    -RecipientDomainIs (Get-AcceptedDomain).Name `
    -Enabled $true

# Verify the policy is active
Get-SafeLinksPolicy -Identity "Custom - SafeLinks Policy"
Get-SafeLinksRule -Identity "Custom - SafeLinks Policy"
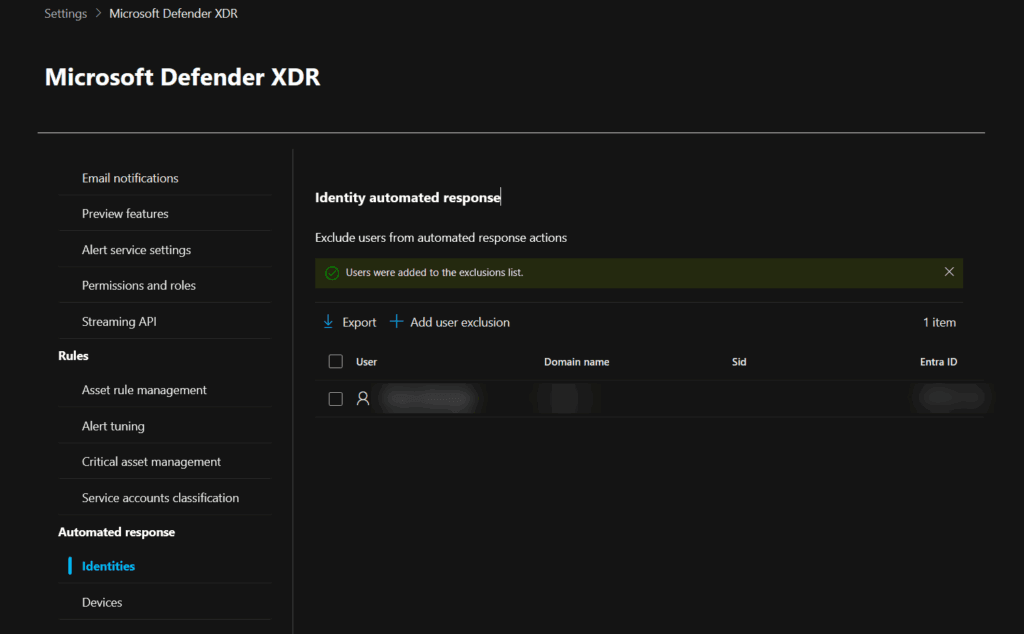
Strategic exclusion management
User account exclusions
While the platform allows excluding specific accounts from automated responses, use this capability sparingly. High-value accounts—often targeted in attacks—need maximum protection.
Configure user exclusions:
- In the Microsoft Defender portal, go to Settings > Microsoft Defender XDR
- Under Automated response, select Identities
- Click Add user exclusion
- Enter user account names (UPN format)
- Select Exclude users to save
Appropriate exclusions include:
- Emergency break-glass accounts (with compensating controls)
- Critical service accounts with unique authentication patterns
- Test accounts in completely isolated environments
Never exclude:
- C-level executives or VIPs (prime targets for BEC/AiTM)
- Domain administrators
- Service accounts with broad permissions
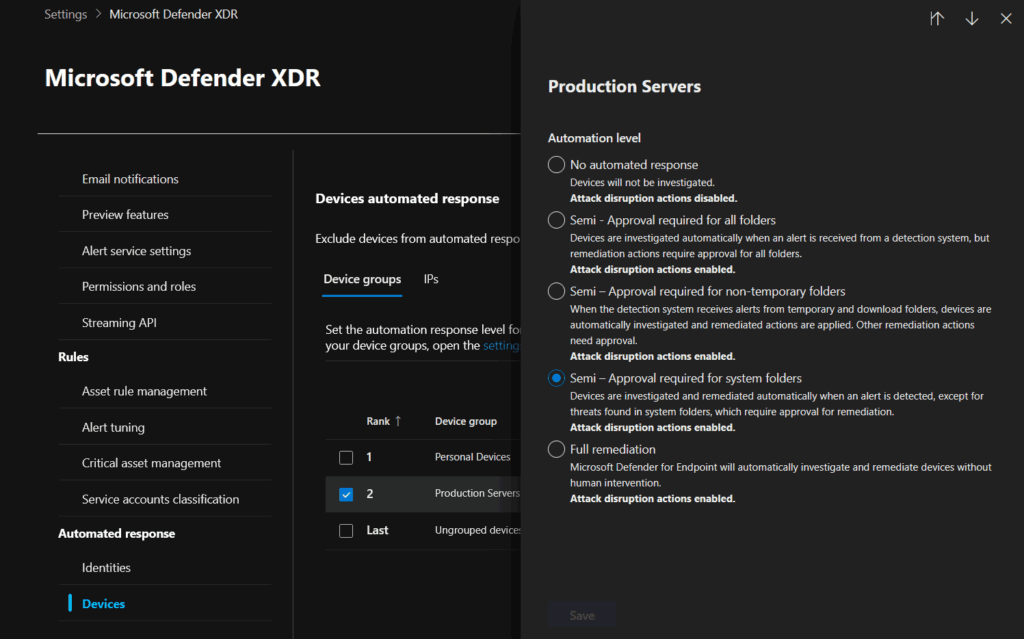
Device Group exclusions
Device exclusions affect both Attack Disruption and broader automated investigation capabilities.
Configuration process:
- Navigate to Settings > Microsoft Defender XDR > Automated response > Devices
- In the Device groups tab, select the group to configure
- Choose the appropriate automation level
- Document business justification for any “No automated response” settings
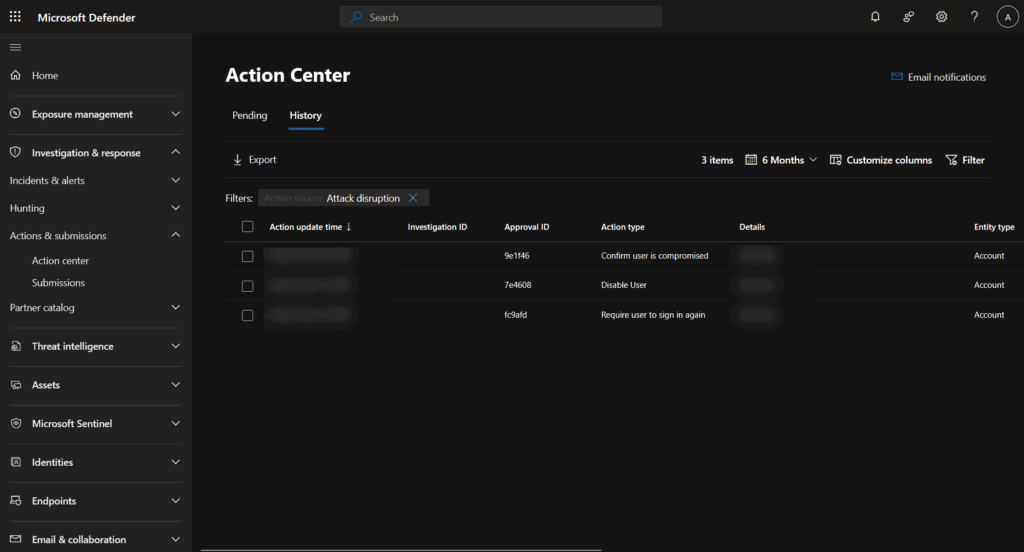
Action Center operations
Understanding the Action Center interface
The Action Center (https://security.microsoft.com/action-center) serves as your command center for Attack Disruption events.
Pending Actions tab:
- Displays actions awaiting approval in semi-automated scenarios
- Provides bulk approval/rejection for similar action types
- Shows full incident context and affected assets
- Critical for maintaining automated investigation flow
History tab:
- Complete audit trail of all automated actions
- Tracks automated investigations and Live Response sessions
- Provides ability to undo certain completed actions
- Serves as compliance documentation
Incident recognition
Attack Disruption incidents are easily identifiable through several indicators:
- Attack Disruption tag in the incident queue for easy filtering
- Yellow banner at the top of incident pages highlighting automatic actions taken
- Asset status indicators in the incident graph showing contained devices and disabled accounts
- (attack disruption) string added to incident titles via API
Managing automated responses
When investigations confirm threats have been remediated, contained assets can be released:
Device release process:
- Navigate to the incident page or Action Center
- Locate the contained device in the incident graph
- Click on the device to open asset details
- Select “Release from containment”
- Provide business justification
- Confirm the release action
User account re-enablement:
- Locate the disabled user account in incident details
- Click on the user account
- Select “Enable user”
- Provide justification for enablement
- Confirm the action
Advanced Monitoring queries
Attack Disruption effectiveness
List compromised accounts
kql
DisruptionAndResponseEvents
| where isnotempty( CompromisedAccountCount)
Show policies applied
kql
DisruptionAndResponseEvents
| distinct PolicyName
Show unique ActionTypes
kql
DisruptionAndResponseEvents
| distinct ActionType
Additional resources
https://learn.microsoft.com/en-us/defender-xdr/automatic-attack-disruption
Conclusion
Attack Disruption represents a paradigm shift in automated threat response. When properly deployed with all components—Microsoft Entra ID integration, complete Defender product suite, proper network configurations, and comprehensive auditing—it transforms your security posture from reactive to preemptive, containing sophisticated attacks in minutes rather than hours.
Success requires more than just turning on features. It demands:
- Comprehensive product deployment across all four Defender products
- Minimum configuration must contain at least Entra ID data, mailbox auditing, and SafeLinks
- Thoughtful automation level selection balancing security and operations
- Continuous optimization based on real-world performance
- Regular updates to meet evolving network and security requirements
The organizations I’ve worked with report dramatic improvements after full implementation: ransomware attacks contained before encryption, BEC attempts stopped before wire transfers, AiTM attacks disrupted before token theft, and lateral movement halted at the first compromised credential.
But perhaps most importantly, their security teams can focus on threat hunting and strategic improvements rather than fighting fires. In an era where attackers operate 24/7 with increasing sophistication, Attack Disruption serves as your organization’s immune system—always on, constantly learning, and ready to respond automatically when threats strike.
As the threat landscape evolves—from FIDO downgrade attacks to OAuth app exploitation—Microsoft continues enhancing Attack Disruption capabilities. Stay engaged with the security community, monitor Microsoft’s security updates, and continuously refine your implementation.
Remember: Attack Disruption isn’t just another security tool. It’s your organization’s automatic defense system, ready to protect your environment when every second counts. Configure it thoughtfully, monitor it diligently, and trust it to protect your organization during those critical moments when human response simply isn’t fast enough.