Introduction
With the introduction of Selective Isolation, Microsoft Defender for Endpoint has taken a significant step toward more flexible incident response. Instead of fully isolating an endpoint from the network, security teams can now allow specific outbound connections — enabling secure communication with approved services such as a forensic server or response platform.
This development removes a critical blocker for incident responders: the trade-off between containment and investigation. Defender’s own investigation tools, including Live Response and Timeline, provide powerful capabilities. But for deeper forensics, with tools like Velociraptor still offer value — especially in scenarios involving memory analysis, persistence detection, or large-scale artifact collection.
In this article, we explore how Selective Isolation works, what Microsoft Defender for Endpoint (MDE) can offer natively, how it can be extended with Velociraptor, and what a modern DFIR process looks like when combining containment with full investigative access.
Native Defender for Endpoint capabilities
Before considering third-party tooling, it is important to recognize that Microsoft Defender for Endpoint already includes a mature and evolving set of response and investigation capabilities. When a device is onboarded, the following functions become available to security analysts:
- Device Timeline: Provides detailed visibility into process execution, file creation, registry activity, and more.
- Alert Storyline: Automatically correlates signals from various components to show attack progression.
- Advanced Hunting: Allows threat analysts to write custom KQL queries across telemetry.
- Live Response: A remote PowerShell-based shell that can retrieve files, kill processes, and execute scripts.
- Investigation Graph: Visualizes relationships between alerts, identities, devices, and evidence.
- File and Registry Evidence: Enables analysts to isolate and inspect malicious binaries and registry modifications.
- Integration across XDR: Correlation with signals from Defender for Identity, Cloud Apps, and Office 365.
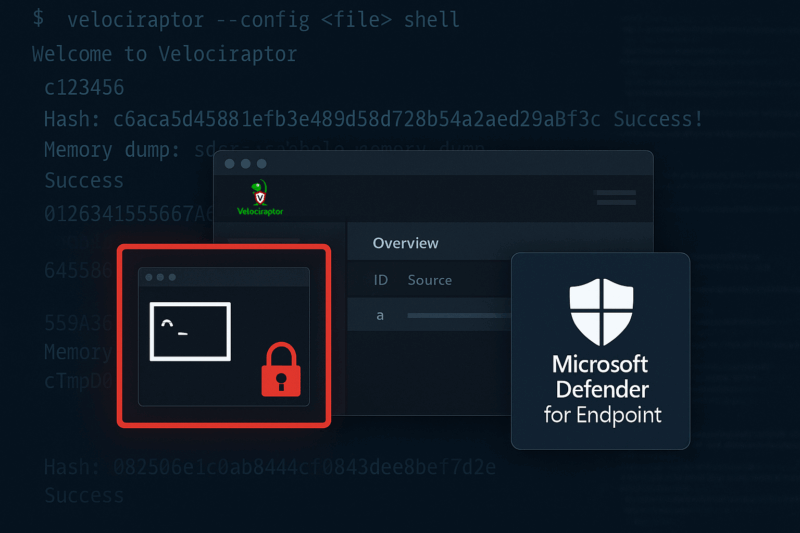
However, during an active DFIR case, you may encounter situations where critical visibility is missing — and physically retrieving the device is not a viable option when remote investigation is possible. Traditionally, isolating a device for containment meant losing remote access, and the Investigation Package alone was often insufficient. Selective Isolation addresses this limitation by allowing secure connectivity to approved forensic tools during containment.
Selective Isolation: overview and modes
Selective Isolation is a network containment feature within Defender for Endpoint that allows administrators to restrict all outbound traffic except specific destinations required for investigation or remediation.
Unlike traditional full isolation, which only permits communication with Microsoft security services, Selective Isolation introduces configurable allowlists for IP addresses and more.
Microsoft formally introduced Selective Isolation in June 2025 in public preview, and it is available to all customers with Microsoft Defender for Endpoint Plan 2 or via Microsoft 365 E5 licensing.
Supported modes
There are currently two modes of network isolation available:
- Full Isolation: All outbound traffic is blocked except communication with Microsoft Defender backend services.
- Selective Isolation: Communication is blocked except to destinations defined by the organization in an isolation exclusion profile.
Selective Isolation enables secure interaction with:
- Internal forensic servers (e.g., Velociraptor)
- SOAR or IR orchestration platforms
- Secure file repositories or cloud storage
- Internal services such as revocation servers or proxies
Configuration and application of Selective Isolation
Implementing Selective Isolation requires a small number of preparatory steps. Once configured, it becomes an operational tool during containment or escalation procedures.
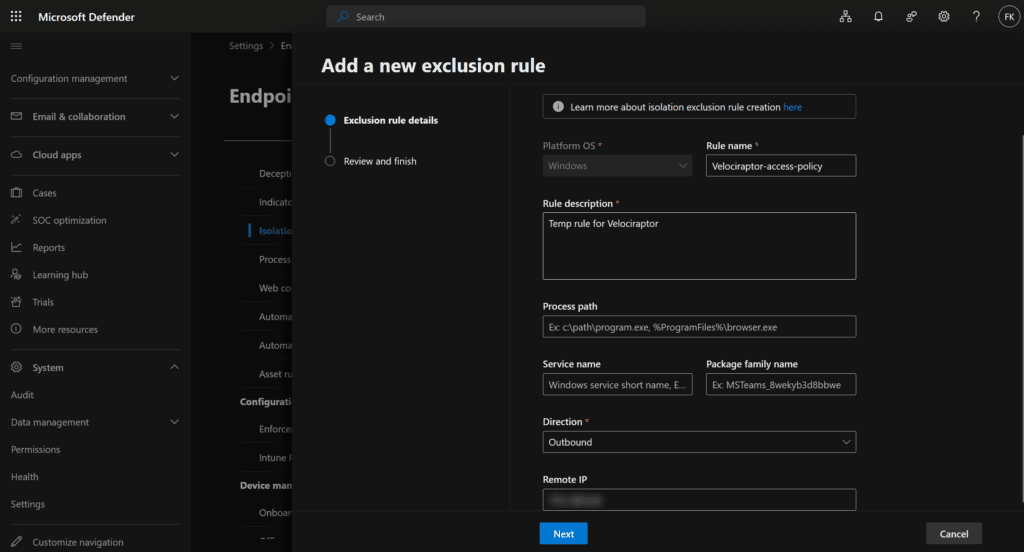
Step 1: Enable Isolation exclusion rules
- Log into the Microsoft 365 Defender portal
- Navigate to Settings → Endpoints → Advanced Features
- Enable Isolation Exclusion Rules and Live Response unsigned script execution (or else you have to sign the PS1 files later on – which is better ofcourse 🙁 )

This enables the option to apply Selective Isolation and define custom allowlists.
Step 2: Create an exclusion profile
- Navigate to Settings → Endpoints → Isolation Exclusion Rules
- Click Add device isolation exclusion (make sure to add an inbound and outbound rule to your server IP which we create in the steps below)
- Provide a clear name (e.g.,
velociraptor-access-policy) - Define one or more destinations:
- IP addresses (e.g.,
10.1.2.10)
- IP addresses (e.g.,
- Save the policy
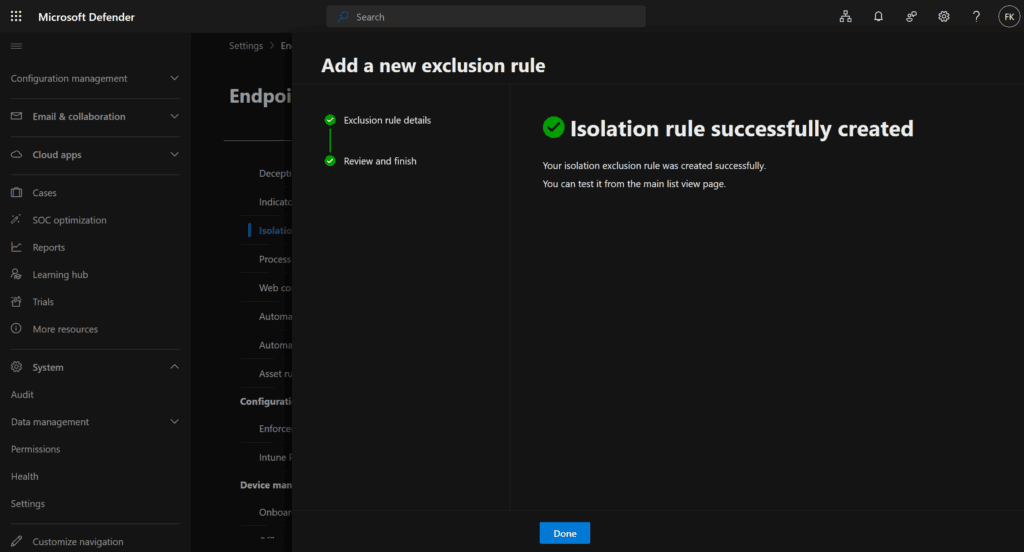
Step 3: Apply isolation with exclusion
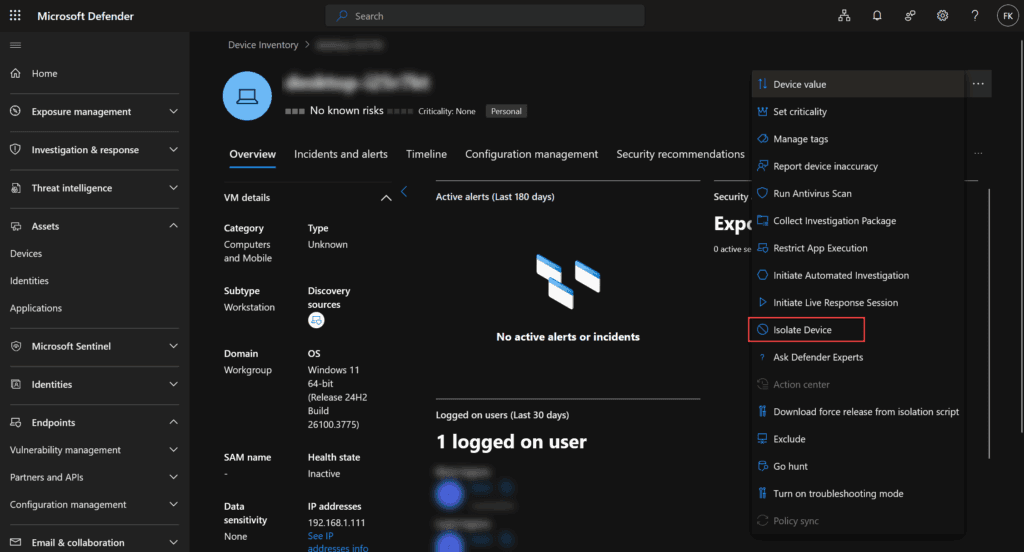
- Go to Device inventory and select the affected endpoint
- Choose Isolate Device from the action menu
- Select Isolation Exclusions to be allowed
- Confirm
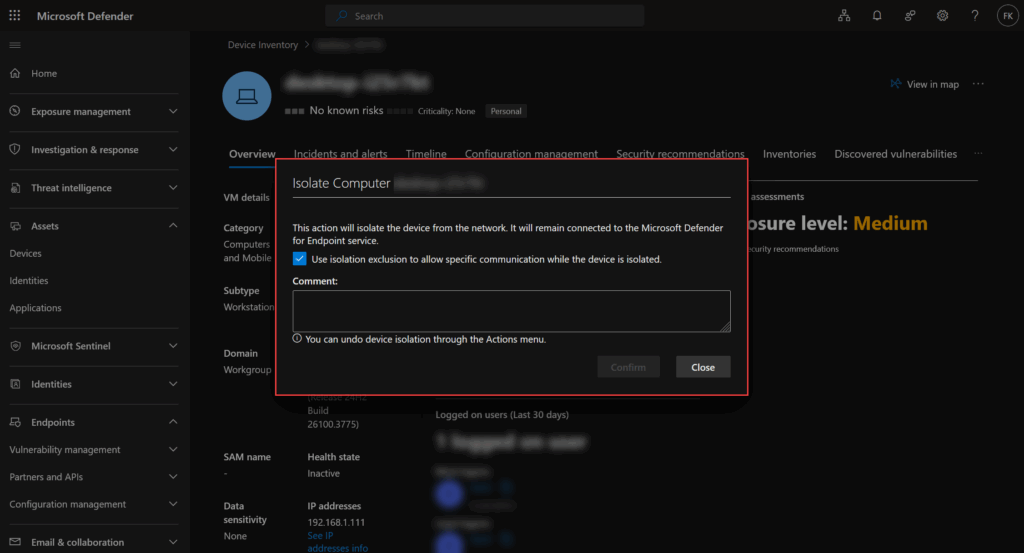
The device will be isolated from all other network activity except the explicitly defined destinations.
Step 4: Validate behavior
Once isolated, validate the configuration:
- The device will appear as Isolated
- Live Response remains available
- Connectivity to defined destinations should succeed
- Other network activity will be blocked
This isolation mode preserves investigation access without allowing lateral movement or external communication.
Extending DFIR with Velociraptor
Velociraptor is an open-source DFIR platform that complements Defender for Endpoint by providing deep forensic visibility. It enables memory acquisition, advanced artifact collection, and persistent hunt capability at scale.

While Defender for Endpoint offers excellent detection and triage, Velociraptor adds:
- Memory dumps and YARA scanning
- Collection of Amcache, Prefetch, MFT, and Registry artifacts
- In-memory malware detection and process forensics
- Live artifact scheduling across multiple endpoints
- Persistence across reboots and sessions
When paired with Selective Isolation, Velociraptor can continue to operate securely on an endpoint under containment.
Deploying Velociraptor for use with isolated endpoints
There are several ways to deploy Velociraptor in a secure and scalable manner. One notable example is a project by Eric Mannon, who developed a clean and efficient Azure-based Velociraptor deployment method that avoids the need for a persistent VM.
This approach is ideal for scalable and ephemeral deployments in modern cloud environments. You can even use his MDEAutomator to push the files to Live Response.
More information can be found on his GitHub repository and LinkedIn article:
In this blog, however, I will do a traditional legacy lame VM-based deployment. That can be used for environments that require or prefer direct control over server infrastructure.
Server Deployment
- Deploy a Linux virtual machine (tested with Ubuntu 24.10)
- Paste the script below and make sure to chmod +x it and run (beware I hardcoded the lastest version as of per july 2025)
#!/usr/bin/env bash
set -euo pipefail

VR_BIN="/usr/local/bin/velociraptor"
VR_USER="velociraptor"
VR_CONFIG="/etc/velociraptor/server.config.yaml"
VR_SERVICE="/etc/systemd/system/velociraptor.service"

echo "[+] Installing curl"
apt-get update -y
apt-get install -y curl

echo "[+] Creating Velociraptor user if not exists"
id -u "$VR_USER" &>/dev/null || useradd -r -s /usr/sbin/nologin "$VR_USER"

echo "[+] Downloading Velociraptor v0.74.5"
curl -L -o "$VR_BIN" https://github.com/Velocidex/velociraptor/releases/download/v0.74/velociraptor-v0.74.5-linux-amd64

echo "[+] Validating binary"
if ! file "$VR_BIN" | grep -q "ELF 64-bit"; then
    echo "[✗] Invalid Velociraptor binary"
    rm -f "$VR_BIN"
    exit 1
fi
chmod 755 "$VR_BIN"

echo "[+] Generating server config"
mkdir -p "$(dirname "$VR_CONFIG")"
"$VR_BIN" config generate > "$VR_CONFIG"

echo "[+] Setting permissions"
chown -R "$VR_USER:$VR_USER" /etc/velociraptor

echo "[+] Creating systemd service"
cat >"$VR_SERVICE" <- Edit the Config yaml:
nano /etc/velociraptor/server.config.yaml - Configure GUI and Frontend
bind_addressto0.0.0.0and change thebind_port to 8443 (I had to change the default port for a specific reason – you can leave as default too) - Change the Client
server_urlsto your URL and check if the correct port is used too (8443 in my case) - Define custom SSL certificates and change it too as per following link (by default you get a self signed SSL)
- Save the yaml file
- Add an admin account:
./velociraptor --config server.config.yaml user add admin P@ss123 --role administrator - Restart Velociraptor:
sudo systemctl restart velociraptor - Check the logs in case Velociraptor can’t run:
/usr/local/bin/velociraptor -c /etc/velociraptor/server.config.yaml frontend -v
Agent Deployment (on isolated device)
Follow the steps below to manually install the agent on the isolated endpoint. For an automated approach you can use the Live Response API too.
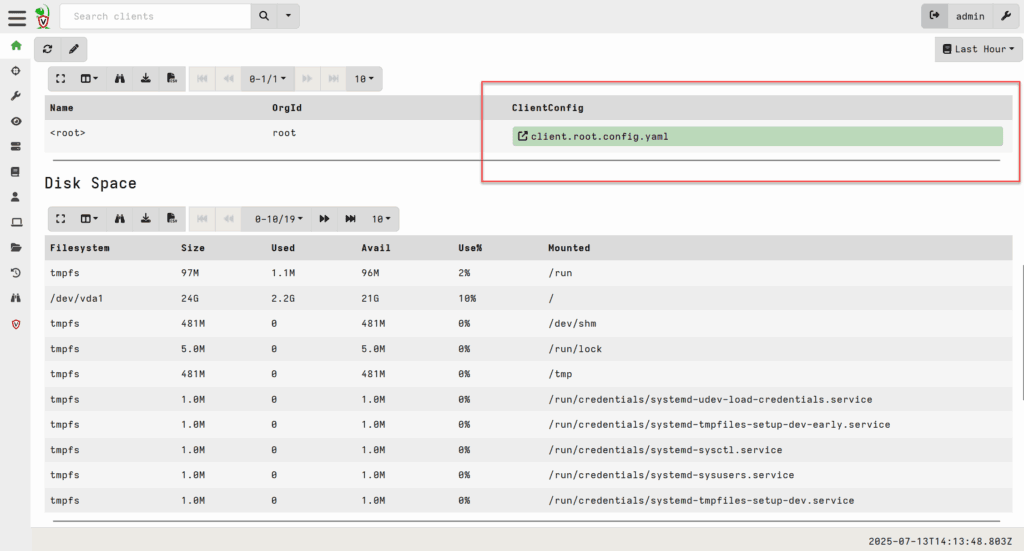
- First grab the client.root.config.yaml from the Velociraptor portal, by logging in with the admin account created above and save the config as client.config.yaml:
- Download the corresponding .msi file (velociraptor-vx.xx.x-windows-amd64.msi) from here and save it as velociraptor.msi (you can also wrap a bundle yourself through this link)
- Create a fresh powershell and name it like install_velociraptor.ps1 with the code below:
# Paths
$MsiPath = "C:\ProgramData\Microsoft\Windows Defender Advanced Threat Protection\Downloads\velociraptor.msi"
$ConfigPath = "C:\ProgramData\Microsoft\Windows Defender Advanced Threat Protection\Downloads\client.config.yaml"

Write-Output "---- Velociraptor MSI installation initiated ----"

# Step 1: Copy config to the expected location
$ConfigDest = "C:\Program Files\Velociraptor\client.config.yaml"
if (!(Test-Path "C:\Program Files\Velociraptor")) {
    New-Item -Path "C:\Program Files\Velociraptor" -ItemType Directory -Force
}
Copy-Item -Path $ConfigPath -Destination $ConfigDest -Force

# Step 2: Install the MSI silently
Start-Process msiexec.exe -ArgumentList "/i `"$MsiPath`" /qn" -Wait

# Step 3: Start the service
Start-Service -Name velociraptor

Write-Output "Velociraptor installed and service started."
- Now upload the install_velociraptor.ps1, client.config.yaml and velociraptor.msi via Live Response and submit:
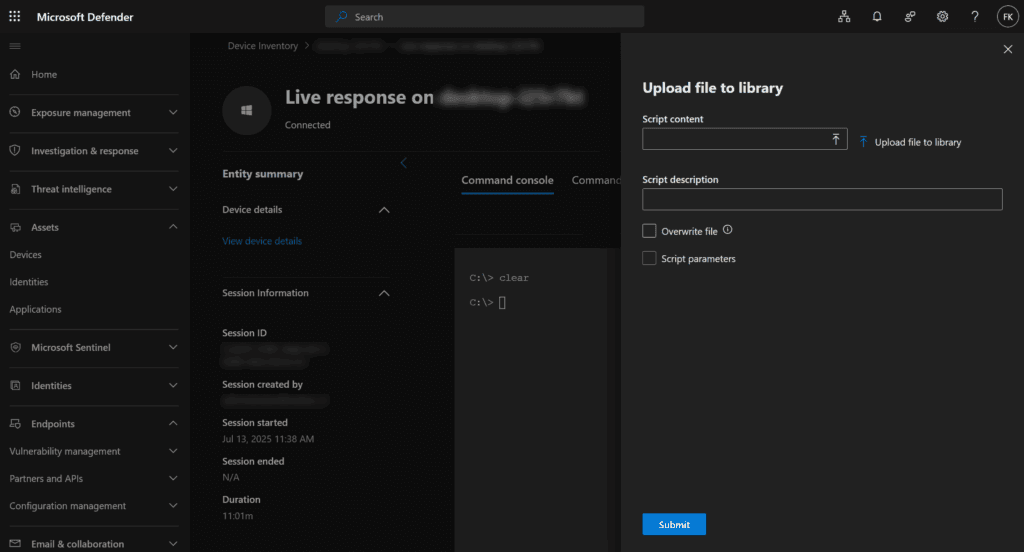
- Start a Live Response session and type putfile and the filenames, to download them onto the device:
putfile velociraptor.msi
putfile client.config.yaml
putfile install_velociraptor.ps1- Now start the Powershell file to install the MSI (I’m using the MSI to be able to install the service and gain persistency):

- At this point if you check the Timeline in MDE, the events start popping up:

- From my setup I can interact with my isolated endpoint and do all the fancy stuff now 🙂

Using Velociraptor
I’m not going to dive in how you can use Velociraptor, I recommend going through these docs and video:
https://training.velociraptor.app
And make sure to check KAPE too
Practical use cases
| Scenario | MDE + Live Response | Velociraptor |
|---|---|---|
| Memory dump | ✖ | ✔ |
| Shimcache, Amcache | ✖ | ✔ |
| YARA scan (memory/disk) | ✖ | ✔ |
| Registry and autoruns | ✔ (limited) | ✔ |
| Event log timeline | ✔ | ✔ |
| Multi-endpoint hunt | ✔ (AH) | ✔ |
| Persistent session (DFIR) | ✖ | ✔ |
Combined, these tools provide layered insight without lifting containment.
Conclusion
Selective Isolation introduces a meaningful improvement to containment and investigation in Microsoft Defender for Endpoint. Where previously an isolated endpoint was also inaccessible to responders, we now have the ability to safely maintain access to critical tools such as Velociraptor or Live Response.
Security operations teams can confidently apply isolation without compromising forensic capability. Defender provides strong triage and analysis features natively, while Velociraptor extends the response lifecycle into memory analysis, execution tracing, and attacker behavior correlation.
For organizations dealing with modern threats, this combination enables rapid containment, effective root cause investigation, and informed remediation — without delay or exposure.