For the past few years, MISP has been my go-to for threat intelligence. It’s open source, flexible, and does exactly what it says on the tin. But MISP is also showing its age in some areas — the interface is not the most intuitive, and wiring it into a modern SOC stack takes a fair amount of glue code. So when I kept seeing OpenCTI come up, I figured it was time to actually spin it up and see what the fuss was about.
OpenCTI is developed by the French company Filigran and is built around the STIX 2.1 data model from the ground up. Where MISP started as an event-sharing platform and grew into something more, OpenCTI was designed from day one as a structured threat intelligence platform — with native support for threat actors, campaigns, TTPs, and kill chains. It is gaining serious ground in the threat intelligence space, and for good reason.
In this post I’ll walk through the full process: installing OpenCTI on a clean Ubuntu server, adding free threat intelligence feeds and then wiring it up to Microsoft Sentinel so your IOCs automatically flow into your SIEM and become usable in analytics rules.
What is OpenCTI and why does it matter?
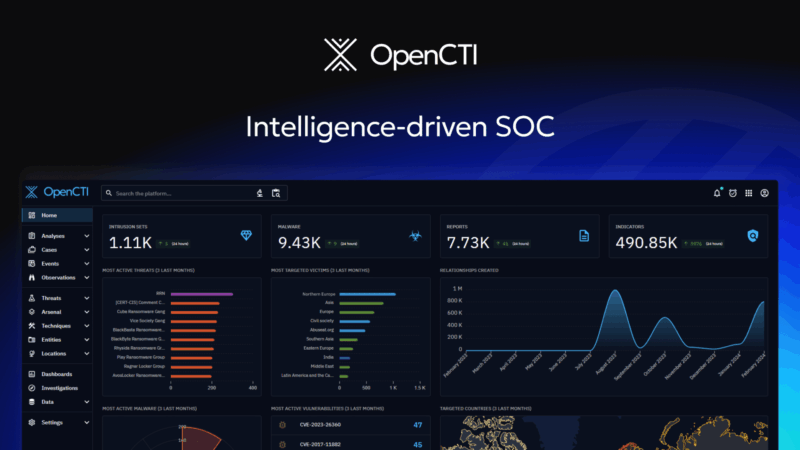
OpenCTI is an open-source threat intelligence platform that lets you store, organize, visualize, and share knowledge about cyber threats. It uses the STIX 2.1 standard for data representation, which means everything is structured and consistent: threat actors, malware families, attack patterns, indicators, observables, relationships — all connected.
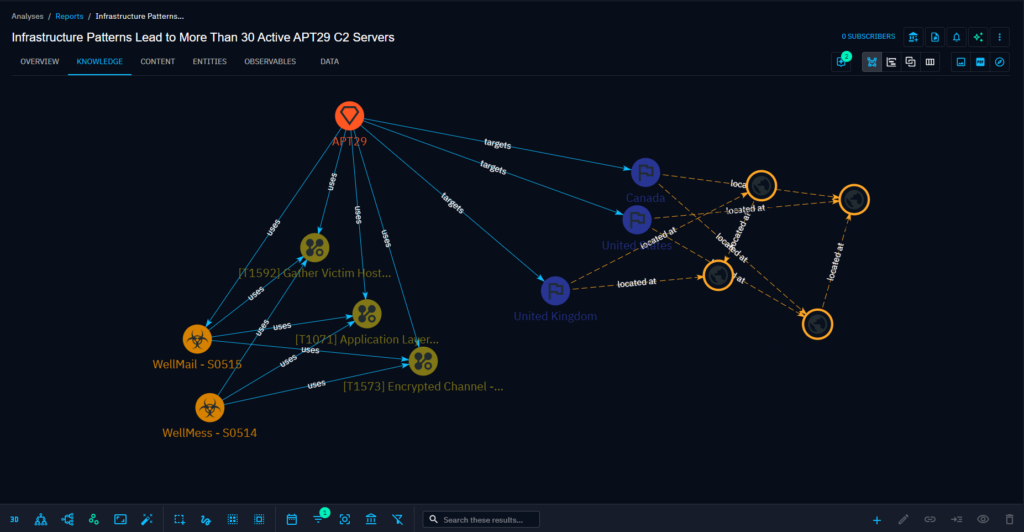
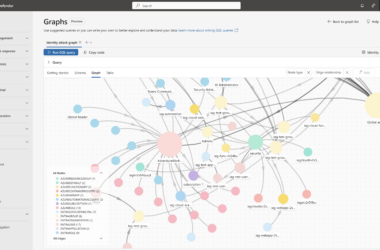
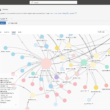
The key difference from MISP is depth of context. In MISP you work with events and attributes. In OpenCTI you work with entities and relationships — a SHA-256 hash is connected to a malware family, which is connected to a threat actor, which maps to MITRE ATT&CK techniques. You can visually navigate that graph and understand the full picture around a single IOC.
For an MDR context, this is where OpenCTI starts to shine. When an alert fires in Sentinel and you’re looking at a malicious domain, being able to pull up OpenCTI and immediately see which campaigns have used that domain, which malware family dropped it, and what the associated ATT&CK technique is — that’s real context, not just a score.
Microsoft Sentinel ships with built-in threat intelligence, but in my experience it is always worth layering additional sources on top — especially when you want coverage beyond what Microsoft’s feeds provide.
Architecture overview
This post covers the setup and configuration only — not a deep dive into how to use OpenCTI as a platform. Before we dive in, here is what we are building:
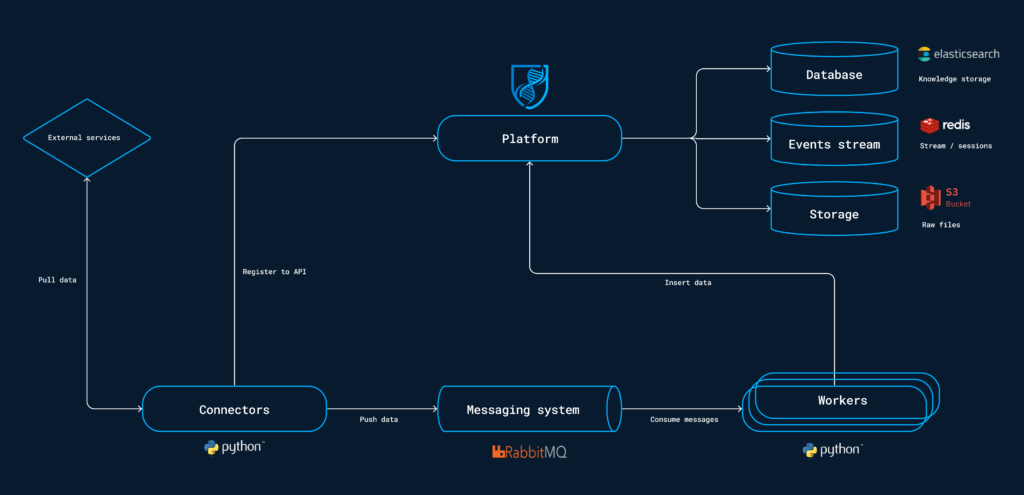
OpenCTI runs on Ubuntu via Docker Compose in my demo (for production environments look into splitting resources/roles and use K8s). Threat intel connectors pull data from external sources on a schedule. A Live Stream connector pushes indicators to Microsoft Sentinel in real time using the Graph API tiIndicators endpoint. Sentinel analytics rules then match those indicators against ingested logs.
Part 1 — Installing OpenCTI
System requirements
| Resource | Minimum | Recommended |
|---|---|---|
| Ubuntu | 22.04 LTS | 24.04 LTS |
| CPU | 4 vCPU | 8+ vCPU |
| RAM | 8 GB | 16 GB |
| Disk | 50 GB | 100+ GB SSD |
RAM note: Elasticsearch is the main memory consumer. On an 8 GB server you’ll feel the pressure during the initial sync of all connectors simultaneously. 16 GB is strongly recommended for a production deployment.
Install Docker
OpenCTI’s official deployment method is Docker Compose. All dependencies — Elasticsearch, Redis, RabbitMQ, MinIO — run as containers. But again: for production environments cluster all your servers and infrastructure 🙂
# Remove legacy Docker packages
sudo apt remove docker.io docker-compose docker-compose-v2 \
  docker-doc podman-docker containerd runc 2>/dev/null || true

sudo apt update
sudo apt install -y ca-certificates curl

# Add Docker's official GPG key
sudo install -m 0755 -d /etc/apt/keyrings
sudo curl -fsSL https://download.docker.com/linux/ubuntu/gpg \
  -o /etc/apt/keyrings/docker.asc
sudo chmod a+r /etc/apt/keyrings/docker.asc

# Add Docker repository
sudo tee /etc/apt/sources.list.d/docker.sources <
Set vm.max_map_count
Elasticsearch needs this or it will crash on startup. Do not skip this step.
sudo sysctl -w vm.max_map_count=1048575
echo 'vm.max_map_count=1048575' | sudo tee -a /etc/sysctl.conf
Clone the OpenCTI Docker repository
git clone https://github.com/OpenCTI-Platform/docker.git /opt/opencti
cd /opt/opencti
Configure .env
Generate the values you’ll need:
# UUIDs
cat /proc/sys/kernel/random/uuid

# Encryption key (base64)
openssl rand -base64 32

# Strong password
openssl rand -base64 18 | tr -d '/+=' | cut -c1-20
Create /opt/opencti/.env:
###########################
# DEPENDENCIES            #
###########################
MINIO_ROOT_USER=opencti
MINIO_ROOT_PASSWORD=YourStrongPassword
RABBITMQ_DEFAULT_USER=opencti
RABBITMQ_DEFAULT_PASS=YourStrongPassword
SMTP_HOSTNAME=localhost
OPENSEARCH_ADMIN_PASSWORD=YourStrongPassword
ELASTIC_MEMORY_SIZE=4G

###########################
# COMMON                  #
###########################
XTM_COMPOSER_ID=8215614c-7139-422e-b825-b20fd2a13a23
COMPOSE_PROJECT_NAME=xtm

###########################
# OPENCTI                 #
###########################
OPENCTI_HOST=opencti.yourdomain.com
OPENCTI_PORT=8080
OPENCTI_EXTERNAL_SCHEME=https
[email protected]
OPENCTI_ADMIN_PASSWORD=YourAdminPassword
OPENCTI_ADMIN_TOKEN=
OPENCTI_HEALTHCHECK_ACCESS_KEY=
OPENCTI_ENCRYPTION_KEY=

###########################
# OPENCTI CONNECTORS      #
###########################
CONNECTOR_EXPORT_FILE_STIX_ID=dd817c8b-abae-460a-9ebc-97b1551e70e6
CONNECTOR_EXPORT_FILE_CSV_ID=7ba187fb-fde8-4063-92b5-c3da34060dd7
CONNECTOR_EXPORT_FILE_TXT_ID=ca715d9c-bd64-4351-91db-33a8d728a58b
CONNECTOR_IMPORT_FILE_STIX_ID=72327164-0b35-482b-b5d6-a5a3f76b845f
CONNECTOR_IMPORT_DOCUMENT_ID=c3970f8a-ce4b-4497-a381-20b7256f56f0
CONNECTOR_IMPORT_FILE_YARA_ID=7eb45b60-069b-4f7f-83a2-df4d6891d5ec
CONNECTOR_IMPORT_EXTERNAL_REFERENCE_ID=d52dcbc8-fa06-42c7-bbc2-044948c87024
CONNECTOR_ANALYSIS_ID=4dffd77c-ec11-4abe-bca7-fd997f79fa36

###########################
# OPENCTI DEFAULT DATA    #
###########################
CONNECTOR_OPENCTI_ID=dd010812-9027-4726-bf7b-4936979955ae
CONNECTOR_MITRE_ID=8307ea1e-9356-408c-a510-2d7f8b28a0e2
ELASTIC_MEMORY_SIZE: Set to roughly 50% of your total RAM. On 8 GB set
2G, on 16 GB set6G.
Fix docker-compose.yml
The default docker-compose.yml needs three corrections before you start.
Fix 1 — Bind OpenCTI to localhost:
Find the opencti service ports section and change:
# Before
ports:
  - "${OPENCTI_PORT}:8080"

# After
ports:
  - "127.0.0.1:8080:8080"
Fix 2 — Bind MinIO to localhost:
Find the minio service ports section and change:
# Before
ports:
  - "9000:9000"

# After
ports:
  - "127.0.0.1:9000:9000"
Fix 3 — Remove port from APP__BASE_URL:
Find the opencti service environment and change:
# Before
- APP__BASE_URL=${OPENCTI_EXTERNAL_SCHEME}://${OPENCTI_HOST}:${OPENCTI_PORT}

# After
- APP__BASE_URL=${OPENCTI_EXTERNAL_SCHEME}://${OPENCTI_HOST}
Without this fix, every link inside OpenCTI will have :8080 appended, which breaks navigation when you access it through nginx on port 443.
Install and configure nginx
sudo apt install -y nginx
sudo systemctl enable nginx
Create /etc/nginx/sites-available/opencti:
server {
    listen 80;
    server_name opencti.yourdomain.com;
    return 301 https://$host$request_uri;
}

server {
    listen 443 ssl;
    server_name opencti.yourdomain.com;

    ssl_certificate     /etc/ssl/opencti/origin.crt;
    ssl_certificate_key /etc/ssl/opencti/origin.key;
    ssl_protocols       TLSv1.2 TLSv1.3;
    ssl_ciphers         HIGH:!aNULL:!MD5;
    ssl_prefer_server_ciphers on;

    location / {
        proxy_pass         http://127.0.0.1:8080;
        proxy_set_header   Host $host;
        proxy_set_header   X-Real-IP $remote_addr;
        proxy_set_header   X-Forwarded-For $proxy_add_x_forwarded_for;
        proxy_set_header   X-Forwarded-Proto $scheme;

        # WebSocket support — required by OpenCTI
        proxy_http_version 1.1;
        proxy_set_header   Upgrade $http_upgrade;
        proxy_set_header   Connection "upgrade";

        proxy_read_timeout 3600s;
        proxy_send_timeout 3600s;
    }
}
WebSocket support is mandatory. OpenCTI uses WebSockets for live UI updates. Without the
Upgradeheaders, the interface will partially break.
Enable and start:
sudo ln -s /etc/nginx/sites-available/opencti /etc/nginx/sites-enabled/
sudo nginx -t
sudo systemctl start nginx
Configure SSL
I’m using Cloudflare for SSL all the way, you can also use LetsEncrypt (bot) to generate SSL certificates. After you obtained a certificate and key:
- Set hostname to
opencti.yourdomain.comfor the SSL certificate - Copy the Origin Certificate and Private Key
sudo mkdir -p /etc/ssl/opencti
sudo nano /etc/ssl/opencti/origin.crt   # paste the certificate
sudo nano /etc/ssl/opencti/origin.key   # paste the private key
sudo chmod 644 /etc/ssl/opencti/origin.crt
sudo chmod 600 /etc/ssl/opencti/origin.key
Add a DNS A record at your domain registrar:
| Name | Type | Value | Proxy |
|---|---|---|---|
opencti | A | Your server IP | Depends on your setup |
I would not recommend exposing OpenCTI directly to the internet. If possible, restrict access to specific IP ranges or put it behind a VPN. For an MDR context where multiple analysts need access, a site-to-site VPN or a zero-trust solution is a cleaner approach than opening it up publicly.
Reload nginx:
sudo nginx -t && sudo systemctl reload nginx
Start OpenCTI
cd /opt/opencti
docker compose up -d
docker compose logs -f opencti
Initial startup takes 2–5 minutes. Elasticsearch initializes first, then OpenCTI creates the admin user. Once you see a log entry confirming the admin is ready, navigate to https://opencti.yourdomain.com and log in.
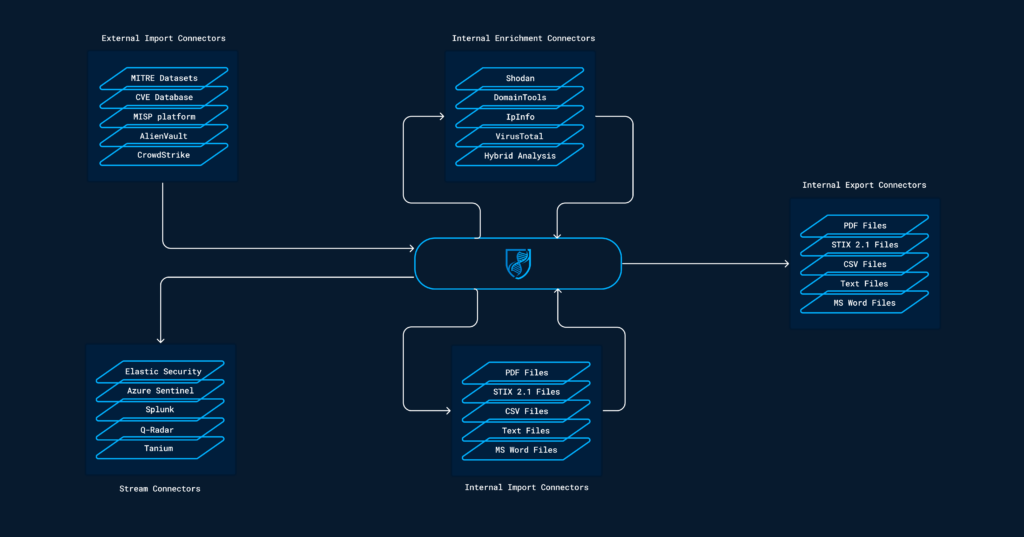
Part 2 — Adding threat intelligence feeds
This is where OpenCTI starts earning its keep. Out of the box it already pulls in MITRE ATT&CK and OpenCTI’s own datasets (marking definitions, identities, locations). But you want IOCs — and for that you need external connectors.
Here is what I added, just an example of a few free feeds. You can also move onto paid feeds like Recorded Future. For my POC this is just enough to demonstrate:
| Connector | Data | Notes |
|---|---|---|
| AbuseCH | SSL blacklist | IP/domain C2 infrastructure |
| URLhaus | Malware URLs | Live and recent malicious URLs |
| ThreatFox | IOCs | IPs, domains, URLs, hashes tagged to malware families |
| MalwareBazaar | File hashes | Recent malware sample hashes with family tags |
| AlienVault OTX | Pulses | Broad threat intel, requires free API key |
| CISA KEV | CVEs | Confirmed exploited vulnerabilities, high confidence |
| VirusTotal | File/URL reputation | Enrichment on demand, requires free API key |
Generate UUIDs for each connector
Each connector needs a unique UUIDv4:
for i in 1 2 3 4 5 6 7; do cat /proc/sys/kernel/random/uuid; done
Update .env
Add this section to your .env:
###########################
# THREAT INTEL CONNECTORS #
###########################
CONNECTOR_ABUSECH_ID=
CONNECTOR_URLHAUS_ID=
CONNECTOR_ALIENVAULT_ID=
ALIENVAULT_API_KEY=
CONNECTOR_THREATFOX_ID=
CONNECTOR_MALWAREBAZAAR_ID=
CONNECTOR_CISA_KEV_ID=
CONNECTOR_VIRUSTOTAL_ID=
VIRUSTOTAL_API_KEY=
Get your API keys:
- AlienVault OTX: https://otx.alienvault.com → Settings → API Key
- VirusTotal: https://www.virustotal.com → Profile → API Key
Add connectors to docker-compose.yml
Add the following services to your docker-compose.yml under the threat intel section:
  connector-abusech:
    image: opencti/connector-abuse-ssl:latest
    environment:
      - OPENCTI_URL=http://opencti:8080
      - OPENCTI_TOKEN=${OPENCTI_ADMIN_TOKEN}
      - CONNECTOR_ID=${CONNECTOR_ABUSECH_ID}
      - CONNECTOR_NAME=AbuseCH
      - CONNECTOR_SCOPE=ipv4-addr,ipv6-addr,domain-name,url,file
      - CONNECTOR_AUTO=true
      - CONNECTOR_CONFIDENCE_LEVEL=80
      - ABUSE_SSL_INTERVAL=43200
    restart: always
    depends_on:
      opencti:
        condition: service_healthy

  connector-urlhaus:
    image: opencti/connector-urlhaus:latest
    environment:
      - OPENCTI_URL=http://opencti:8080
      - OPENCTI_TOKEN=${OPENCTI_ADMIN_TOKEN}
      - CONNECTOR_ID=${CONNECTOR_URLHAUS_ID}
      - CONNECTOR_NAME=URLhaus
      - CONNECTOR_SCOPE=urlhaus
      - CONNECTOR_AUTO=true
      - CONNECTOR_CONFIDENCE_LEVEL=40
      - URLHAUS_CSV_URL=https://urlhaus.abuse.ch/downloads/csv_recent/
      - URLHAUS_IMPORT_OFFLINE=true
      - URLHAUS_CREATE_INDICATORS=true
      - URLHAUS_INTERVAL=3
    restart: always
    depends_on:
      opencti:
        condition: service_healthy

  connector-alienvault:
    image: opencti/connector-alienvault:latest
    environment:
      - OPENCTI_URL=http://opencti:8080
      - OPENCTI_TOKEN=${OPENCTI_ADMIN_TOKEN}
      - CONNECTOR_ID=${CONNECTOR_ALIENVAULT_ID}
      - CONNECTOR_NAME=AlienVault
      - CONNECTOR_SCOPE=alienvault
      - CONNECTOR_AUTO=true
      - CONNECTOR_CONFIDENCE_LEVEL=80
      - ALIENVAULT_BASE_URL=https://otx.alienvault.com
      - ALIENVAULT_API_KEY=${ALIENVAULT_API_KEY}
      - ALIENVAULT_TLP=White
      - ALIENVAULT_CREATE_OBSERVABLES=true
      - ALIENVAULT_CREATE_INDICATORS=true
      - ALIENVAULT_PULSE_START_TIMESTAMP=2020-01-01T00:00:00
      - ALIENVAULT_REPORT_TYPE=threat-report
      - ALIENVAULT_REPORT_STATUS=New
      - ALIENVAULT_GUESS_MALWARE=false
      - ALIENVAULT_GUESS_CVE=false
      - ALIENVAULT_EXCLUDED_PULSE_INDICATOR_TYPES=FileHash-MD5,FileHash-SHA1
      - ALIENVAULT_ENABLE_RELATIONSHIPS=true
      - ALIENVAULT_ENABLE_ATTACK_PATTERNS_INDICATES=false
      - ALIENVAULT_INTERVAL_SEC=1800
    restart: always
    depends_on:
      opencti:
        condition: service_healthy

  connector-threatfox:
    image: opencti/connector-threatfox:latest
    environment:
      - OPENCTI_URL=http://opencti:8080
      - OPENCTI_TOKEN=${OPENCTI_ADMIN_TOKEN}
      - CONNECTOR_ID=${CONNECTOR_THREATFOX_ID}
      - CONNECTOR_NAME=ThreatFox
      - CONNECTOR_SCOPE=threatfox
      - CONNECTOR_AUTO=true
      - CONNECTOR_CONFIDENCE_LEVEL=40
      - THREATFOX_API_KEY=
      - THREATFOX_CREATE_INDICATORS=true
      - THREATFOX_CREATE_OBSERVABLES=true
      - THREATFOX_IMPORT_OFFLINE=true
      - THREATFOX_INTERVAL=3
    restart: always
    depends_on:
      opencti:
        condition: service_healthy

  connector-malwarebazaar:
    image: opencti/connector-malwarebazaar-recent-additions:latest
    environment:
      - OPENCTI_URL=http://opencti:8080
      - OPENCTI_TOKEN=${OPENCTI_ADMIN_TOKEN}
      - CONNECTOR_ID=${CONNECTOR_MALWAREBAZAAR_ID}
      - CONNECTOR_NAME=MalwareBazaar
      - CONNECTOR_SCOPE=malwarebazaar
      - CONNECTOR_AUTO=true
      - CONNECTOR_CONFIDENCE_LEVEL=50
      - MALWAREBAZAAR_CREATE_INDICATORS=true
      - MALWAREBAZAAR_INTERVAL=3
    restart: always
    depends_on:
      opencti:
        condition: service_healthy

  connector-cisa-kev:
    image: opencti/connector-cisa-known-exploited-vulnerabilities:latest
    environment:
      - OPENCTI_URL=http://opencti:8080
      - OPENCTI_TOKEN=${OPENCTI_ADMIN_TOKEN}
      - CONNECTOR_ID=${CONNECTOR_CISA_KEV_ID}
      - CONNECTOR_NAME=CISA KEV
      - CONNECTOR_SCOPE=identity,vulnerability
      - CONNECTOR_AUTO=true
      - CONNECTOR_CONFIDENCE_LEVEL=100
      - CISA_CATALOG_URL=https://www.cisa.gov/sites/default/files/feeds/known_exploited_vulnerabilities.json
      - CISA_CREATE_INFRASTRUCTURES=false
      - CISA_TLP=TLP:CLEAR
      - CISA_INTERVAL=3
    restart: always
    depends_on:
      opencti:
        condition: service_healthy

  connector-virustotal-livehunt:
    image: opencti/connector-virustotal-livehunt-notifications:latest
    environment:
      - OPENCTI_URL=http://opencti:8080
      - OPENCTI_TOKEN=${OPENCTI_ADMIN_TOKEN}
      - CONNECTOR_ID=${CONNECTOR_VIRUSTOTAL_ID}
      - CONNECTOR_NAME=VirusTotal
      - CONNECTOR_SCOPE=StixFile,Artifact
      - CONNECTOR_AUTO=true
      - CONNECTOR_CONFIDENCE_LEVEL=50
      - VIRUSTOTAL_API_KEY=${VIRUSTOTAL_API_KEY}
      - VIRUSTOTAL_MAX_TLP=TLP:AMBER
      - VIRUSTOTAL_CREATE_INDICATORS=true
      - VIRUSTOTAL_CREATE_OBSERVABLES=true
      - VIRUSTOTAL_INTERVAL_SEC=300
    restart: always
    depends_on:
      opencti:
        condition: service_healthy
Apply the changes:
cd /opt/opencti
docker compose down
docker compose up -d
Checking connector status
Go to Data → Ingestion → Connectors. All connectors should turn green within a few minutes. AlienVault takes the longest on first sync — it pulls historical pulses going back to 2020 in my config, so give it time.
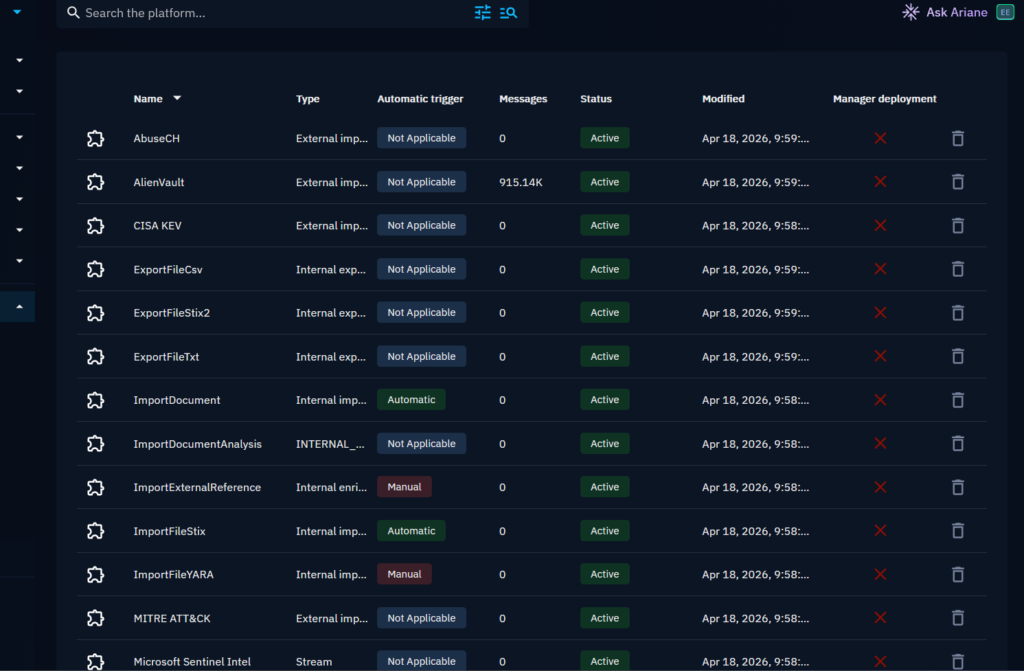
Once data starts flowing, you can browse it at:
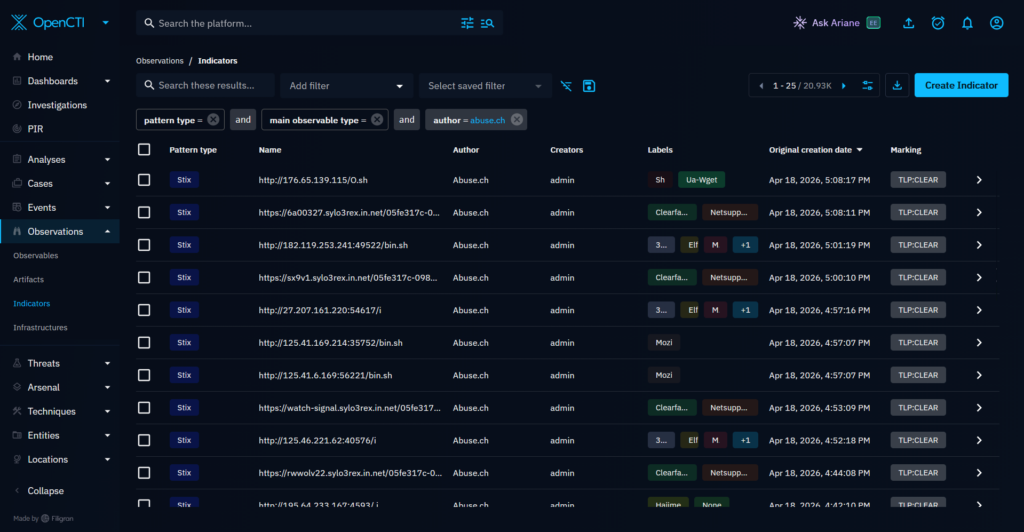
- Observations → Indicators — all IOCs with source, type, TLP, and confidence
- Threats → Malware — malware families from MITRE and connectors
- Threats → Threat Actors — APT groups and their associated campaigns
- Techniques → Attack Patterns — MITRE ATT&CK techniques
Part 3 — Connecting OpenCTI to Microsoft Sentinel
This is where the integration becomes operationally relevant. We’re going to push OpenCTI indicators into Sentinel’s Threat Intelligence blade in real time, so they can be used in analytics rules to match against ingested logs.
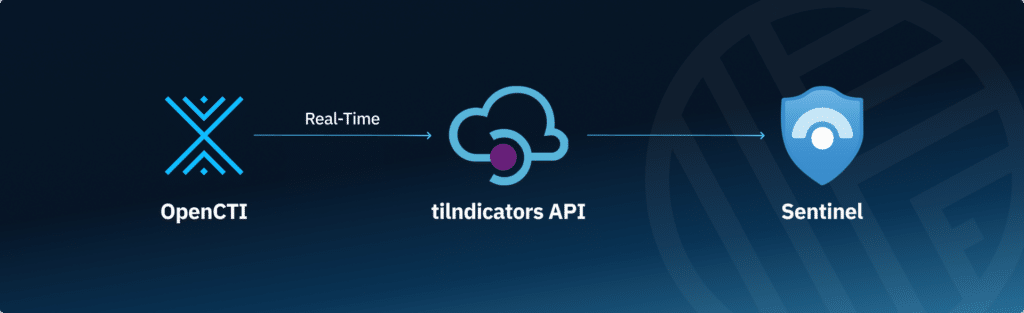
The connector is opencti/connector-sentinel-intel and it works via OpenCTI’s Live Stream feature — a server-sent events stream that pushes indicator create/update/delete events to the connector, which then forwards them to Sentinel via the Microsoft Graph API.
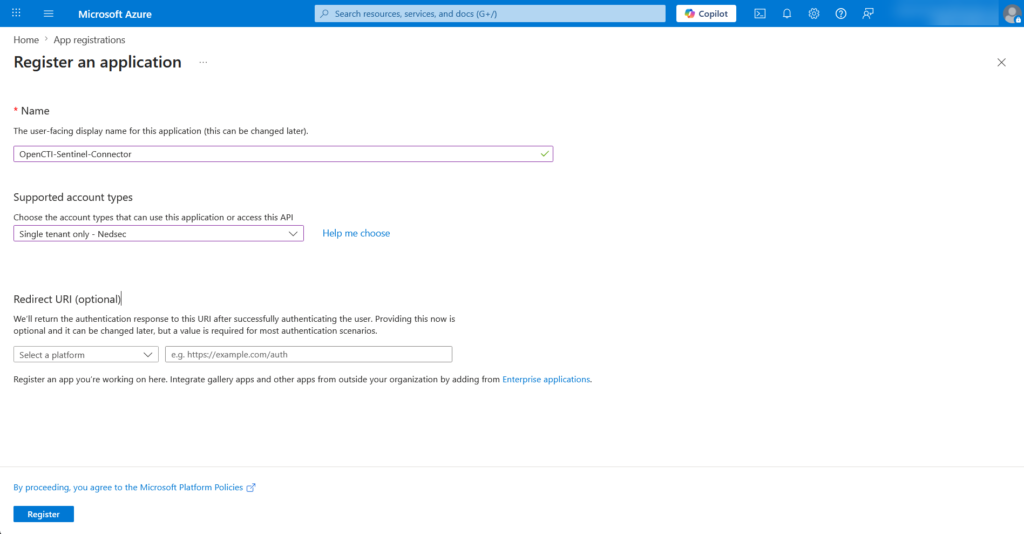
Azure App Registration
The connector authenticates to Microsoft’s Graph API using an Entra ID app registration. This gives OpenCTI permission to write threat indicators into your Sentinel workspace.
Register the application:
- Go to portal.azure.com
- Navigate to Microsoft Entra ID → App registrations
- Click New registration
- Fill in the details:
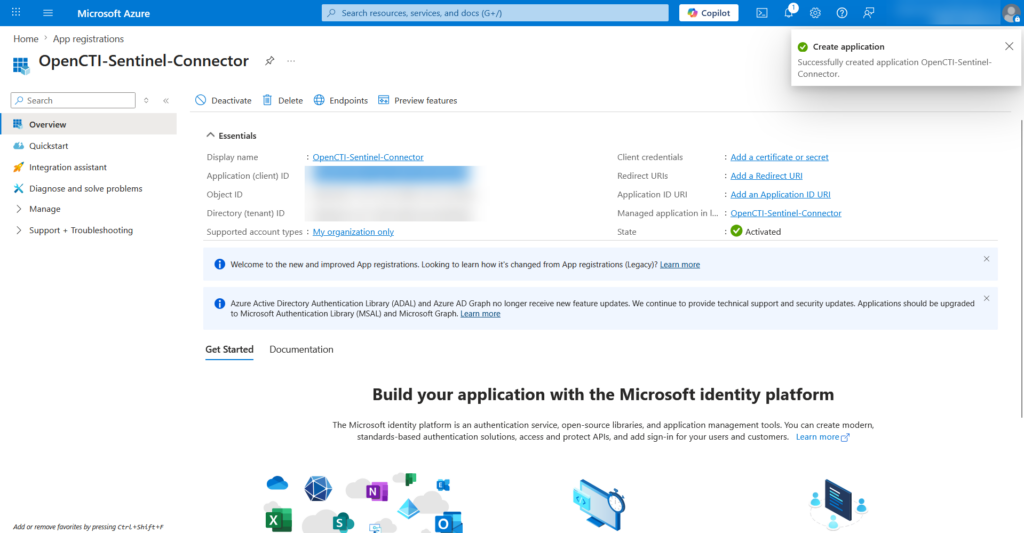
- Name:
OpenCTI-Sentinel-Connector - Supported account types: Accounts in this organizational directory only
- Redirect URI: leave empty
- Name:
- Click Register
You will land on the app overview page. Note down two values — you’ll need both later:
- Application (client) ID — this is your
CLIENT_ID - Directory (tenant) ID — this is your
TENANT_ID
Add API permissions:
The connector needs permission to read and write threat indicators. This permission is on the Microsoft Threat Intelligence API, not Microsoft Graph.
- In the left sidebar click API permissions
- Click Add a permission
- Scroll down and select Microsoft Threat Intelligence
- Select Application permissions (not Delegated)
- Expand the list and check
ThreatIndicators.ReadWrite.OwnedBy - Click Add permissions
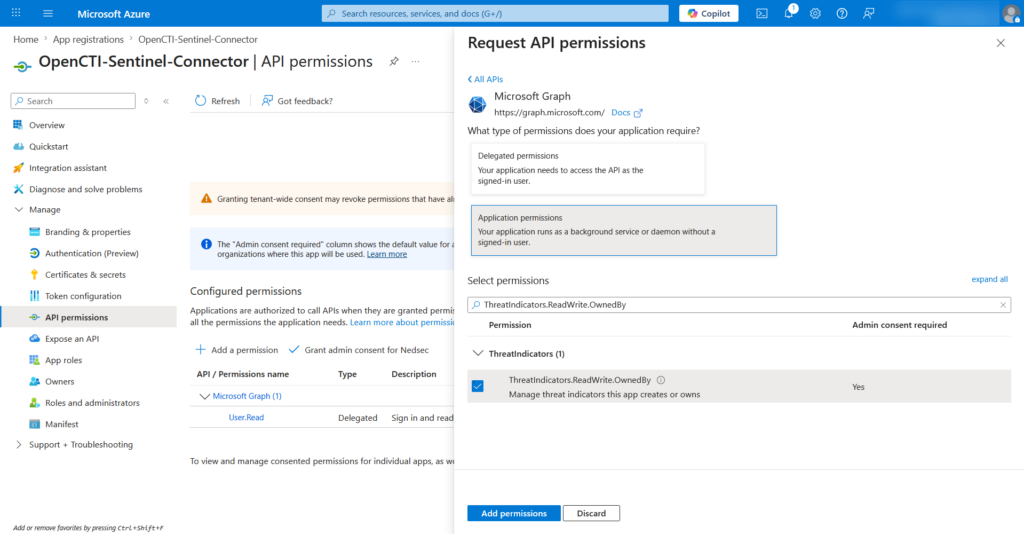
After adding the permission, it will show as Not granted. You need to grant admin consent:
- Click Grant admin consent for [your tenant name]
- Confirm by clicking Yes
The permission status should now show a green checkmark and read Granted for [your tenant].
This step requires a Global Administrator or Privileged Role Administrator role in Entra ID. If you don’t have that role, ask your Azure admin to grant consent.
Create a client secret:
The connector uses a client secret to authenticate. Think of it as a password for the app registration.
- In the left sidebar click Certificates & secrets
- Click Client secrets tab
- Click New client secret
- Set a description (e.g.
opencti-connector) and an expiry period - Click Add
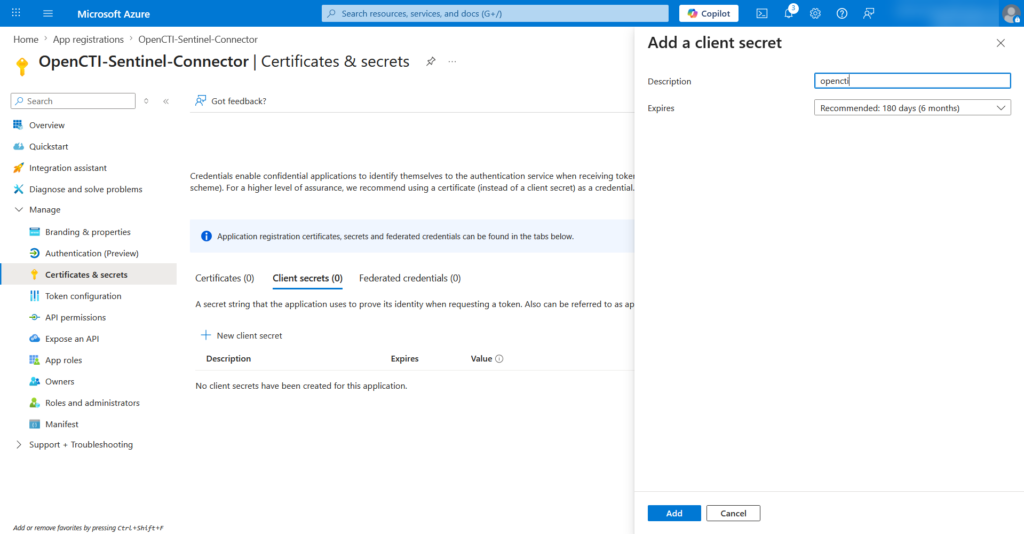
Azure will show the secret in the list. It has two columns:
| Column | Example | What it is |
|---|---|---|
| Secret ID | dd93e053-7a34-4c21-... | A UUID identifier — not what you need |
| Value | 90o8Q~LL_0U0dkHbX... | The actual secret — this is what you copy |
- Copy the Value column immediately
Enable Threat Intelligence in Sentinel
Before Sentinel can receive indicators from OpenCTI, you need to enable the Threat Intelligence solution and its data connector.
Install the Threat Intelligence solution:
- Go to Microsoft Sentinel → your workspace
- In the left sidebar click Content Hub
- In the search box type
Threat Intelligence - Click on the Threat Intelligence solution by Microsoft
- Click Install in the right panel
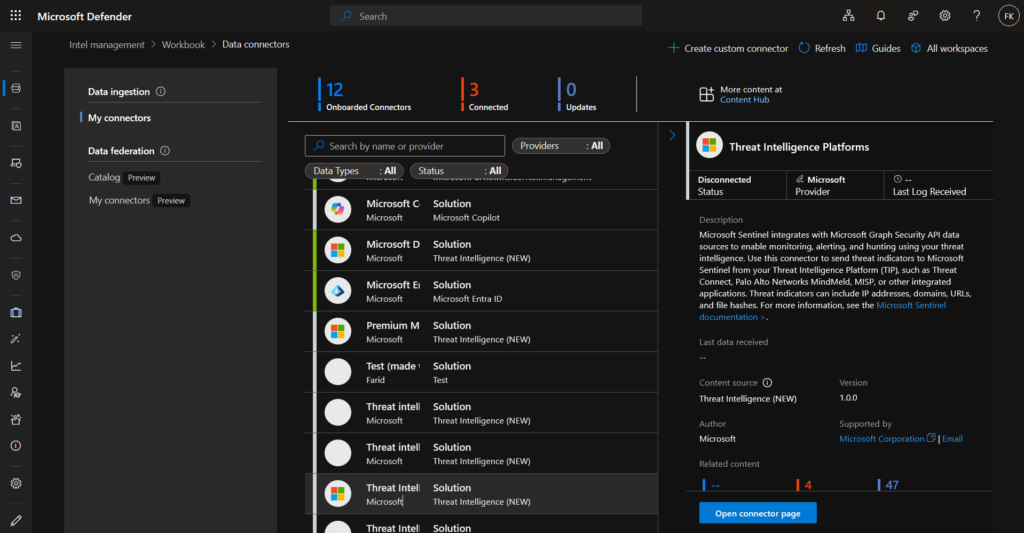
Wait for the installation to complete. It installs the data connector, workbooks, and analytics rule templates.
Enable the Threat Intelligence Platforms data connector:
- In Microsoft Sentinel → Data connectors
- Search for
Threat Intelligence Platforms - Click on it and then click Open connector page
- Click Connect to enable it
This connector is what receives the indicators pushed via the Microsoft Graph API. Without enabling it, no data will flow into Sentinel even if the OpenCTI connector is running correctly.
Verify the connector is active:
After connecting, the status should show as Connected with a green indicator. The Data received section will show the first data once indicators start flowing from OpenCTI.
Create a Live Stream in OpenCTI
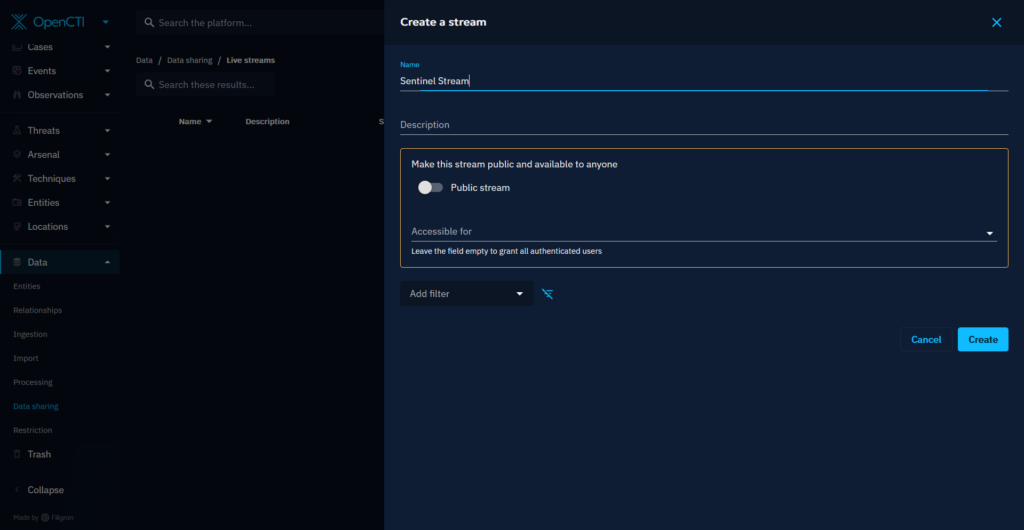
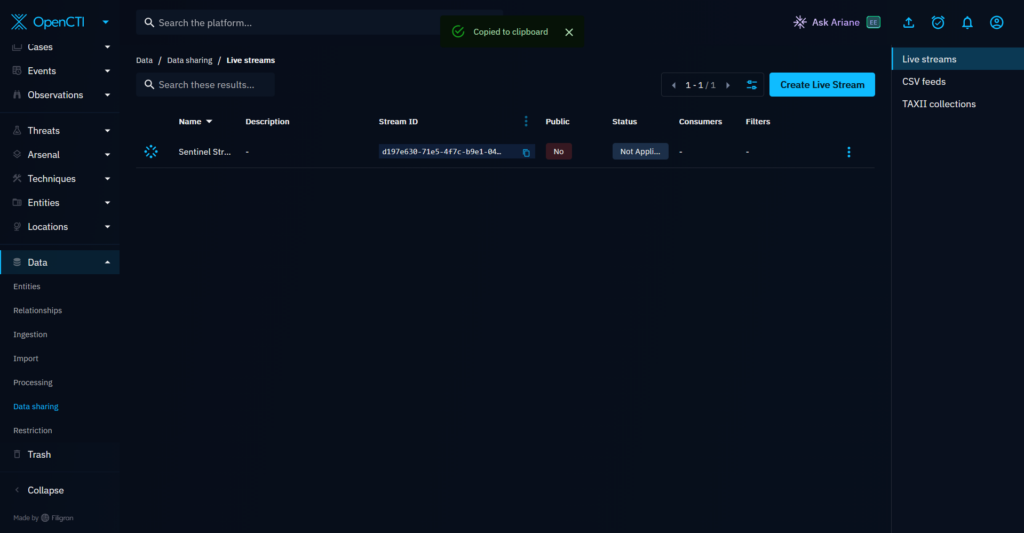
- Go to Data → Data Sharing → Live Streams
- Click +, give it a name (e.g.
Sentinel), leave it private, click Create - Copy the generated Stream ID
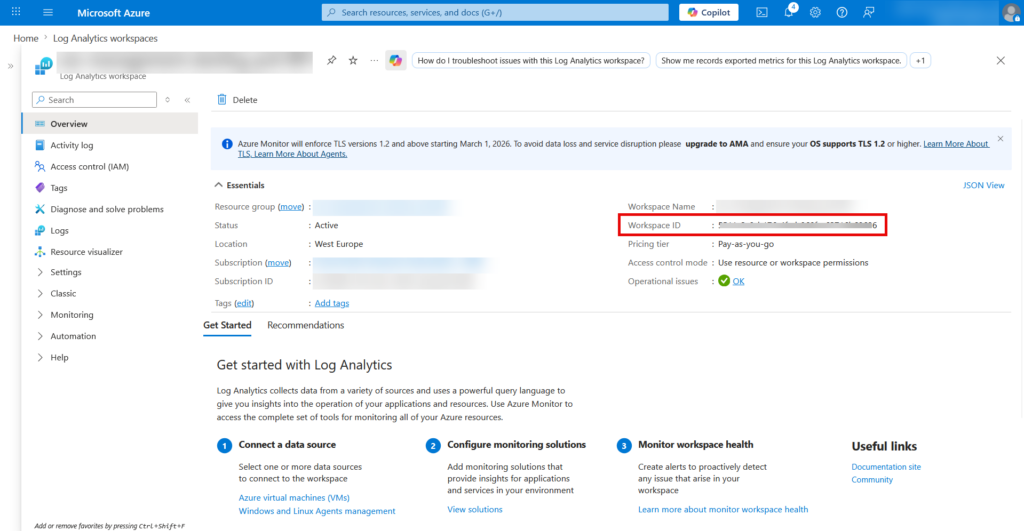
Get the Sentinel Workspace ID
In Microsoft Sentinel → Settings → Workspace settings — copy the Workspace ID
Add connector to docker-compose.yml
Generate a UUID for the connector:
cat /proc/sys/kernel/random/uuid
Add to .env:
###########################
# SENTINEL INTEGRATION    #
###########################
CONNECTOR_SENTINEL_INTEL_ID=
SENTINEL_STREAM_ID=
SENTINEL_TENANT_ID=
SENTINEL_CLIENT_ID=
SENTINEL_CLIENT_SECRET=
SENTINEL_WORKSPACE_ID=
Add to docker-compose.yml:
  ###########################
  # SENTINEL INTEGRATION    #
  ###########################

  connector-sentinel-intel:
    image: opencti/connector-sentinel-intel:latest
    environment:
      - OPENCTI_URL=http://opencti:8080
      - OPENCTI_TOKEN=${OPENCTI_ADMIN_TOKEN}
      - CONNECTOR_ID=${CONNECTOR_SENTINEL_INTEL_ID}
      - CONNECTOR_LIVE_STREAM_ID=${SENTINEL_STREAM_ID}
      - CONNECTOR_LIVE_STREAM_LISTEN_DELETE=true
      - CONNECTOR_LIVE_STREAM_NO_DEPENDENCIES=true
      - "CONNECTOR_NAME=Microsoft Sentinel Intel"
      - CONNECTOR_SCOPE=sentinel
      - CONNECTOR_CONFIDENCE_LEVEL=80
      - CONNECTOR_LOG_LEVEL=error
      - SENTINEL_INTEL_TENANT_ID=${SENTINEL_TENANT_ID}
      - SENTINEL_INTEL_CLIENT_ID=${SENTINEL_CLIENT_ID}
      - SENTINEL_INTEL_CLIENT_SECRET=${SENTINEL_CLIENT_SECRET}
      - SENTINEL_WORKSPACE_ID=${SENTINEL_WORKSPACE_ID}
      - "SENTINEL_INTEL_TARGET_PRODUCT=Azure Sentinel"
      - SENTINEL_INTEL_LOGIN_URL=https://login.microsoftonline.com
      - SENTINEL_INTEL_BASE_URL=https://graph.microsoft.com
      - SENTINEL_INTEL_RESOURCE_PATH=/beta/security/tiIndicators
      - SENTINEL_INTEL_EXPIRE_TIME=30
      - SENTINEL_INTEL_ACTION=alert
    restart: always
    depends_on:
      opencti:
        condition: service_healthy
Apply:
cd /opt/opencti
docker compose up -d connector-sentinel-intel
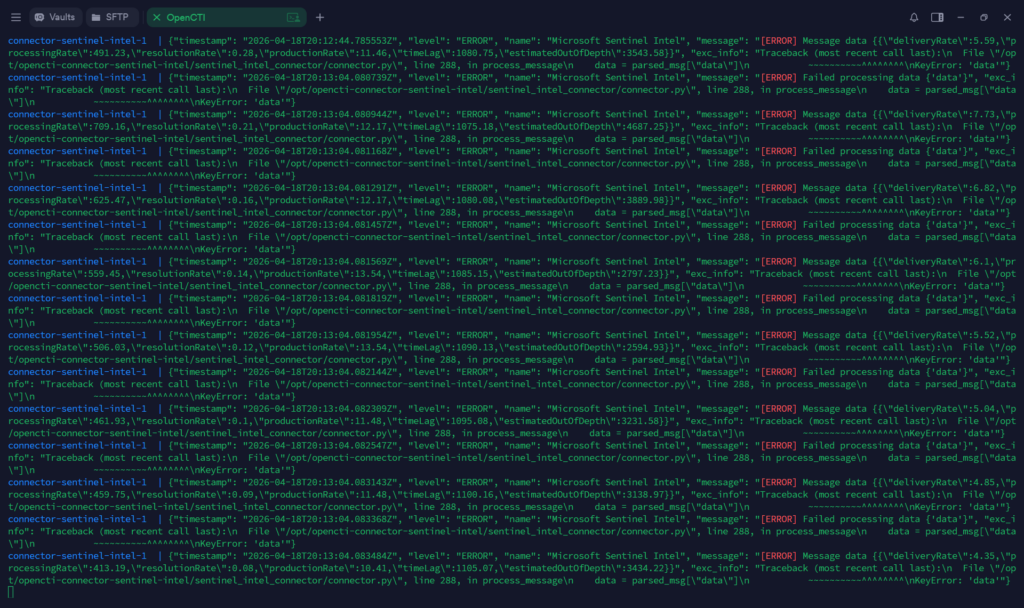
docker compose logs -f connector-sentinel-intel
The connector will show KeyError: 'data' errors on stream heartbeat messages — this is a known bug in the connector and does not affect functionality. What you should not see is authentication errors or Invalid URL 'NoneNone'.
Verifying indicators in Sentinel
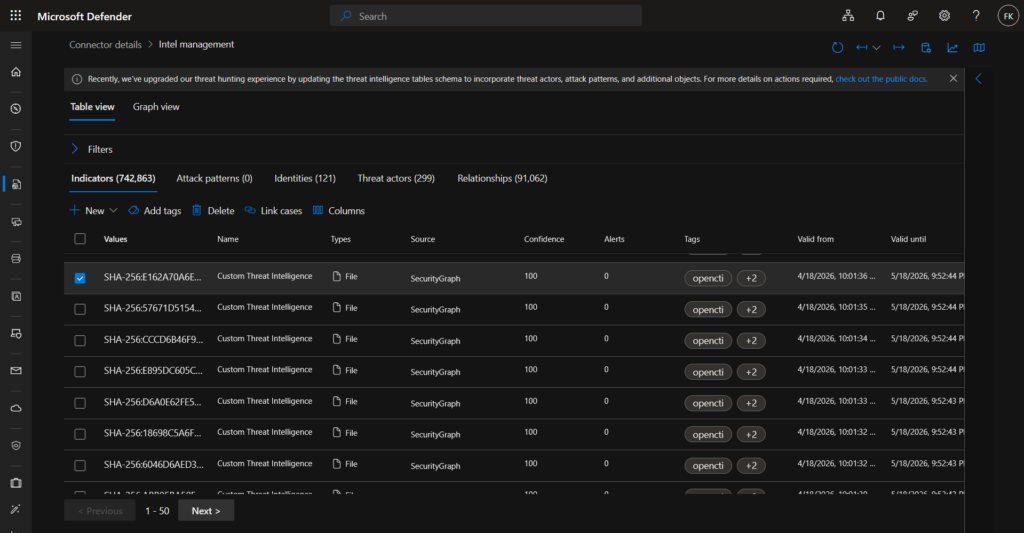
Go to Microsoft Sentinel → Threat Intelligence. Indicators should start appearing within a few minutes:
Once indicators are in Sentinel you can query them in KQL:
ThreatIntelIndicators
| where TimeGenerated > ago(24h)
| where isnotempty(ObservableKey)
| extend IndicatorType = tostring(split(ObservableKey, ":", 0)[0])
| summarize Count = count() by IndicatorType
| order by Count desc
Match IP indicators against CommonSecurityLog (firewalls, proxies):
let dt_lookBack = 1h;
let ioc_lookBack = 14d;
let IP_Indicators = ThreatIntelIndicators
    | extend IndicatorType = replace(@"\[|\]|\""", "", tostring(split(ObservableKey, ":", 0)))
    | where IndicatorType in ("ipv4-addr", "ipv6-addr", "network-traffic")
    | extend TI_ipEntity = toupper(ObservableValue)
    | where TimeGenerated >= ago(ioc_lookBack)
    | where ipv4_is_private(TI_ipEntity) == false
    | where isnotempty(TI_ipEntity)
    | summarize arg_max(TimeGenerated, *) by TI_ipEntity;
IP_Indicators
| join kind=innerunique (
    CommonSecurityLog
    | where TimeGenerated >= ago(dt_lookBack)
    | extend CS_ipEntity = toupper(DestinationIP)
    | where isnotempty(CS_ipEntity)
) on $left.TI_ipEntity == $right.CS_ipEntity
| project
    TimeGenerated,
    TI_ipEntity,
    SourceIP,
    DestinationIP,
    DeviceVendor,
    Activity,
    Confidence,
    Tags
| order by TimeGenerated desc
Match domain indicators against DNS events:
let dt_lookBack = 1h;
let ioc_lookBack = 14d;
let Domain_Indicators = ThreatIntelIndicators
    | where ObservableKey == "domain-name:value"
    | extend TI_domainEntity = tolower(ObservableValue)
    | where TimeGenerated >= ago(ioc_lookBack)
    | where isnotempty(TI_domainEntity)
    | summarize arg_max(TimeGenerated, *) by TI_domainEntity;
Domain_Indicators
| join kind=innerunique (
    DnsEvents
    | where TimeGenerated >= ago(dt_lookBack)
    | extend DNS_Name = tolower(Name)
    | where isnotempty(DNS_Name)
) on $left.TI_domainEntity == $right.DNS_Name
| project
    TimeGenerated,
    TI_domainEntity,
    ClientIP,
    Confidence,
    Tags
| order by TimeGenerated desc
Match file hash indicators against Defender for Endpoint:
let dt_lookBack = 1h;
let ioc_lookBack = 14d;
let Hash_Indicators = ThreatIntelIndicators
    | where ObservableKey has "file:hashes"
    | extend TI_hashEntity = toupper(ObservableValue)
    | where TimeGenerated >= ago(ioc_lookBack)
    | where isnotempty(TI_hashEntity)
    | summarize arg_max(TimeGenerated, *) by TI_hashEntity;
Hash_Indicators
| join kind=innerunique (
    DeviceFileEvents
    | where TimeGenerated >= ago(dt_lookBack)
    | extend File_SHA256 = toupper(SHA256)
    | where isnotempty(File_SHA256)
) on $left.TI_hashEntity == $right.File_SHA256
| project
    TimeGenerated,
    TI_hashEntity,
    DeviceName,
    FileName,
    FolderPath,
    Confidence,
    Tags
| order by TimeGenerated desc
Closing thoughts
Coming from MISP, OpenCTI took me a little while to get used to — the mental model is different. But once you start navigating the entity graph and seeing how everything connects, it clicks. A malware hash becomes more than a hash: it’s part of a campaign, tied to a threat actor, mapped to ATT&CK techniques. That context is what makes the difference in an investigation.
The Sentinel integration is genuinely useful for an MDR operation. You maintain one source of truth for threat intelligence and it flows automatically into your SIEM without any manual steps. No CSV exports, no copy-pasting, no manual watchlist updates.
In a follow-up post I’ll look at using the imported indicators in Sentinel analytics rules and how to build workbooks around the threat intelligence data. For now — this stack is running, the indicators are flowing, and it’s already looking AND working good. Need to get more familiar with OpenCTI but honest: it’s promising.