

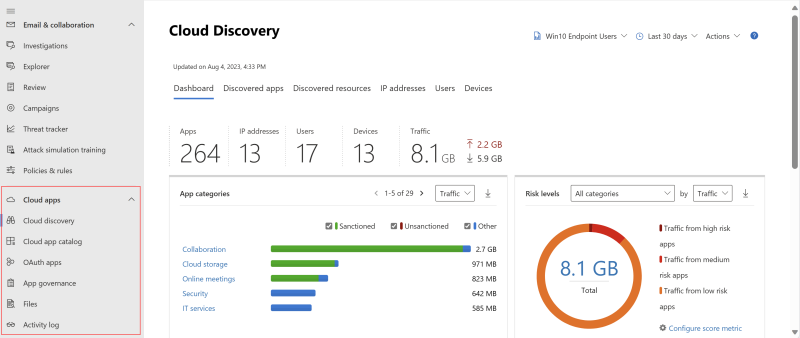
Shadow IT remains one of the biggest challenges for security teams. Users access cloud applications daily without IT awarenes, shady AI tooling, file sharing services, or apps that don’t meet compliance requirements like SOC 2 or ISO 27001.
With the integration between Microsoft Defender for Cloud Apps and Microsoft Defender for Endpoint, you can proactively block apps on your endpoints before users even access them. This goes beyond monitoring: you can automatically block apps based on their risk score, category (like Generative AI), or specific compliance and security attributes.
In this guide, I’ll walk you through the complete setup, prerequisites, and how to create policies that automatically block risky or unwanted apps.
How it works
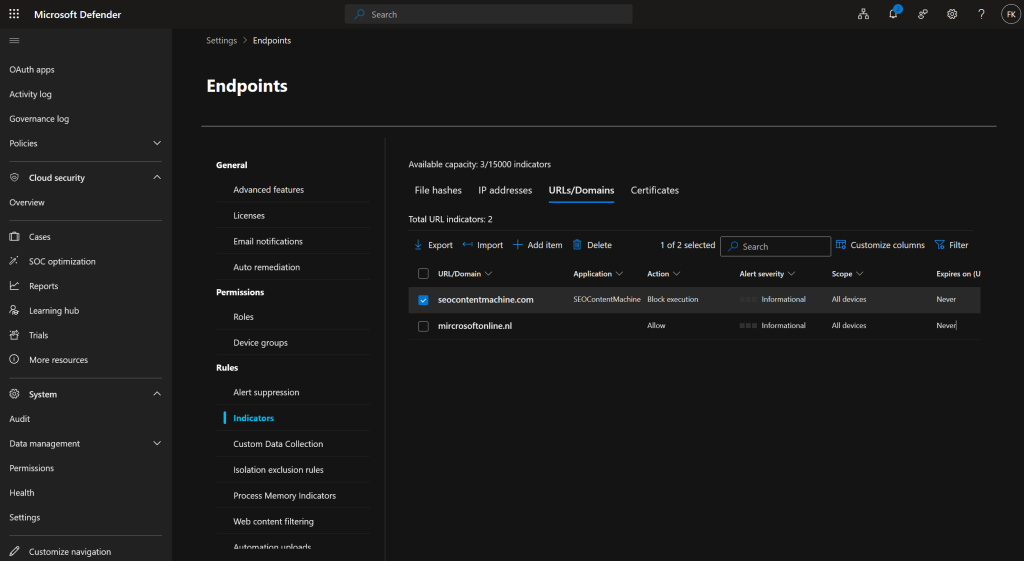
When you mark an app as Unsanctioned in Defender for Cloud Apps, the domains associated with that app are automatically synced to Defender for Endpoint as custom URL indicators. From there, Network Protection blocks access at the endpoint level, this happens on all onboarded devices running Microsoft Defender Antivirus with Network Protection enabled.
The integration works like this:
- You mark an app as Unsanctioned in Defender for Cloud Apps (manually or via policy)
- The domains used by that app sync to Defender for Endpoint (up to 1 hour)
- Defender for Endpoint creates custom URL indicators for those domains
- The indicators propagate to your endpoint devices (up to 2 hours)
- Network Protection blocks access when users try to reach those domains
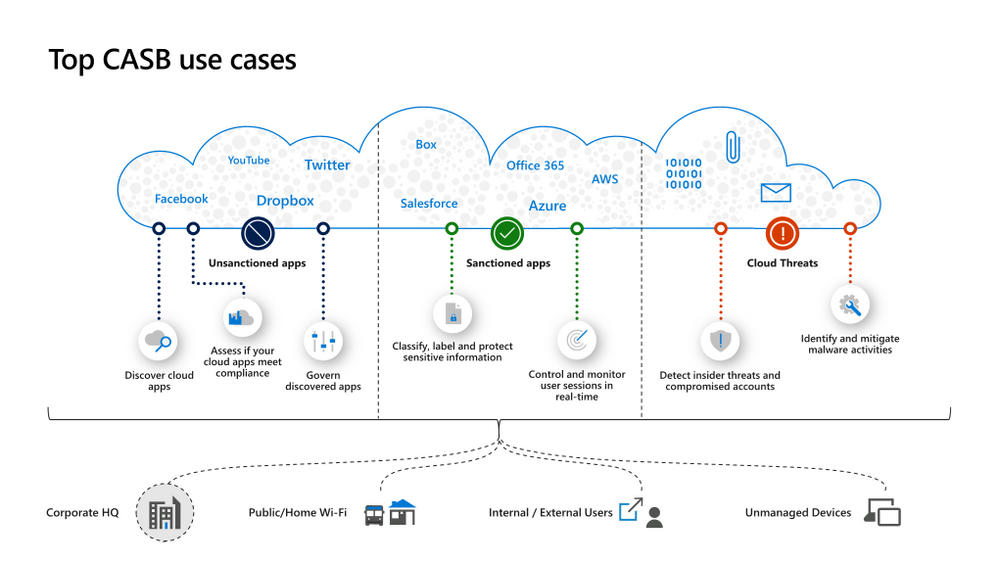
Total maximum latency: up to 3 hours from marking an app as unsanctioned to actual blocking on devices. In practice it’s often faster, but plan for the full window if you’re doing time-sensitive blocking.
One important limitation: blocking works at the domain level, not full URL paths. So drive.google.com can be blocked, but google.com/drive will not work. Keep this in mind when planning your blocking strategy.
How is this different from Web Content Filtering?
Both use Network Protection for enforcement, but they serve different purposes:
Web Content Filtering (WCF) blocks based on URL categorie, broad classifications like “Adult Content,” “Gambling,” “Social Networking,” or “High Bandwidth.” It’s category-based filtering where you block entire types of websites.
Defender for Cloud Apps blocking is app-specific. The Cloud App Catalog contains over 31,000 apps, each scored on more than 90 risk factors across security, compliance, legal, and general categories. You’re not blocking “all cloud storage”, you’re blocking specific apps that don’t meet your security requirements while allowing others.
Order of Precedence
When multiple web protection features are configured, they’re evaluated in this order:
| Priority | Feature | Action |
|---|---|---|
| 1 (Highest) | Custom Indicators (includes Defender for Cloud Apps policies) | Allow |
| 2 | Custom Indicators | Warn |
| 3 | Custom Indicators | Block |
| 4 | Web Threats (malware, phishing) | Block |
| 5 (Lowest) | Web Content Filtering | Block |
This means if you have a Web Content Filtering policy blocking “Cloud Storage” but you’ve sanctioned a specific app like OneDrive in Defender for Cloud Apps, OneDrive will still be accessible because custom indicators (Allow) take precedence over WCF.
Prerequisites
Licensing
You need one of the following combinations:
- Microsoft Defender for Cloud Apps + Microsoft Defender for Endpoint Plan 2
- Microsoft 365 E5
- Microsoft Defender for Endpoint with Microsoft Defender for Business
Microsoft Defender for Endpoint Configuration
The following must be enabled on your devices:
| Setting | Location | Required State |
|---|---|---|
| Real-time protection | Microsoft Defender Antivirus | Enabled |
| Cloud-delivered protection | Microsoft Defender Antivirus | Enabled |
| Network Protection | Microsoft Defender for Endpoint | Block mode (not Audit) |
| Custom network indicators | Settings → Endpoints → Advanced features | Enabled |
Important: Network Protection in Audit mode will log events but won’t actually block anything. Custom network indicators must be enabled or Defender for Cloud Apps won’t be able to create the URL indicators.
Supported Operating Systems
| OS | Minimum Version |
|---|---|
| Windows | Windows 10 version 1809 (RS5) OS Build 17763.379 or higher, Windows 11 |
| macOS | Big Sur (11) or higher, with MDE version 20.123072.25.0+ |
| iOS | 14.0 or higher |
| Android | 8.0 or higher |
| Linux | See Microsoft’s specific distro requirements |
Browser behavior
This is where it gets nuanced:
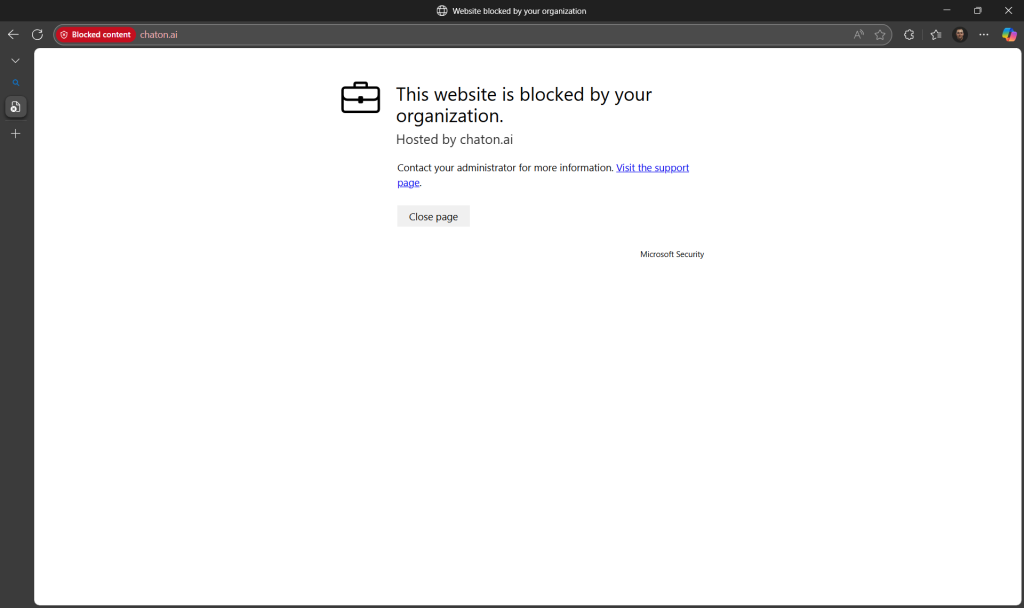
Microsoft Edge: Uses SmartScreen directly. Users see a proper block page with your custom message when they hit a blocked app. Network Protection is not required for Edge on Windows, SmartScreen handles it natively.
Chrome, Firefox, Brave, Opera, Safari: Network Protection handles blocking at the network level. Users see a “Secure Connection Failed” error in the browser, plus a Windows/macOS toast notification explaining the block.
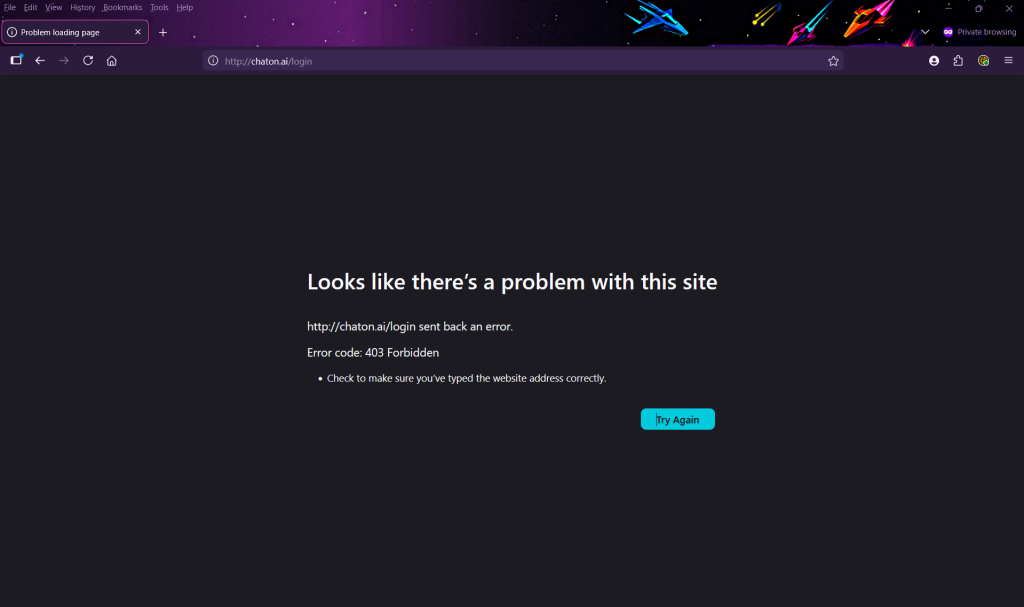
For Network Protection to properly inspect HTTPS traffic in non-Edge browsers, connections must use TCP/IP (not UDP/QUIC) and the TLS ClientHello must not be encrypted. If you want full coverage, consider deploying browser policies:
Chrome enterprise policies:
QuicAllowed= falseEncryptedClientHelloEnabled= false
Firefox policies:
network.http.http3.enable= falseDisableEncryptedClientHello= true
About the Microsoft Defender Browser Protection Extension
You may see references to the “Microsoft Defender Browser Protection” extension in some Microsoft documentation. This is a consumer-focused browser add-on that provides SmartScreen-like phishing/malware protection to Chrome users.
For enterprise customers with Microsoft Defender for Endpoint deployed, this extension is not required for Defender for Cloud Apps blocking to work. Network Protection handles blocking in third-party browsers at the OS level.
Microsoft’s guidance for enterprise customers is to use Network Protection rather than the browser extension. The extension is being deprecated for Manifest V3 and provides redundant functionality for MDE-protected devices.
Step 1: Enable the integration
You need to configure settings in two places.
In the Defender Portal (Microsoft Defender for Cloud Apps settings)
- Go to Settings → Cloud Apps → Cloud Discovery → Microsoft Defender for Endpoint
- Enable Enforce app access
- Click Save
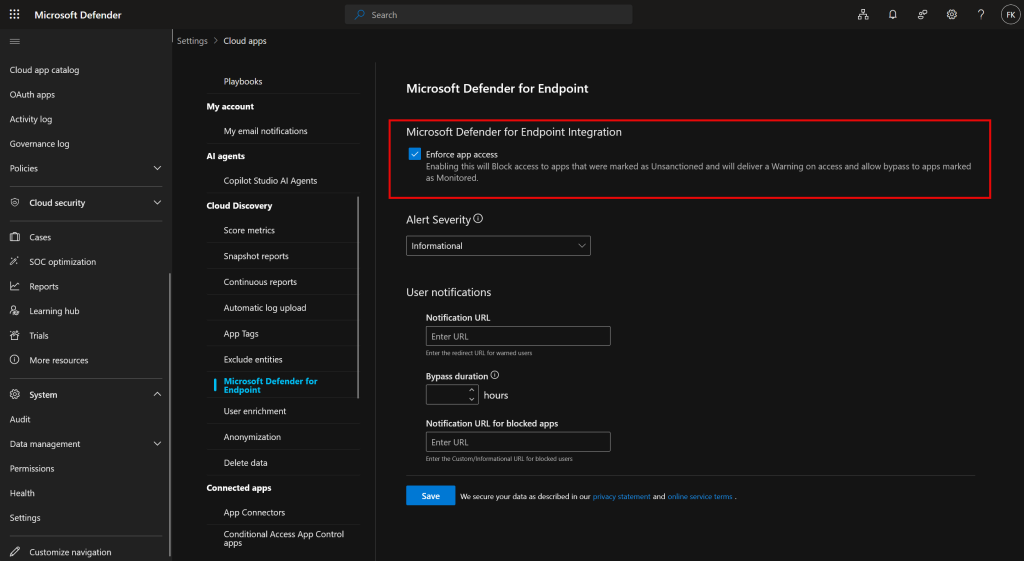
It can take up to 30 minutes for this setting to take effect
In the Defender Portal (Endpoint settings)
- Go to Settings → Endpoints → Advanced features
- Enable Microsoft Defender for Cloud Apps (for discovery)
- Enable Custom network indicators (required for blocking)
- Click Save preferences
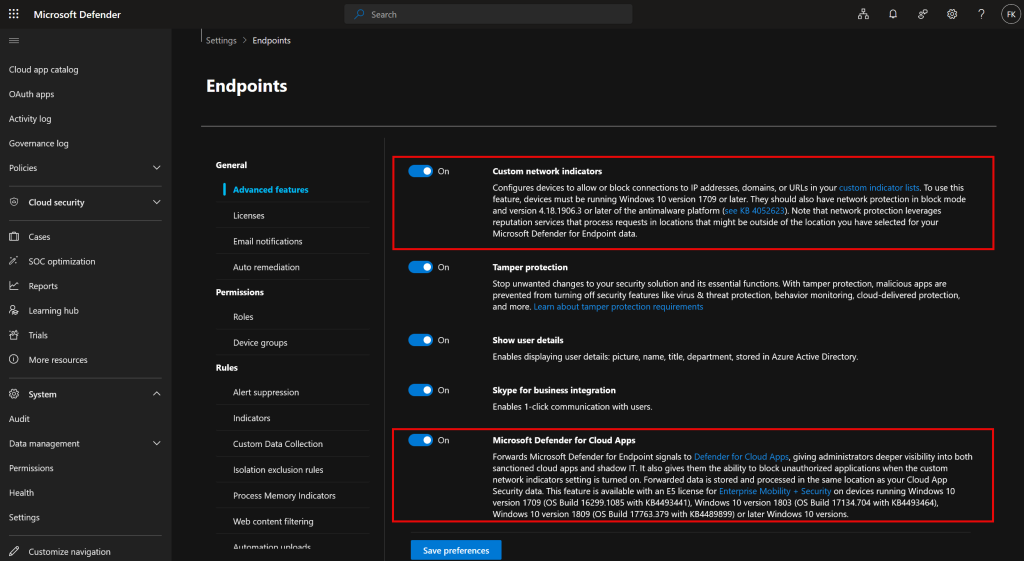
Without Custom network indicators enabled, the blocking won’t work—Defender for Cloud Apps won’t be able to create the URL indicators that Network Protection uses.
Step 2: Understanding the Microsoft Defender for Cloud Apps catalog
Before you start blocking apps, you need to understand how apps are scored. The Cloud App Catalog contains over 31,000 discoverable cloud apps, each scored from 1-10 based on more than 90 risk factors.
The scale: 1 = highest risk, 10 = lowest risk.

This trips people up—lower numbers are worse.
Risk categories
| Category | What It Evaluates |
|---|---|
| General | Company stability, domain age, founding year, popularity |
| Security | MFA support, encryption at rest, data classification, admin/user audit trails, data ownership |
| Compliance | SOC 2, ISO 27001, HIPAA, PCI-DSS, CSA, and other certifications |
| Legal | DMCA compliance, data retention policy, GDPR readiness, data ownership terms |
Viewing the catalog
- Go to Cloud Apps → Cloud app catalog
- Use the Category filter on the left to browse by app type (Generative AI, Cloud Storage, etc.)
- Toggle Advanced filters to filter by specific risk factors
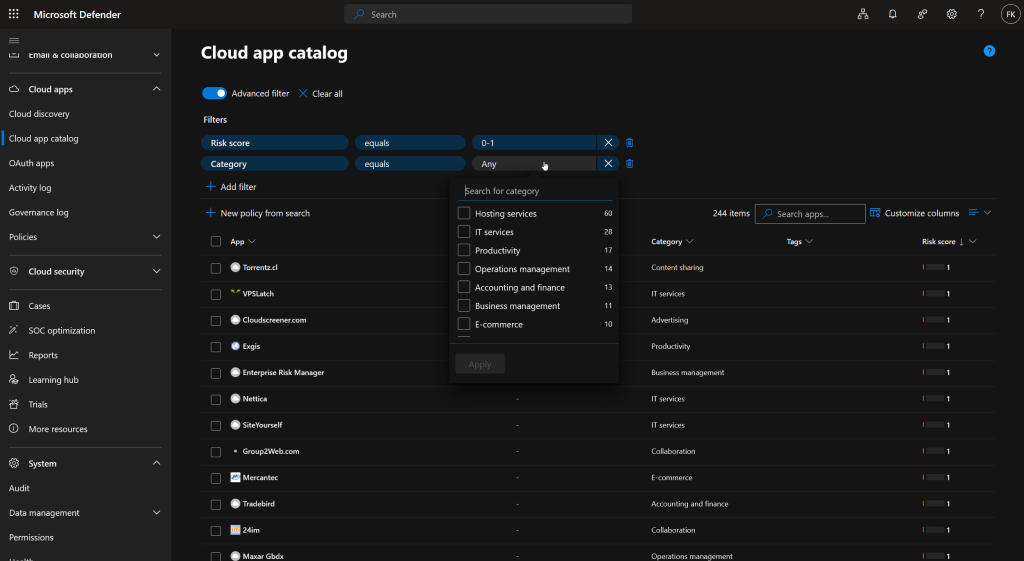
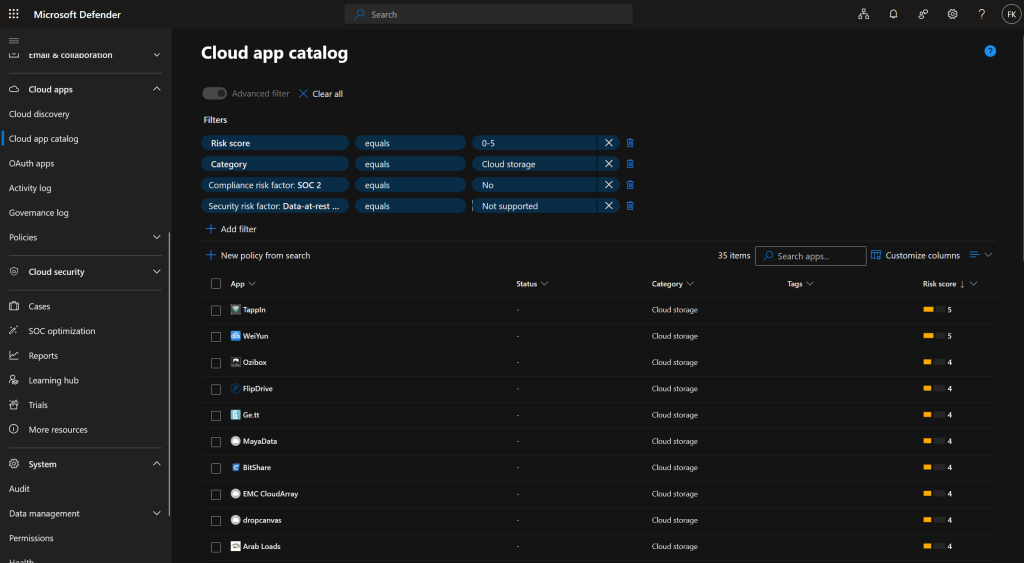
For example, to find risky cloud storage apps:
- Category: Cloud storage
- Risk score: 5 or lower
- Compliance risk factor → SOC 2: No
- Security risk factor → Data-at-rest encryption: Not supported
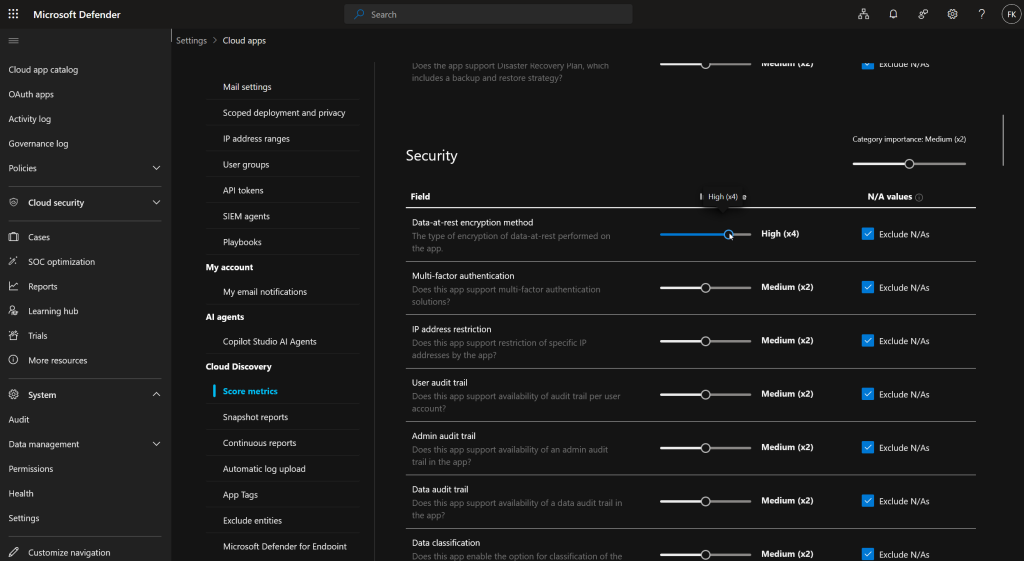
Customizing Risk Score weights
If certain factors matter more to your organization, you can adjust the weighting:
- Go to Settings → Cloud Apps → Cloud Discovery → Score metrics
- Adjust the Importance slider for each category: Ignored, Low, Medium, High, or Very High
- Enable N/A values checkbox if you want missing information to negatively impact scores
Overriding Risk Scores
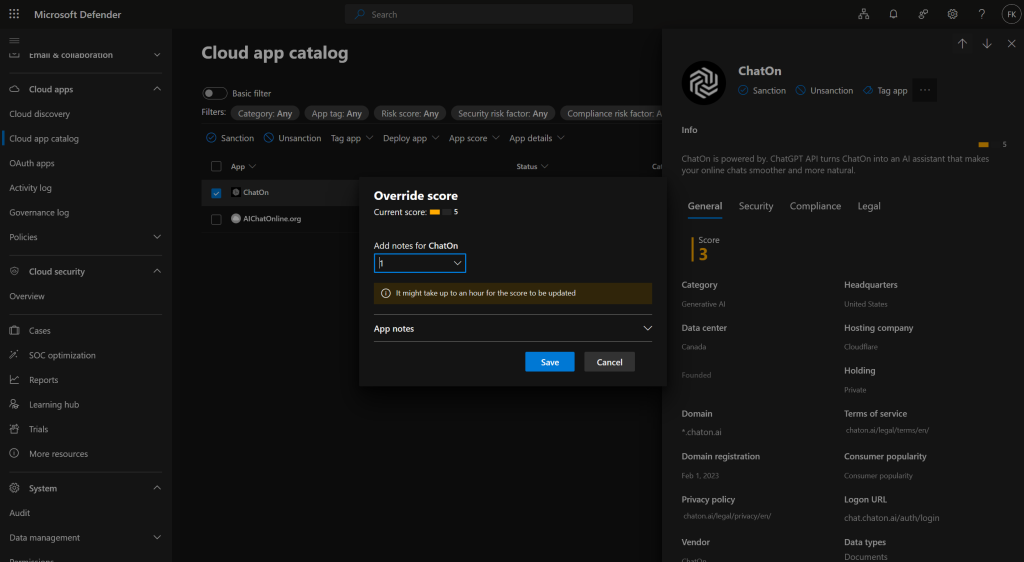
Sometimes you’ve vetted an app internally even though its catalog score is low. You can override scores for specific apps:
- In the Cloud app catalog, find the app
- Click the three dots → Override app score
- Select your custom score
- Add an App note explaining your justification
Step 3: Manually block apps (Unsanction)
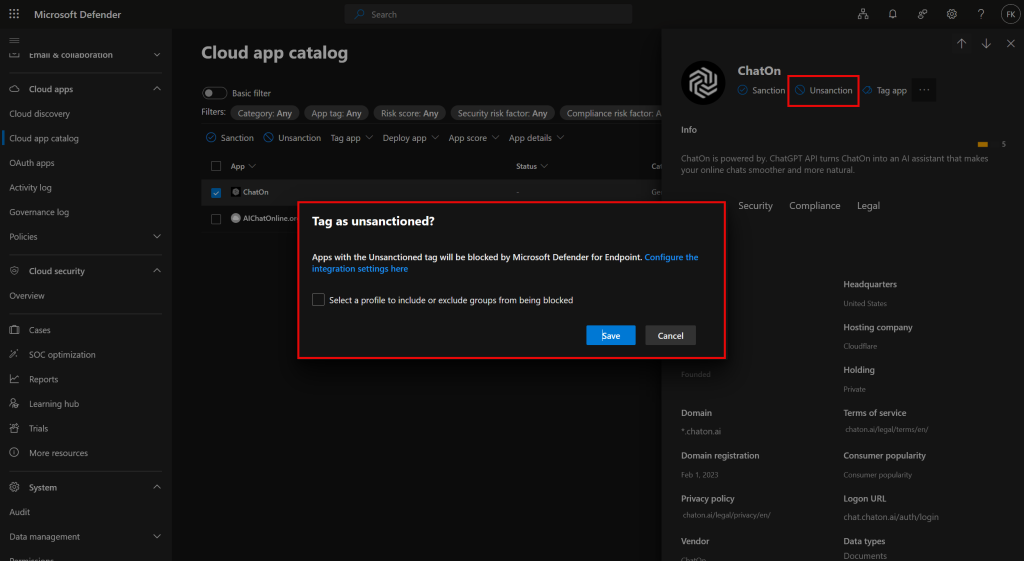
Block from discovered apps
- Go to Cloud Apps → Cloud Discovery → Discovered apps tab
- Find the app you want to block
- Click the three dots at the end of the row → Unsanctioned
- Click Save
Block from the Cloud App catalog
You can also proactively block apps that haven’t been discovered in your environment yet:
- Go to Cloud Apps → Cloud app catalog
- Find an app (e.g., search for a specific AI tool)
- Click the three dots → Unsanctioned
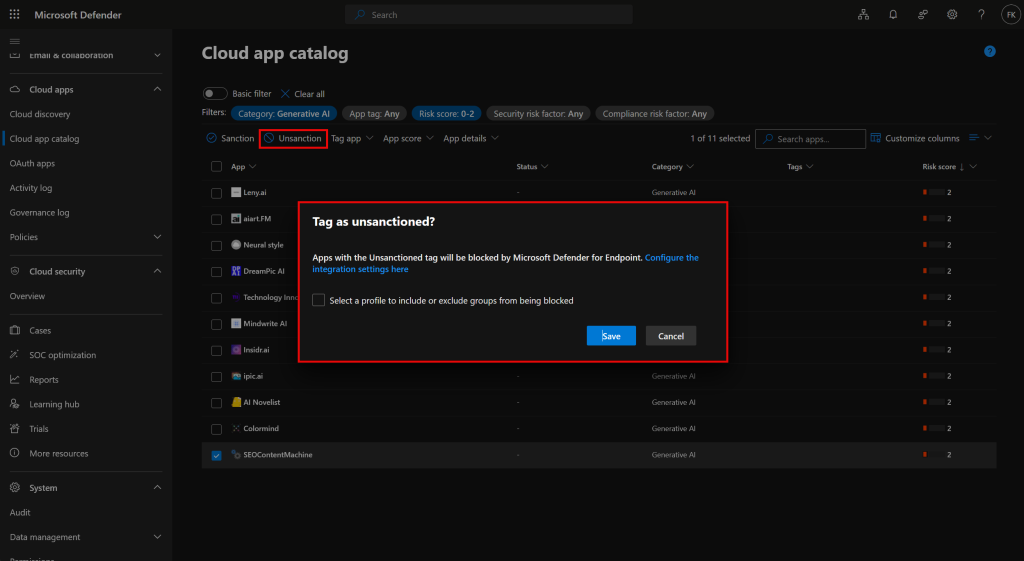
This is useful for preemptively blocking apps before anyone even tries to use them.
What happens after unsanctioning
Once marked as unsanctioned:
- Domains sync to Defender for Endpoint within approximately 1 hour
- URL indicators are created automatically
- Indicators propagate to devices within approximately 2 hours
- Users attempting to access the app get blocked
Step 4: Automate Blocking with App Discovery policies
Manual blocking doesn’t scale. For proactive protection, create policies that automatically unsanction apps based on your criteria.
Create an App Discovery policy
- Go to Cloud Apps → Policies → Policy management
- Select the Shadow IT tab
- Click Create policy → App discovery policy
Example policy 1: Block high-risk apps
This policy automatically blocks apps with poor risk scores that are actually being used.
Configuration:
- Name: Block High-Risk Apps
- Severity: High
- Under Apps matching all of the following:
- Risk score: equals 5 or lower
- Under Trigger a policy match if all the following occur on the same day:
- Daily traffic: greater than 50 MB
- Users: greater than 5
- Governance actions: Tag app as Unsanctioned
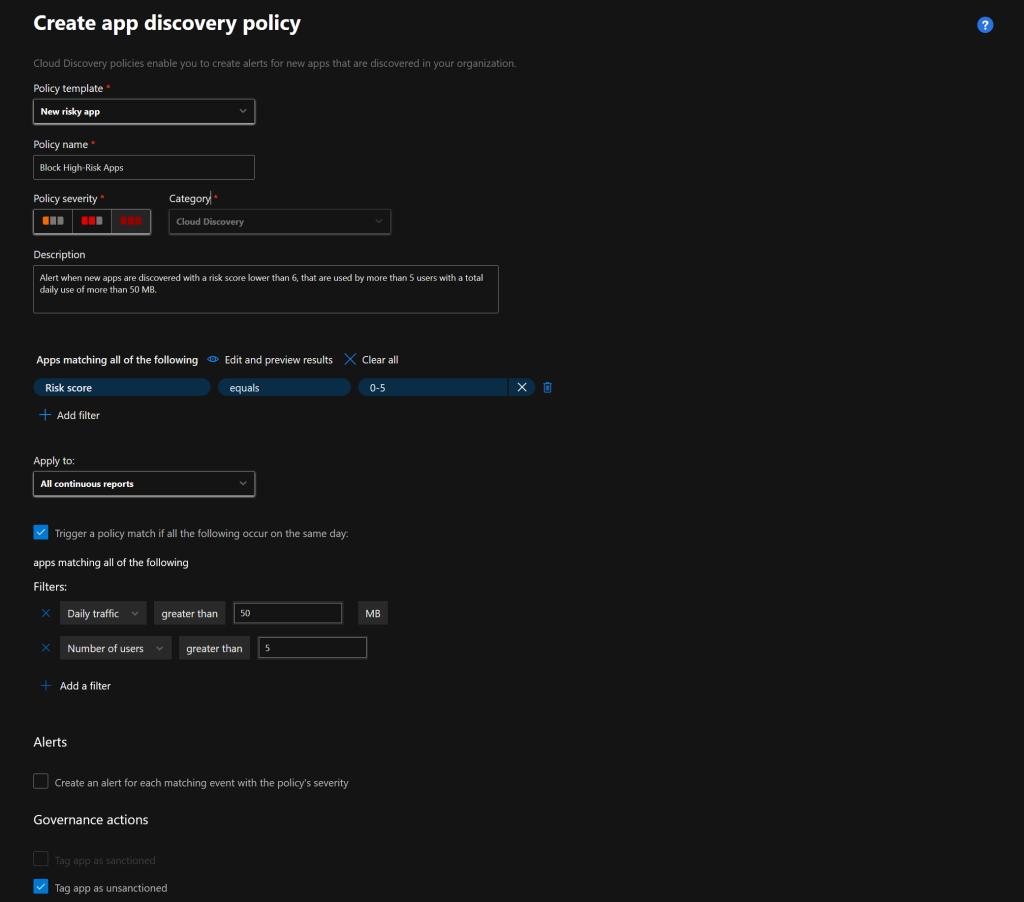
The traffic and user thresholds prevent blocking apps that nobody’s actually using.
Example policy 2: Block all generative AI apps
With AI tools proliferating, many organizations want to block unapproved AI apps by default.
Configuration:
- Name: Block Unapproved AI Apps
- Severity: Medium
- Under Apps matching all of the following:
- Category: equals Generative AI
- Governance actions: Tag app as Unsanctioned
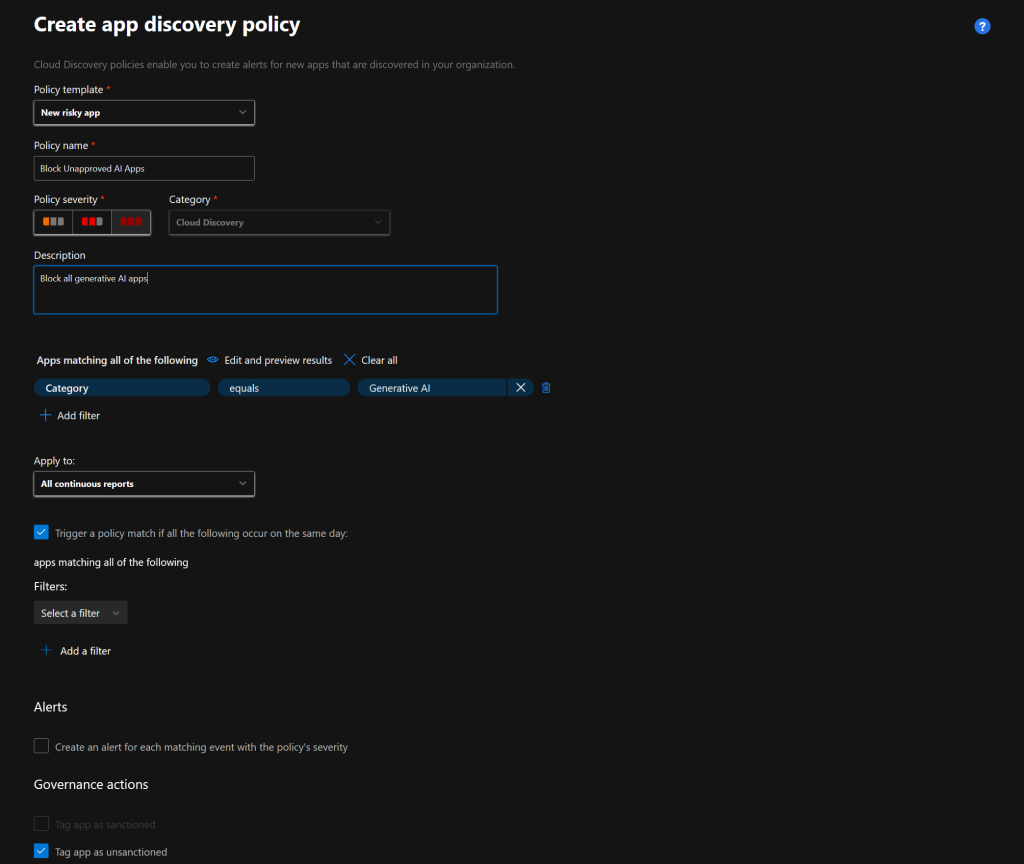
After enabling this policy, manually sanction the AI tools your organization has approved (Microsoft Copilot, ChatGPT Enterprise with your corporate contract, etc.).
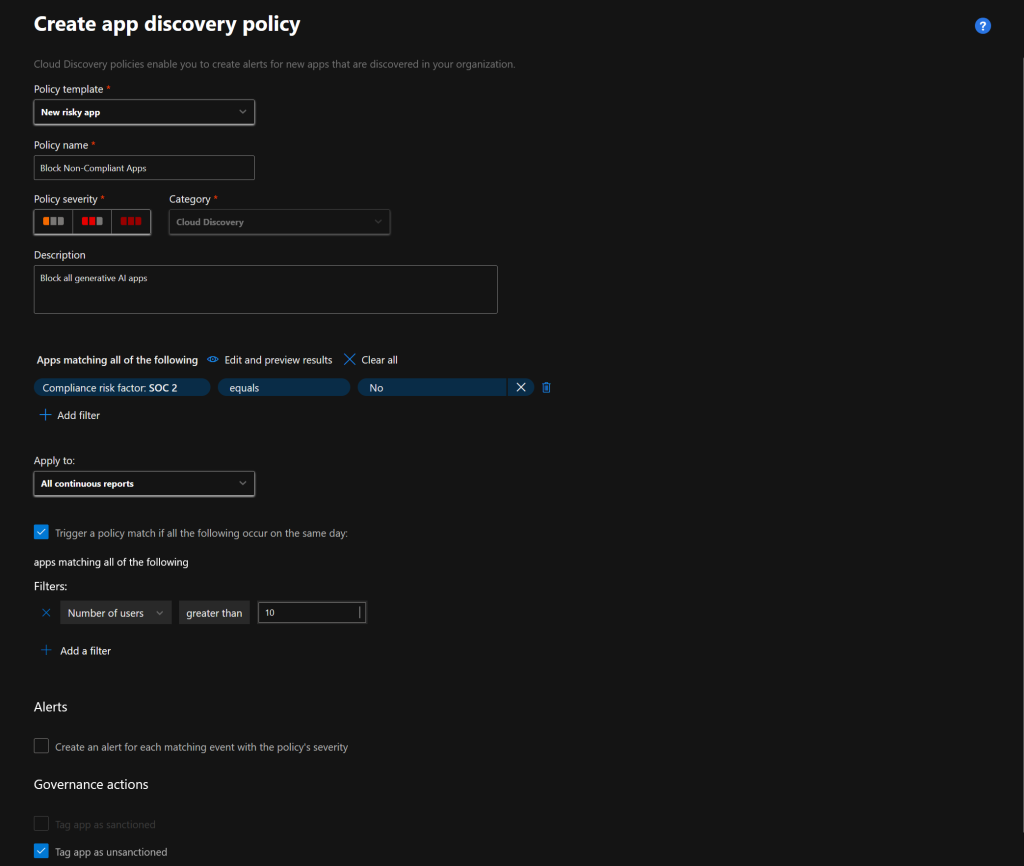
Example policy 3: Compliance-driven blocking
Block apps that don’t meet your compliance requirements.
Configuration:
- Name: Block Non-Compliant Apps
- Severity: High
- Under Apps matching all of the following:
- Compliance risk factor → SOC 2: equals No
- Users: greater than 10
- Governance actions: Tag app as Unsanctioned
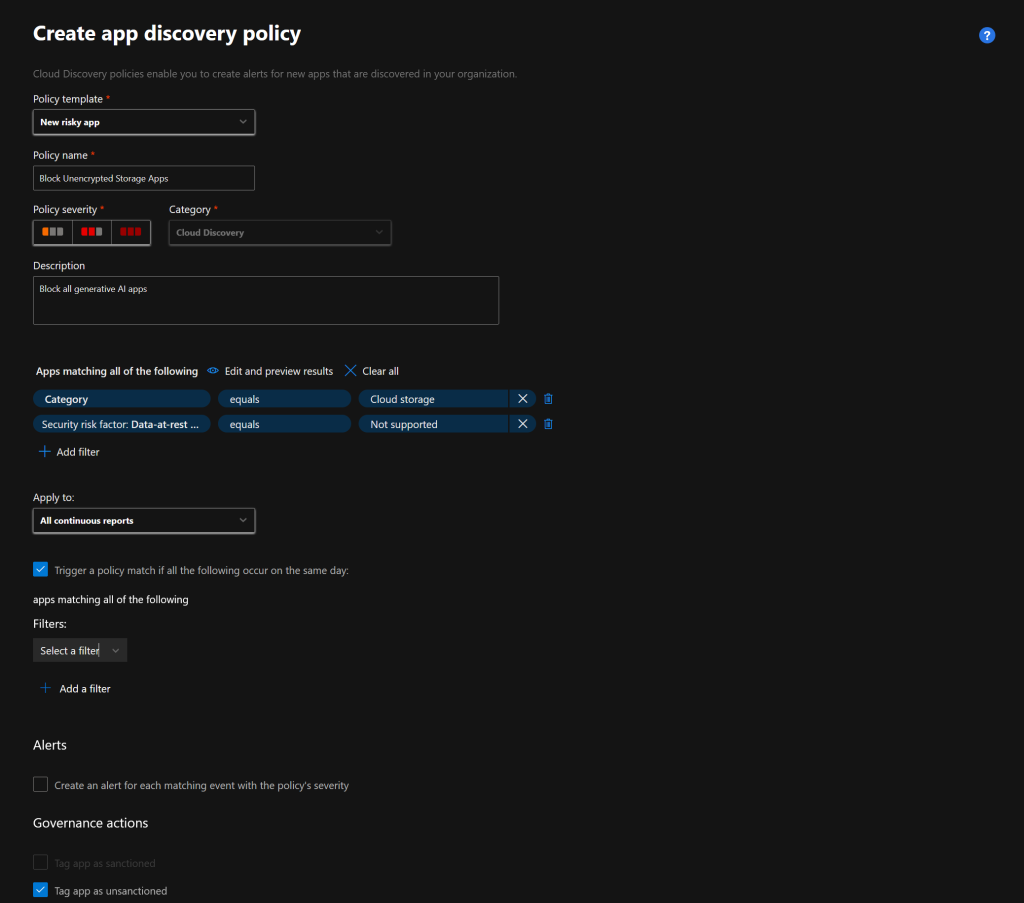
Example policy 4: Block apps without encryption
Configuration:
- Name: Block Unencrypted Storage Apps
- Severity: High
- Under Apps matching all of the following:
- Category: equals Cloud storage
- Security risk factor → Data-at-rest encryption: equals Not supported
- Governance actions: Tag app as Unsanctioned
Policy behavior notes
- Newly created policies can trigger alerts for apps that already exist in your environment. Microsoft limits this to once per 90 days per app per continuous report.
- If there’s a conflict between manual governance actions and policy governance, the last operation applied takes precedence.
- Data from snapshot reports don’t trigger alerts in app discovery policies.
Step 5: Block apps for specific Device Groups (Scoped Profiles)
Not every block should apply organization-wide. Marketing might need access to design tools that should be blocked for Finance. Scoped profiles let you target blocking to specific Defender for Endpoint device groups.
Important: Scoped profiles work with Device Groups only, not User Groups. This is because Microsoft Defender for Endpoint executes the blocking, and MDE works at the device level.
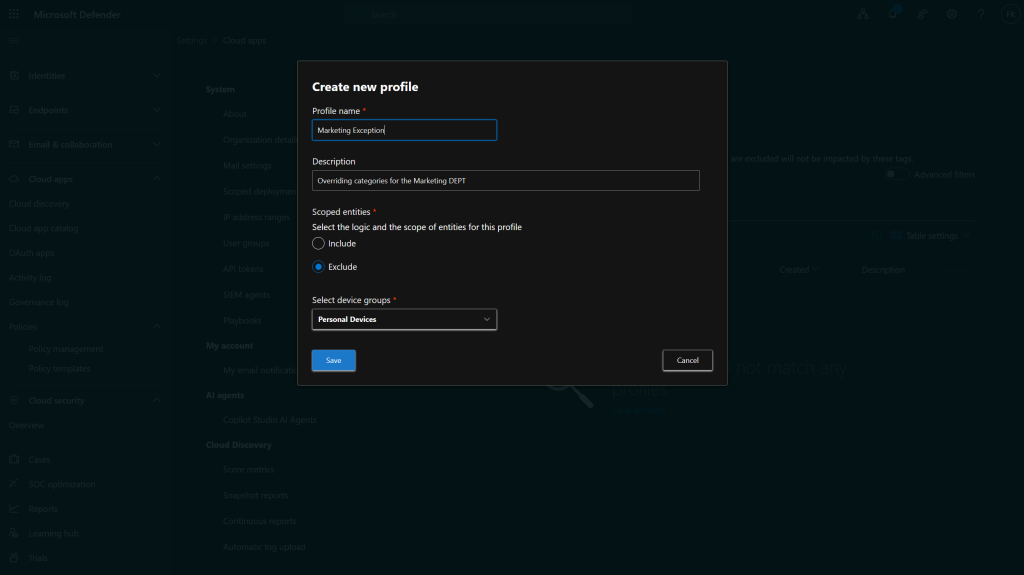
Create a Scoped Profile
- Go to Settings → Cloud Apps → Cloud Discovery → App tags → Scoped profiles tab
- Click Add profile
- Configure:
- Name: Give it a descriptive name (e.g., “Marketing Exception” or “Finance Restrictions”)
- Description: Document the purpose
- Type: Choose Include or Exclude
- Include: Only devices in the selected groups are affected by blocks using this profile
- Exclude: All devices EXCEPT those in the selected groups are affected
- Device groups: Select from your Defender for Endpoint device groups
- Click Save
Apply a Scoped Profile when blocking
When you unsanction an app:
- In the Tag as unsanctioned? dialog, you’ll see an option to Select a profile to include or exclude groups from being blocked
- Choose your scoped profile
- Click Save
The app will only be blocked for devices matching that profile.
Important notes on Scoped Profiles
- Device groups are pulled from Microsoft Defender for Endpoint. Create device groups there first if needed.
- The scoped profile option only appears if the Win10 Endpoint Users data source has consistently received data during the past 30 days.
- If you’re using Microsoft Defender for Business instead of full Defender for Endpoint, device groups are managed differently and won’t appear in Defender for Cloud Apps.
- To change the scoped profile for an already-unsanctioned app, you must first remove the unsanctioned tag, then re-unsanction with the new profile.
- It can take up to 2 hours for domain changes to propagate to devices after modifying scoping.
Step 6: Warn Users instead of blocking (Monitored)
Sometimes a hard block is too aggressive. You might want to discourage use without completely preventing access. The Monitored tag provides a warning experience instead of blocking.
The three app states
| Tag | Behavior | Sync to MDE |
|---|---|---|
| Sanctioned | Allowed | Creates Allow indicator |
| Monitored | Warn | Creates Warn indicator |
| Unsanctioned | Blocked | Creates Block indicator |
How warnings work
When you tag an app as Monitored:
- The domains sync to Defender for Endpoint with Action=Warn (usually within a few minutes)
- Users see a warning page when they try to access the app
- Users can choose to proceed (bypass the warning)
- You can track bypass behavior in the Defender portal
Configure warning settings
- Go to Settings → Cloud Apps → Cloud Discovery → Microsoft Defender for Endpoint
- Configure the following:
Notification URL: Enter a URL pointing to a page explaining:
- Why the app is flagged as risky
- What approved alternatives exist
- How to request an exception
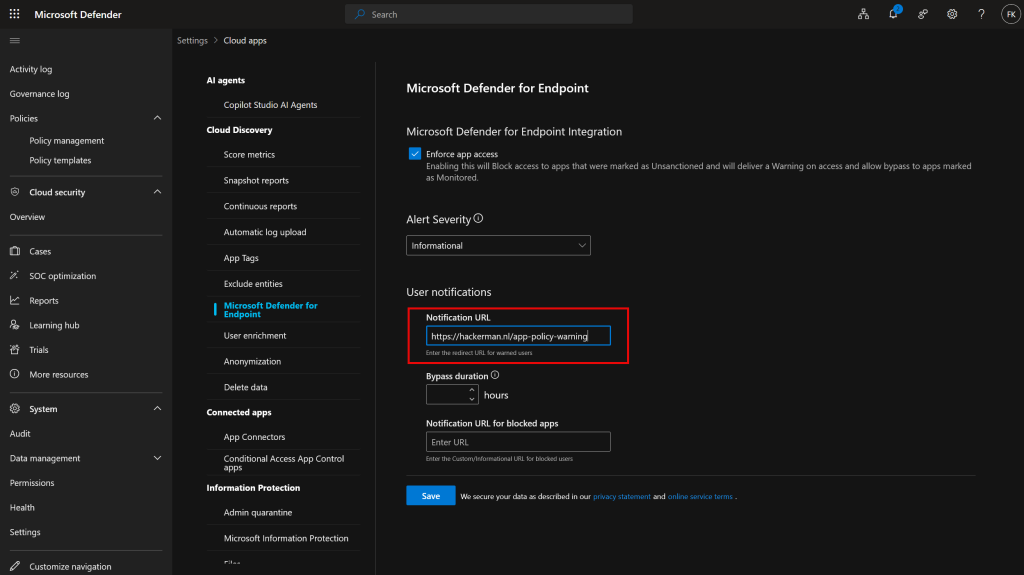
Bypass duration: Configure how long (in hours) a user can access the app after bypassing the warning before seeing it again. Default is 24 hours.
Tag an app as monitored
- Go to Cloud Apps → Cloud Discovery → Discovered apps
- Find the app
- Click the three dots → Monitored
Monitor user behavior
Track how many users are bypassing warnings:
- Go to Cloud Apps → Cloud Discovery → Discovered apps
- Select the monitored app
- View applied controls and bypass statistics on the app’s overview page
High bypass rates indicate either a training opportunity or that you should formally sanction (or fully block) the app.
Step 7: Customize the block page
When users hit a blocked app in Microsoft Edge, they see a block notification. You can customize this experience by providing a link to internal resources.
Configure the block page URL
- Go to Settings → Cloud Apps → Cloud Discovery → Microsoft Defender for Endpoint
- In the Alerts dropdown, select Informational
- Under User warnings → Notification URL for blocked apps, enter your URL
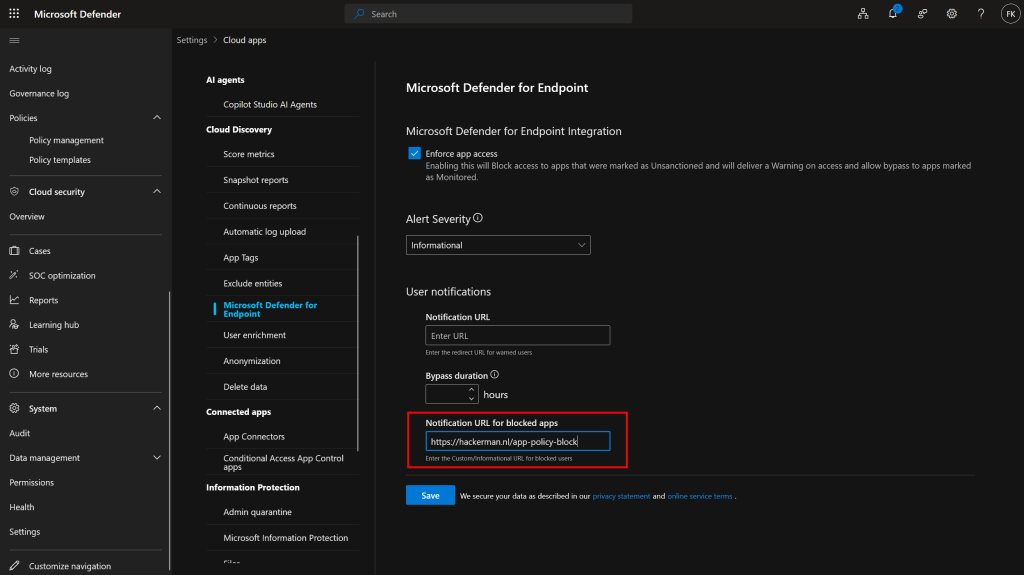
Point this to a SharePoint page or internal wiki explaining:
- Why apps get blocked
- Your organization’s acceptable use policy
- How to request an exception
- What approved alternatives exist
When users click “Visit the Support page” on the block page, they’ll be redirected to this URL.
Step 8: Anomaly Detection for Unusual Behavior
Beyond policy-based blocking, Defender for Cloud Apps can detect anomalous behavior—like a user who suddenly uploads 600 GB to an app they’ve never used.
Cloud Discovery Anomaly Detection
This is enabled by default, but you can fine-tune it:
- Go to Cloud Apps → Policies → Policy management → Shadow IT tab
- Click Create policy → Cloud Discovery anomaly detection policy
- Configure:
- Name: e.g., “Unusual Upload Activity”
- Filters: Target specific apps, categories, or risk scores
- Apply to: All continuous reports or specific reports
- Raise alerts only for suspicious activities occurring after: Set a date
- Daily alert limit: Prevent alert fatigue
Anomaly detection policies alert on unusual behavior but don’t auto-block. They’re early warning signals for investigation.
Apps you cannot block
Microsoft prevents blocking certain business-critical services to avoid accidental outages:
- Microsoft Defender for Cloud Apps
- Microsoft Defender Security Center
- Microsoft 365 Security Center
- Microsoft Defender for Identity
- Microsoft Purview
- Microsoft Entra Permissions Management
- Microsoft Conditional Access Application Control
- Microsoft Secure Score
- Microsoft Intune
- Microsoft Support
- Microsoft AD FS Help
- Microsoft Online Services
Additionally, apps that are onboarded to inline proxy (Conditional Access App Control) or connected via app connector are automatically set to Sanctioned and cannot be blocked through this mechanism.
Alternative: Block Script generation for Firewalls
If you don’t have Defender for Endpoint deployed everywhere, you can still use Defender for Cloud Apps intelligence with your existing security appliances.
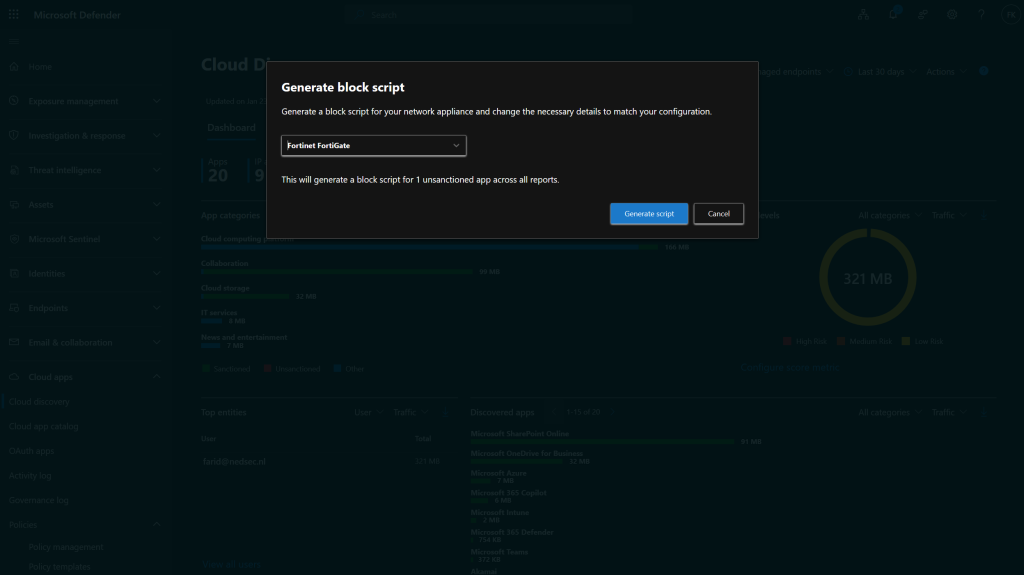
Generate a Block Script
- Tag your target apps as Unsanctioned in Cloud Discovery
- Go to the Cloud Discovery dashboard
- Click Actions → Generate block script
- Select your appliance type (Fortigate, Palo Alto, Cisco, Blue Coat, etc.)
- Click Generate script
- Import the generated file into your appliance
config webfilter urlfilter
	edit
		config entries
			edit 1
				set url seocontentmachine.com
				set type simple
				set action block
				set status enable
			end
		end
	end
Export Domain List
For unsupported appliances:
- Go to Cloud Apps → Cloud Discovery → Discovered apps
- Filter for Unsanctioned apps
- Use the export capability to export all domains
- Configure your third-party appliance to block those domains
Third-Party Integrations
If you use Zscaler NSS, iboss, Corrata, Menlo, or Open Systems, these have native integrations with Defender for Cloud Apps. Apps marked as unsanctioned are automatically blocked. However, these integrations don’t support scoped device group blocking or the warn-and-educate features.
Monitoring and Hunting
Once blocking is in place, monitor what’s happening with Advanced Hunting queries.
Find blocks from Defender for Cloud Apps in Microsoft Edge
DeviceEvents
| where ActionType == "SmartScreenUrlWarning"
| extend ParsedFields = parse_json(AdditionalFields)
| project Timestamp, DeviceName, RemoteUrl, InitiatingProcessFileName,
          Experience = tostring(ParsedFields.Experience)
| where Experience == "CasbPolicy"
| summarize BlockCount = count() by RemoteUrl, DeviceName
| order by BlockCount desc
Find blocks in Non-Edge Browsers (Network Protection)
DeviceEvents
| where ActionType == "ExploitGuardNetworkProtectionBlocked"
| extend ParsedFields = parse_json(AdditionalFields)
| project Timestamp, DeviceName, RemoteUrl, InitiatingProcessFileName,
          ResponseCategory = tostring(ParsedFields.ResponseCategory)
| where ResponseCategory == "CasbPolicy"
| summarize BlockCount = count() by RemoteUrl, DeviceName
| order by BlockCount desc
ResponseCategory values
| ResponseCategory | Source |
|---|---|
| CasbPolicy | Defender for Cloud Apps |
| CustomPolicy | Web Content Filtering |
| CustomBlockList | Custom Indicators |
| Malicious | Web Threats |
| Phishing | Web Threats |
Find users hitting blocked apps
DeviceEvents
| where ActionType in ("SmartScreenUrlWarning", "ExploitGuardNetworkProtectionBlocked")
| extend ParsedFields = parse_json(AdditionalFields)
| where tostring(ParsedFields.Experience) == "CasbPolicy"
    or tostring(ParsedFields.ResponseCategory) == "CasbPolicy"
| summarize
    BlockCount = count(),
    Apps = make_set(RemoteUrl)
    by AccountName, DeviceName
| order by BlockCount desc
Troubleshooting
Apps not being blocked
Check the following:
- Network Protection enabled? Must be in Block mode, not Audit. Check with PowerShell:
Get-MpPreference | Select-Object EnableNetworkProtectionValue should be1(Block). If it’s0(Disabled) or2(Audit), blocking won’t work. - Custom network indicators enabled? Required in Settings → Endpoints → Advanced features
- Time elapsed? Allow up to 3 hours after unsanctioning
- Domain vs URL? Full URL paths like
google.com/drivewon’t work—only domains - QUIC enabled? Network Protection can’t inspect QUIC traffic in non-Edge browsers. Disable QUIC protocol via browser policies or Windows Firewall.
Verify Indicators were created
- Go to Settings → Endpoints → Indicators → URLs/Domains
- Look for the domains from your unsanctioned apps
- Check the Action (Block/Warn) and scope
Check device configuration
On an endpoint, verify Network Protection is active:
Get-MpPreference | Select-Object EnableNetworkProtection
| Value | State |
|---|---|
| 0 | Disabled |
| 1 | Enabled (Block mode) |
| 2 | Audit mode |
Best practices
Start with monitoring: Deploy discovery first. Let it run for a few weeks. Understand what apps are actually in use before you start blocking. Nothing kills adoption faster than blocking something the CEO uses daily.
Create an exception process: Document how users can request access to blocked apps. Put the link on your block page.
Communicate before blocking: Send out communications before enabling blocking policies. Give users time to find alternatives.
Use Monitored before Unsanctioned: For apps you’re unsure about, start with warnings. If users bypass constantly, you have data to justify either formally approving or fully blocking the app.
Review policies quarterly: The app landscape changes. New apps appear, existing apps improve their security posture, and your organization’s needs evolve.
Don’t rely solely on risk scores: A risk score of 6 doesn’t mean an app is safe—it means Microsoft hasn’t found evidence it’s particularly risky. Do your own due diligence for apps handling sensitive data.
Consider browser configuration: For comprehensive coverage, deploy browser policies to disable QUIC and Encrypted Client Hello in non-Edge browsers.
Test in scoped groups first: Use device groups to pilot blocking policies before rolling out organization-wide.
References
Govern discovered apps using Microsoft Defender for Endpoint
Integrate Microsoft Defender for Endpoint with Microsoft Defender for Cloud Apps
Cloud app catalog and risk scores
Summary
The Defender for Cloud Apps and Defender for Endpoint integration provides proactive, scalable control over Shadow IT:
- Enable the integration in Cloud Apps settings and Endpoint advanced features
- Understand the catalog and how apps are scored (1-10, lower = riskier)
- Manually unsanction specific apps for immediate blocking
- Create App Discovery policies for automated blocking based on risk score, category, or compliance
- Use scoped profiles for device group-specific blocking
- Configure warnings (Monitored) for softer enforcement
- Customize block pages to educate users
- Monitor with Advanced Hunting to track effectiveness
This shifts your security posture from reactive (discovering Shadow IT after the fact) to proactive (blocking risky apps before they become incidents).