


Introduction
In a previous post on modernsecurity.nl, I walked through the classic installation of Microsoft Defender for Identity (MDI) using the v2.x sensor — prerequisites, gMSA configuration, Windows event auditing, NTLM auditing, and the manual download-and-install process. If you’ve deployed MDI before, you’ll remember the overhead: downloading an installer package, running it on each domain controller, creating and maintaining a gMSA account, configuring audit GPOs, and dealing with Npcap.
That process is now behind us.
With the general availability of the Microsoft Defender for Identity sensor v3.x in early 2026, and the release of the portal-based migration wizard in March 2026, Microsoft has completely changed how MDI sensors are deployed and managed. The new sensor runs as an extension of Microsoft Defender for Endpoint (MDE) — if MDE is already on your domain controllers (as it should be), MDI protection is now a matter of a few clicks from the portal.
This guide covers everything you need:
- What changed and why it matters
- Prerequisites for both fresh deployments and migrations
- Deploying the sensor from the Defender portal
- Migrating existing v2.x sensors to v3.x with zero downtime
- Post-deployment and post-migration configuration: RPC auditing, automatic Windows auditing, and gMSA removal
All steps are verified against Microsoft Learn documentation and tested in live environments.
What changed with the MDI sensor v3.x
The biggest change is architectural. The v3.x sensor is not a standalone agent — it runs as a component within the MDE/SENSE service already present on your domain controllers. This is the long-awaited unification of endpoint and identity telemetry into a single agent.
| Area | v2.x (classic) | v3.x (new) |
|---|---|---|
| Deployment | Manual installer on each DC | Portal-based activation, no installer |
| Dependency | Standalone agent | Built on top of MDE (SENSE service) |
| Authentication account | gMSA required | Local SYSTEM — no gMSA needed |
| Windows auditing | Manual GPO configuration | Automatic configuration (preview) available |
| RPC auditing | Not available | Available via asset rule tag |
| Sensor updates | Manual or delayed update ring | Automatically via Windows Updates — no manual packages |
| Delayed update ring | Supported | Not available (v2.x only) |
| OS requirement | Windows Server 2008 R2 and later | Windows Server 2019 and later |
| Npcap / WinPcap | Required | Not required |
Beyond deployment simplicity, v3.x also brings detection improvements: it uses the Windows Filtering Platform (WFP) for deeper network inspection, adds enhanced RPC auditing for advanced identity attack detections, and caps resource usage at 30% CPU and 1.5 GB memory.
Prerequisites
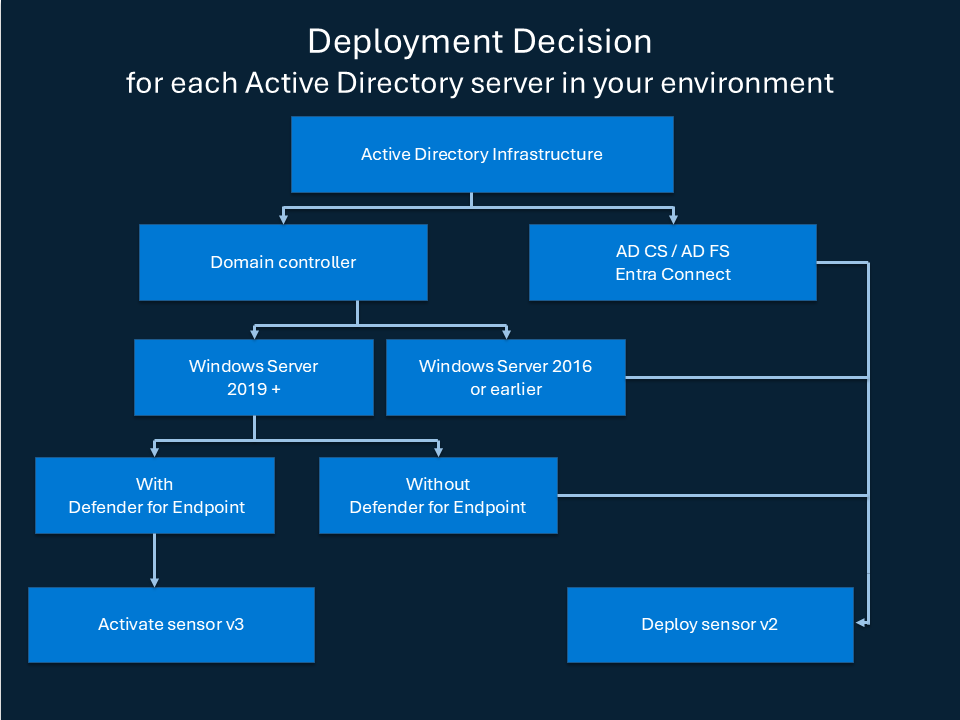
Before diving into the requirements, a quick note on scope. The v3.x sensor applies to domain controllers running Windows Server 2019 or later. Two scenarios still require the v2.x classic sensor:
- Domain controllers running Windows Server 2016 or earlier
- Standalone servers running AD FS, AD CS, or Microsoft Entra Connect without a DC role — v3.x will never apply here since the sensor only runs on domain controllers
DCs that also run AD FS, AD CS, or Entra Connect alongside the DC role are supported by v3.x as of March 2026, but the migration wizard does not support them yet — those require a fresh deployment. See Supported server roles and the following decision tree:
Licensing and permissions
One of the following licenses is required:
| License |
|---|
| Enterprise Mobility + Security E5 (EMS E5/A5) |
| Microsoft 365 E5 (E5/A5/G5) |
| Microsoft 365 E5/A5/G5/F5 Security |
| Microsoft 365 F5 Security + Compliance |
To deploy, you need one of the following:
| Role | Detail |
|---|---|
| Security Administrator | Microsoft Entra ID built-in role |
| Unified RBAC (alternative) | System settings (Read and manage) + Security settings (All permissions) |
Server requirements
| Requirement | Detail |
|---|---|
| Operating system | Windows Server 2019 or later |
| Cumulative update | March 2026 or later (KB5078766 for Windows Server 2022; KB varies by OS version) |
| MDE deployment | Microsoft Defender for Endpoint deployed and running (SENSE service active) |
| Microsoft Defender Antivirus | Active or passive mode both supported |
| Power plan | Set to High Performance on each DC |
| Time sync | Within 5 minutes across all DCs |
| Memory (Hyper-V) | Disable “Enable Dynamic Memory” on the VM |
| Memory (VMware) | Set reserved memory equal to configured memory, or enable “Reserve all guest memory (All locked)” |
The March 2026 cumulative update is a hard dependency. Without it, activation or migration will fail. Apply it to all domain controllers before proceeding. The KB number varies by OS version — KB5078766 is for Windows Server 2022.
If you are doing a fresh deployment, the target DC must not already have a v2.x sensor installed. If you are migrating, the v2.x sensor must be installed and running — those prerequisites are listed separately in the Migration from v2.x to v3.x section.
Supported server roles
As of April 2026:
| Role | Support status |
|---|---|
| Domain controller only | Fully supported — activation and migration wizard |
| Domain controller + Entra Connect | Rolling out — fresh deployment only, requires Windows Server 2019+, March 2026 CU |
| Domain controller + AD FS | Rolling out — fresh deployment only, requires Windows Server 2019+, March 2026 CU |
| Domain controller + AD CS | Rolling out — fresh deployment only, requires Windows Server 2019+, March 2026 CU |
| Standalone AD FS / AD CS / Entra Connect (no DC role) | Use v2.x sensor — v3.x does not apply |
Validating prerequisites
Microsoft provides two useful PowerShell scripts from the DefenderForIdentity module. Both are optional but recommended before a large rollout. Both can be found in the portal from: Identities > Tools:
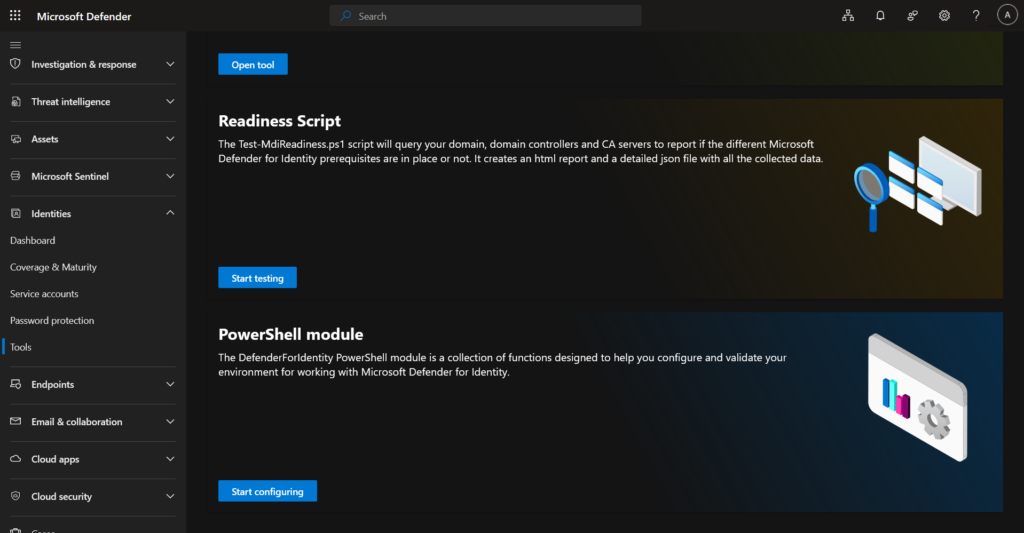
Test-MDIReadiness checks sensor prerequisites — connectivity, permissions, MDE deployment, and overall sensor readiness:
Install-Module -Name DefenderForIdentity
Test-MDIReadiness
New-MDIConfigurationReport generates an HTML report of your current Windows event auditing configuration, showing exactly which audit policies and SACL settings are missing or misconfigured:
New-MDIConfigurationReport -Path "C:\Reports" -Mode Domain -OpenHtmlReport
Test-MDIReadiness is also available directly in the Defender portal at Identities > Tools (Preview) — no download required. New-MDIConfigurationReport requires the PowerShell module installed locally.
Deploying the sensor
Activating the sensor
Microsoft recommends activating the sensor on all domain controllers, including read-only domain controllers (RODCs). For complete coverage, make sure every DC — including RODCs — has MDE deployed and the March 2026 cumulative update installed before proceeding.
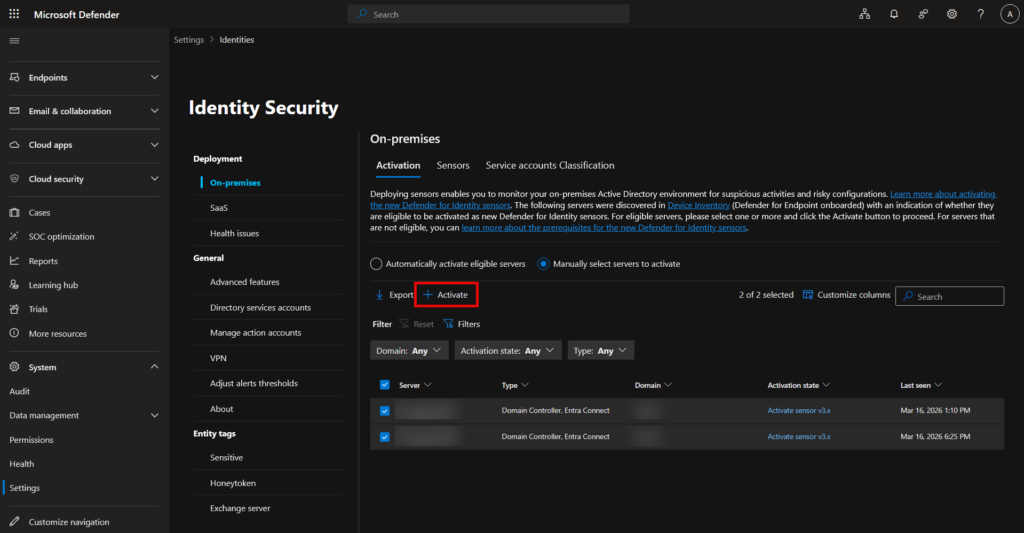
Navigate to the Microsoft Defender portal and go to System > Settings > Identities > Activation.
The portal auto-discovers your domain controllers from the Device Inventory (populated by MDE onboarding). Each server is listed with its current activation state:
| Activation state | What it means |
|---|---|
| Activate new sensor | DC is MDE-onboarded and eligible for v3.x activation |
| Install classic sensor | DC doesn’t meet v3.x requirements — use the classic installer from the Sensors page |
| OS upgrade is required | DC runs an unsupported OS version |
In some portal versions the label may show as “Activate sensor v3.x” instead of “Activate new sensor” — both mean the same thing.
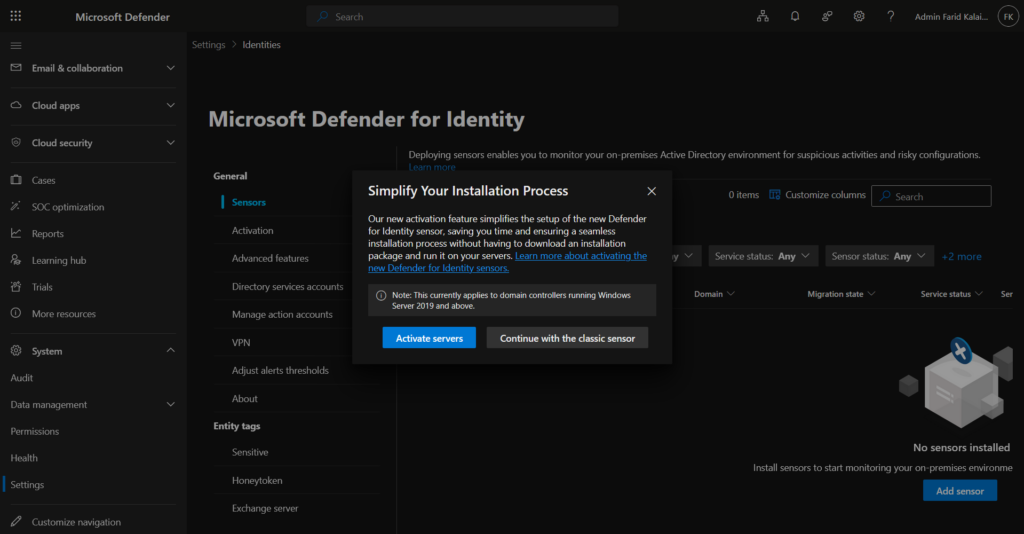
When you first land on this page with no sensors deployed, you may see a “Simplify Your Installation Process” dialog. Click Activate servers to proceed with the new activation-based flow — no installer download needed.
You’ll also see two activation modes:
- Automatically activate eligible servers — MDI activates sensors as soon as eligible DCs are discovered. Good for consistent environments.
- Manually select servers to activate — You control which DCs get activated. Recommended for phased rollouts and MSSP/MSP multi-tenant management.
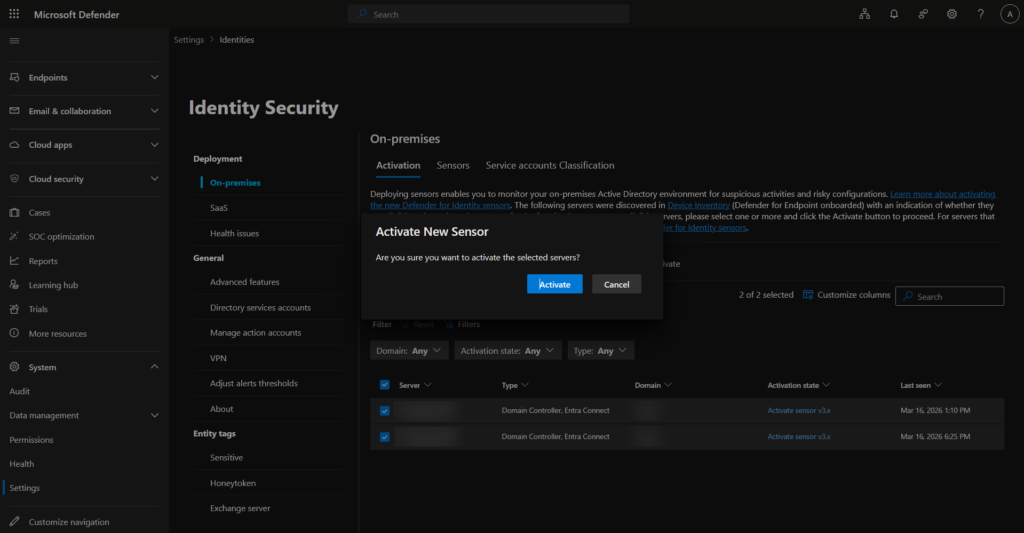
To activate:
- Select one or more domain controllers from the list.
- Click Activate in the toolbar.
- In the “Activate New Sensor” confirmation dialog, verify the selected servers and click Activate.
No installer download, no remote execution, no reboot required. When activation completes, a green success banner appears — click Click here to see the onboarded servers to go directly to the Sensors page.
Verifying sensor status
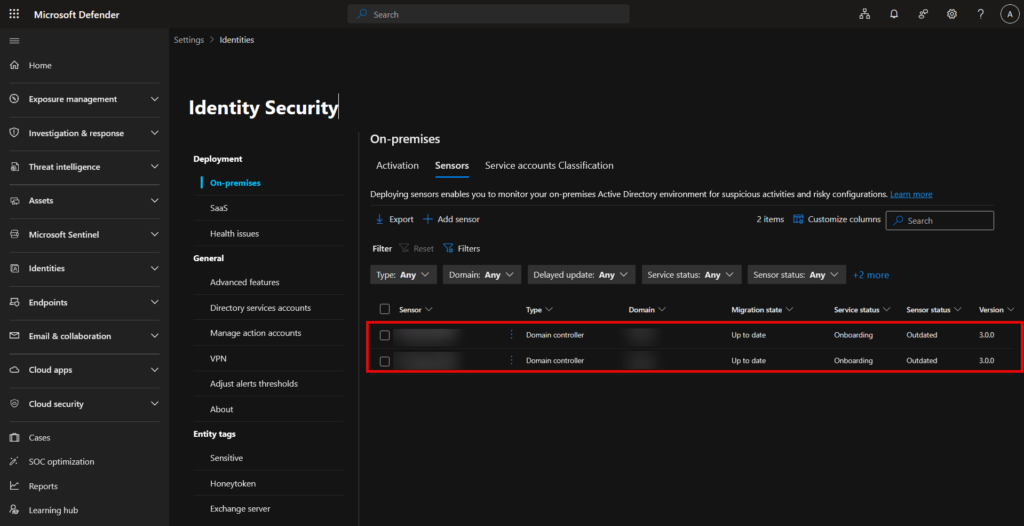
Navigate to Settings > Identities > On-premises > Sensors
After activation, sensors will initially appear with the following status — this is expected:
| Column | Initial value |
|---|---|
| Service status | Onboarding |
| Sensor status | Outdated |
| Version | 3.0.0 |
Wait 15–30 minutes and refresh. A healthy sensor will show:
| Column | Expected value |
|---|---|
| Service status | Running |
| Sensor status | Up to date |
| Version | 3.0.7.419 or later |
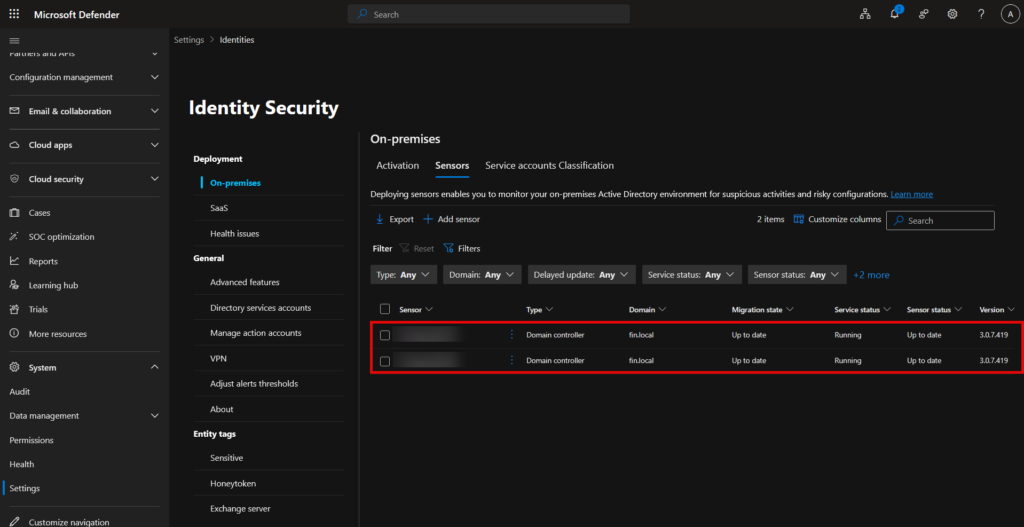
The first activation on a tenant can take up to 1 hour to show as Running. Subsequent activations typically reflect within 5 minutes. No restart is required.
Configuring RPC auditing
RPC (Remote Procedure Call) is a core Windows protocol heavily used in Active Directory for authentication, replication, and directory access. Attackers abuse it for lateral movement and privilege escalation. The v3.x sensor supports enhanced RPC auditing for advanced identity attack detections — but this must be explicitly enabled by applying the Unified Sensor RPC Audit tag via an asset rule.
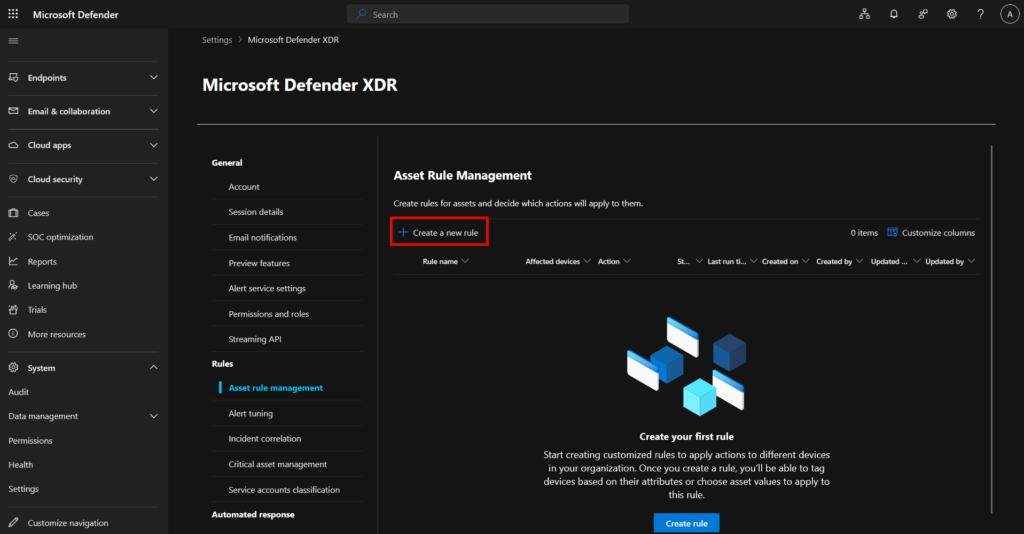
Navigate to Settings > Microsoft Defender XDR > Asset rule management and click Create a new rule
In the wizard:
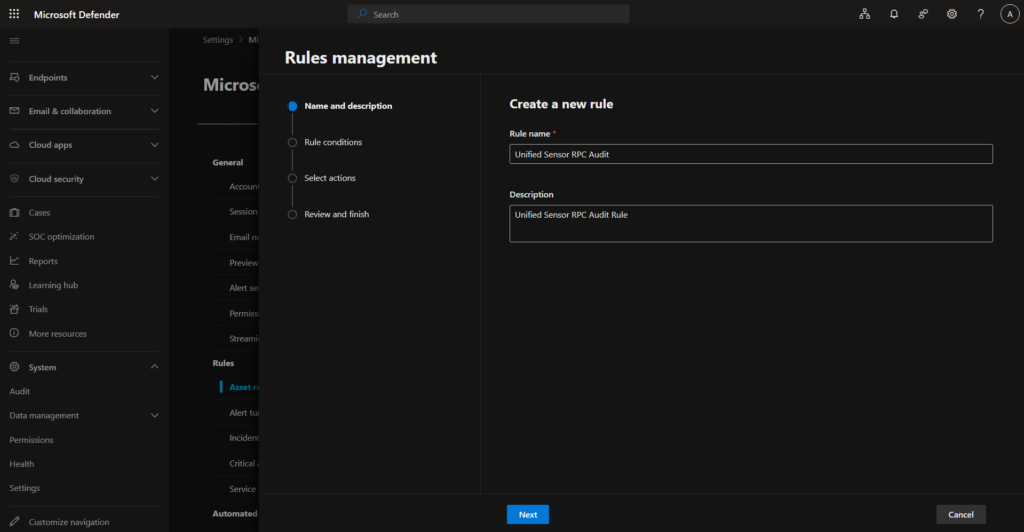
- On Name and description, enter
Unified Sensor RPC Auditas the rule name, add a description, and click Next.

- On Rule conditions, define which devices the rule targets. Use Device name with Starts with conditions to match your DC naming convention. Use OR logic to cover multiple DCs. You can also filter by Domain or Device tag. Click Next. Only target devices that already have the MDI v3.x sensor installed and running. The tag has no effect on devices without the v3.x sensor.
 Only target devices that already have the MDI v3.x sensor installed and running. The tag has no effect on devices without the v3.x sensor.
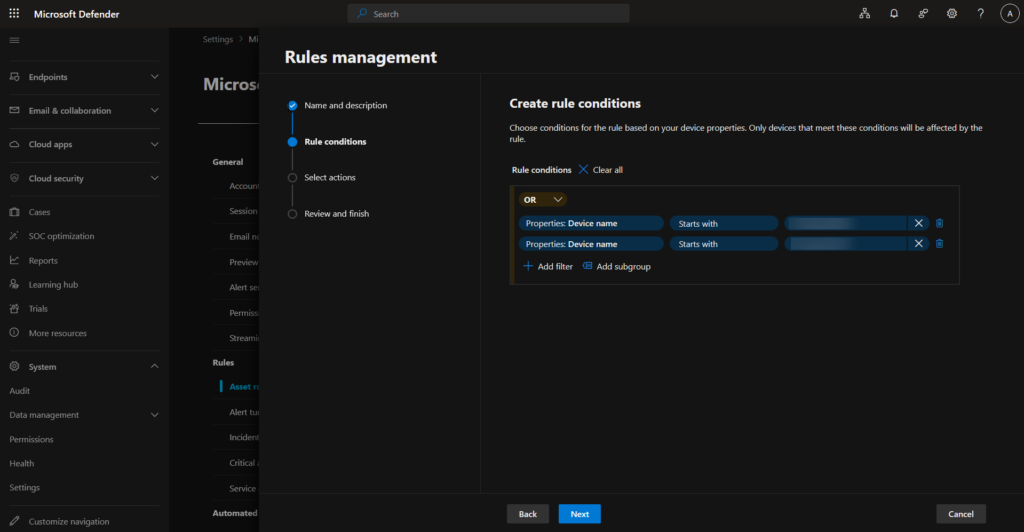
- On Select actions, expand Apply a tag and select or type
Unified Sensor RPC Audit. Click Next.


- On Review and finish, verify the rule name, tag, and number of affected devices. Click Submit.


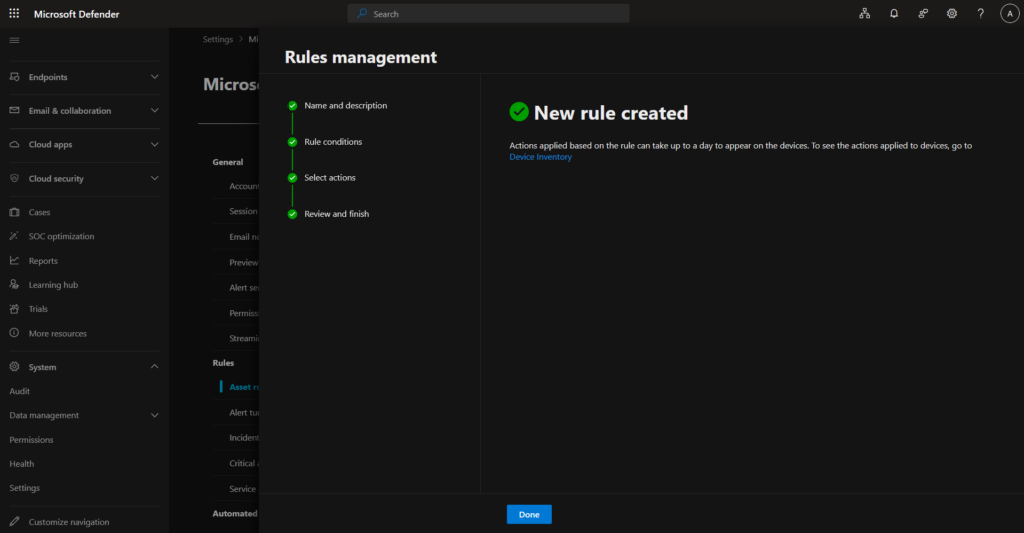
The rule can take up to 1 hour to take effect. To remove RPC auditing from a device later, delete the rule or update the conditions to exclude it.
Enabling automatic Windows auditing
Windows event log collection is the foundation of MDI’s detection engine. The sensor relies on events such as 4662 (object access), 4776 (NTLM authentication), and 4688 (process creation) to detect suspicious activity.
In the v2.x era, this required manually configuring Group Policy Objects, SACL entries on the domain root, and NTLM auditing registry values. With v3.x there’s a preview feature that handles all of this automatically.
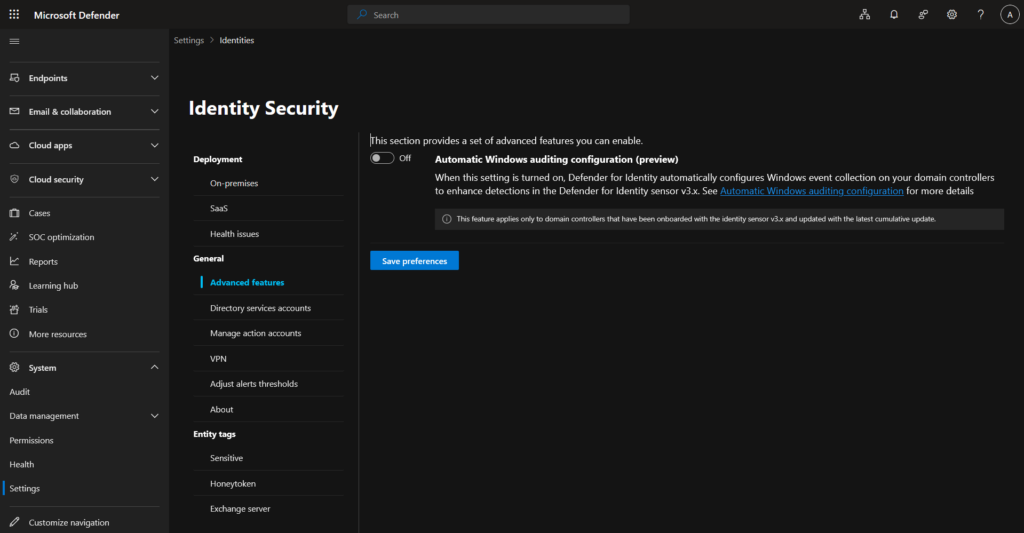
Navigate to Settings > Identities > General > Advanced features
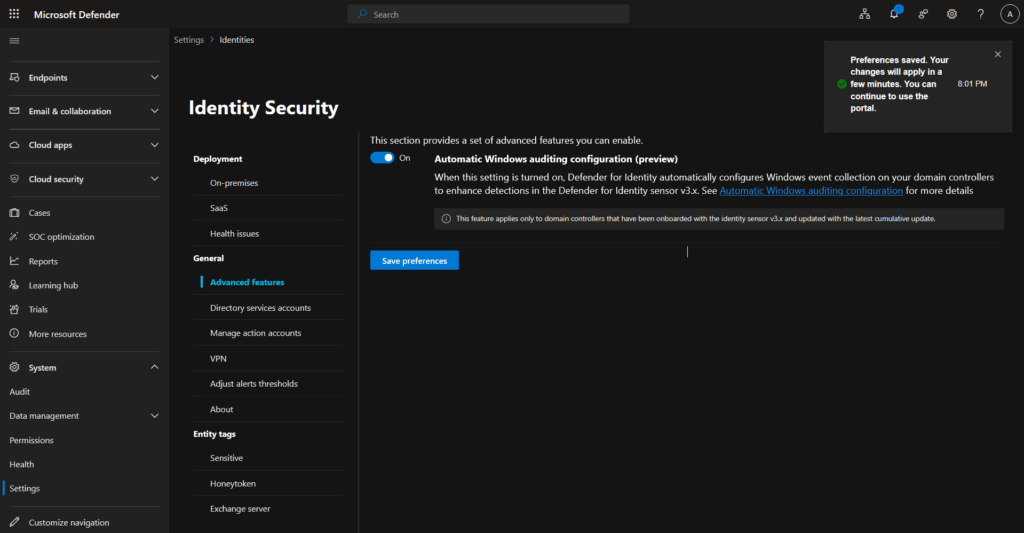
The Automatic Windows auditing configuration (preview) toggle is set to Off by default. Toggle it to On and click Save preferences.
What this configures automatically on each eligible DC:
- Directory Services advanced auditing (SACL on the domain root object)
- NTLM auditing via Windows Registry
- Domain object auditing (SACL on the Configuration partition)
- AD FS auditing (SACL on the AD FS configuration container)
- Windows audit policy subcategories via Local Security Authority (LSA) APIs
The check runs once every 24 hours, so it will self-correct any auditing drift over time — not just at initial deployment.
GPO conflict warning: GPO settings applied to domain controllers can conflict with local settings applied by the sensor. If you have existing GPOs enforcing audit policies, check for conflicts after enabling this feature. The health alerts in Settings > Identities > Health issues will surface any configuration gaps that couldn’t be auto-corrected.
This feature only applies to domain controllers with the v3.x sensor installed and updated to the latest cumulative update. Manual GPO-based configuration still works if you prefer — see the Microsoft Learn documentation.
Migration from v2.x to v3.x
If you have existing MDI v2.x sensors, this section walks through the migration. The migration itself is portal-driven and non-disruptive — the v2.x sensor keeps running until the v3.x sensor is fully ready. After migration completes, there are a few configuration steps to apply, including switching away from gMSA.
Migration prerequisites
| Requirement | Detail |
|---|---|
| Current sensor | MDI v2.x installed and running |
| Operating system | Windows Server 2019 or later |
| Cumulative update | March 2026 or later (KB5078766 for Windows Server 2022; KB varies by OS version) |
| MDE | Microsoft Defender for Endpoint deployed and active |
| DC role | Domain controller only — no additional identity roles (AD FS, AD CS, Entra Connect) |
Important: The migration wizard does not support domain controllers that also run AD FS, AD CS, or Entra Connect roles — even though v3.x itself now supports these DCs via fresh deployment. If your DC carries one of these additional roles, uninstall the v2.x sensor manually and then activate v3.x from the Activation page instead of using the Migrate button.
Common issue: If a DC doesn’t appear as “Ready for migration”, check the MDE/SENSE service version first. An outdated MDE sensor can block the migration. Update MDE to the latest version and try again.
Running the migration
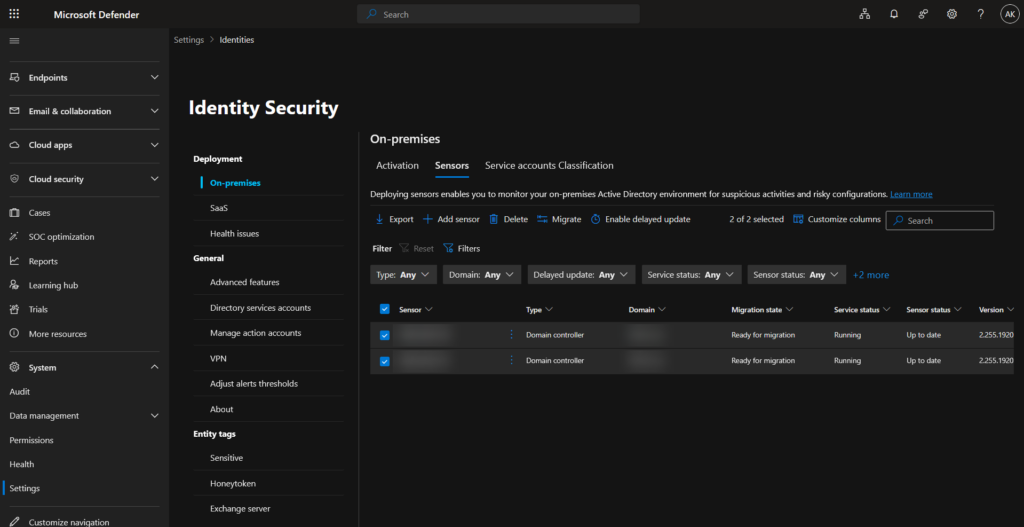
Navigate to Settings > Identities > On-premises > Sensors. Eligible servers show Ready for migration in the Migration state column.
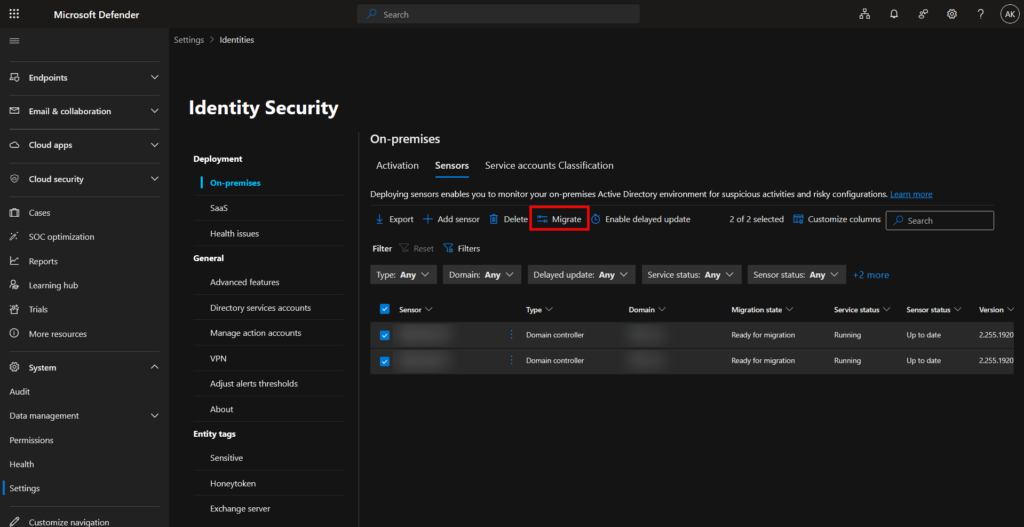
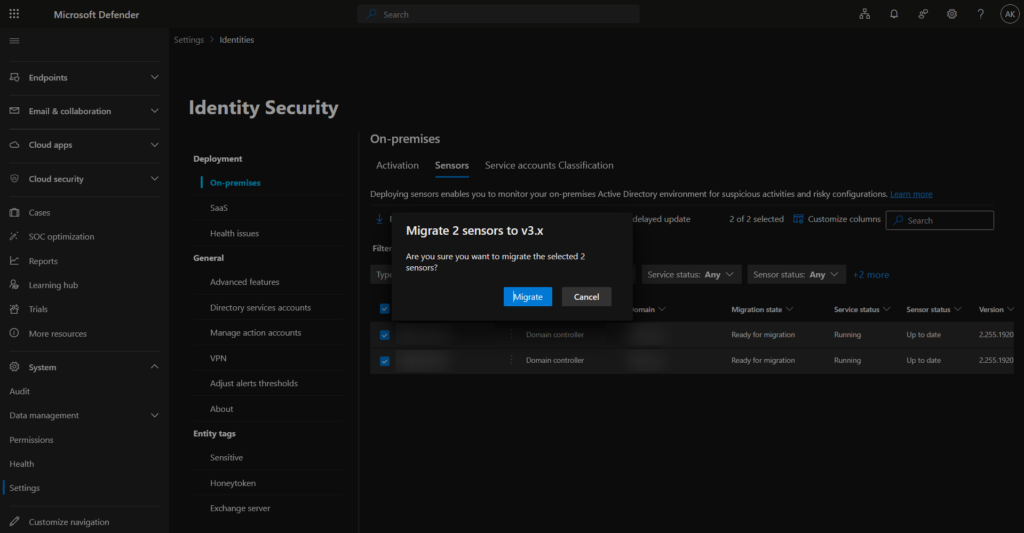
- Select the DCs you want to migrate. You can select all at once or work in batches.
- Click Migrate in the toolbar.
- In the confirmation dialog, verify the server names and click Migrate.
Migration takes up to 20 minutes per batch. During this time:
- The v2.x sensor continues running and sending telemetry — no detection gap
- The v3.x sensor is installed and initialized in the background
- Switchover happens automatically once v3.x is ready
- No reboot is required
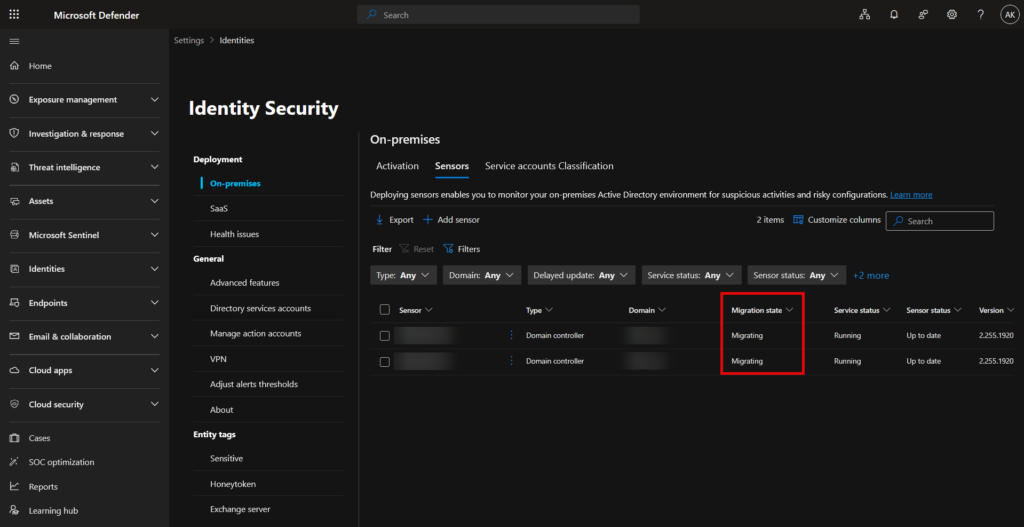
The Migration state column will progress: Ready for migration → Migrating → Already V3 sensor.
Once complete, confirm the sensors show Service status Running, Sensor status Up to date, and version 3.0.7.419 or later.
Post-migration configuration
After migration completes, apply the following configuration steps:
Remove gMSA
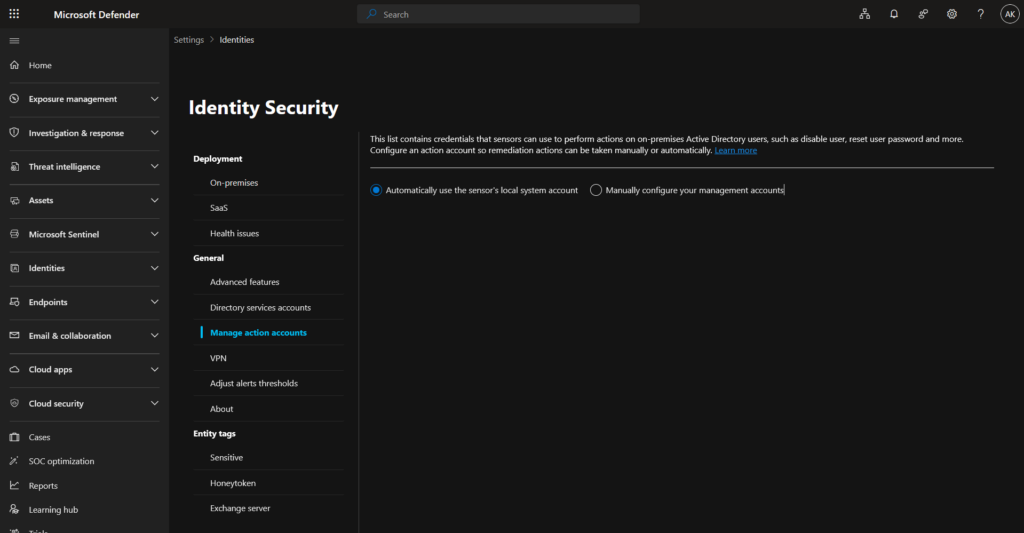
The v3.x sensor uses the Local SYSTEM account for all Active Directory queries and response actions — there is no longer a need for a Group Managed Service Account.
Critical: If gMSA remains enabled after migration, response actions will stop working. This includes disabling compromised accounts, resetting passwords, and forcing password expiration — both automated and manual.
Navigate to Settings > Identities > General > Manage action accounts, select Automatically use the sensor’s local system account, and click Save.
If you’re running a phased migration with some DCs still on v2.x, switch all sensors to local system accounts now. Mixing gMSA and local system in the same environment causes inconsistencies in response actions.
Configure RPC auditing
If the Unified Sensor RPC Audit asset rule doesn’t exist yet, create it following the steps in the Configuring RPC auditing section above. If the rule already exists, update the conditions to include the newly migrated DCs.
Enable automatic Windows auditing
Navigate to Settings > Identities > General > Advanced features and enable the Automatic Windows auditing configuration (preview) toggle if not already active. Existing auditing settings from the v2.x sensor are preserved during migration, but enabling automatic auditing will validate and correct any gaps.
Cleaning up the v2.x sensor
After confirming the v3.x sensor is healthy, remove the legacy components from each DC.
Uninstall the v2.x sensor: Go to Settings > Apps (or Add/Remove Programs) and uninstall “Azure Advanced Threat Protection Sensor”.
This may require a server reboot. Plan it during a maintenance window. After uninstalling, the sensor entry is automatically removed from the portal. If it persists, delete it manually from Settings > Identities > Sensors.
Remove Npcap: The v2.x sensor installed Npcap for network packet capture. The v3.x sensor does not use it. Unless another application on the DC requires Npcap, uninstall it via Add/Remove Programs.
Health alerts
After deployment, keep an eye on Settings > Identities > Health issues for these two alerts:
| Alert | Cause |
|---|---|
| Sensor v3.x RPC audit misconfigured | The Unified Sensor RPC Audit asset rule is missing or not matching the DC |
| Windows event auditing gaps | Automatic auditing found issues it could not auto-correct — typically a conflicting GPO |
Frequently asked questions
Do I need to uninstall v2.x before activating v3.x?
For fresh deployments on a clean DC, yes — a DC cannot have both sensors simultaneously. For migrations, the portal wizard manages the transition automatically without a manual uninstall first.
What are the known limitations in v3.x?
Known limitations of v3.x are: no VPN integration, no syslog notifications, and limited Azure ExpressRoute compatibility.
Will I lose detection coverage during migration?
No. The v2.x sensor continues running and reporting until the v3.x sensor is fully initialized. There is no detection gap.
My DC runs Windows Server 2016 — can I use v3.x?
No. v3.x requires Windows Server 2019 or later with the March 2026 cumulative update. Either upgrade the OS or continue with the v2.x sensor.
Is the March 2026 cumulative update a hard requirement?
Yes. Without it, activation or migration will fail. Apply it before starting.
Can I still configure Windows auditing manually?
Yes. Automatic auditing is a preview feature and optional. Manual GPO-based configuration continues to work with v3.x.
What about AD FS or AD CS servers?
For standalone servers not running a DC role, continue with v2.x — v3.x does not apply there. For DCs that also run AD FS, AD CS, or Entra Connect roles, v3.x support is rolling out as of March 2026. Note that the migration wizard does not support these DCs — they require a fresh v3.x deployment: uninstall v2.x manually, then activate v3.x from the Activation page.
The RPC audit rule is applied — how do I verify it’s working?
Check Settings > Identities > Health issues. If the tag is correctly applied and the sensor is running, the “Sensor v3.x RPC audit misconfigured” alert will not appear. Allow up to 1 hour after rule creation.
References
Install Microsoft Defender for Identity (classic v2.x guide) — modernsecurity.nl
Defender for Identity sensor v3.x prerequisites — Microsoft Learn
Activate the Defender for Identity sensor v3.x — Microsoft Learn
Migrate from sensor v2.x to sensor v3.x — Microsoft Learn
Configure Windows event collection — Microsoft Learn
What’s new in Microsoft Defender for Identity — Microsoft Learn
Conclusion
The Microsoft Defender for Identity sensor v3.x is a major improvement in how identity security is deployed and operated. By building on MDE infrastructure already present on your domain controllers, Microsoft has removed most of the friction that made MDI deployments time-consuming. No more installer packages, no gMSA accounts to manage, no manual audit GPOs, no Npcap to maintain.
For MSSP and enterprise teams managing MDI across multiple tenants, this simplification is significant. Activation is portal-based and takes minutes. Post-deployment configuration — RPC audit tagging and automatic Windows auditing — runs without touching Group Policy.
If you’re still running v2.x, the migration path is now stable and production-ready. Check the March 2026 cumulative update, confirm MDE is deployed and healthy on your DCs, and use the built-in migration wizard. Once migration completes, switch from gMSA to local system and apply the RPC audit tag. The v2.x sensor stays running until v3.x is ready — no maintenance window needed.


1 comment