



Introduction
Managing complex security incidents has always been a challenge for Security Operations Centers (SOCs). From correlating alerts to assigning tasks and documenting steps, analysts often work across disparate tools, losing context and efficiency. To address this, Microsoft has introduced native Case Management within its unified security operations platform. This feature allows security teams to group related incidents, assign tasks, define custom workflows, and collaborate more effectively during investigations.
As someone deeply involved in security operations, I’m very happy and genuinely pleased to see this functionality being introduced within the Microsoft Ecosystem – as I normally use use tooling like TheHive in between, because Microsoft was lacking it’s case management. It’s a welcome improvement for SecOps teams everywhere.
In this post, I will provide a comprehensive, hands-on walkthrough of Case Management in Microsoft’s unified SOC platform. I’ll demonstrate how to use the new features, explain best practices, and show how to leverage this functionality to strengthen your security operations. This guide is based on the latest updates from Microsoft and is intended for security professionals looking to modernize and scale their incident response process.
What is Microsoft case management?
Microsoft case management is a centralized feature that supports structured security investigations within the unified security operations platform. It offers teams better visibility, accountability, and documentation when responding to complex threat scenarios. Instead of handling incidents in isolation, case management lets analysts connect the dots, document their findings, and collaborate more effectively.
Case Management is a new, native capability integrated into the Microsoft Defender portal, built specifically to streamline investigations. It is designed to centralize context from incidents and alerts, assign tasks, and support end-to-end tracking of remediation efforts. Unlike relying solely on individual incidents in Microsoft Sentinel or Defender XDR, Case Management provides a more structured and collaborative approach to security investigations.
Key features:
- Centralized case tracking across Microsoft Sentinel and Microsoft Defender XDR
- Custom case status values to reflect your organization’s workflows
- In-case task assignment with deadlines and ownership
- Linking of multiple incidents to a single case
- Role-based access controls for visibility and management
- Built-in timeline and audit trail for case actions and comments
These features are intended to support larger SOC teams who deal with overlapping investigations and need a system that goes beyond traditional incident-based response.
Prerequisites
Before using Case Management, make sure the following prerequisites are met:
- A Microsoft Sentinel workspace must be connected to the Microsoft Defender portal
- Case Management is available only through the Defender portal, not the classic Azure portal
- Proper role-based access control (RBAC) must be configured
Required permissions and configuration:
| Role | Description | Required For |
|---|---|---|
| Security Reader | Read-only access to incidents and cases | Viewing case queue and details |
| Incident Responder | Can update and take action on incidents and cases | Assigning tasks, updating statuses |
| Microsoft Sentinel Contributor | Can manage content and configuration in Sentinel | Linking Sentinel incidents to cases |
| Custom Role (with specific permissions) | Tailored access control based on tasks | Fine-grained task management and access |
Permissions required for custom roles include:
- View and manage incidents
- Create and manage cases
- Assign and complete tasks
- View and edit timelines
Ensure roles are scoped appropriately (e.g., at the tenant, M365 Defender, or Sentinel level). Navigate to Permissions > Roles & Scopes in the Defender portal to assign or validate access.
For multi-tenant or MSSP environments, use Azure Lighthouse or delegated access models to ensure secure and compliant access.
Step-by-step guide: using Microsoft case management in practice
The hands-on examples below demonstrate how Microsoft case management functions in a real-world SOC environment. Whether you’re part of a blue team, an MSSP, or an incident response unit, these steps show how to operationalize Microsoft Defender and Sentinel’s unified case management.
Below is a hands-on walkthrough. These steps can be followed directly within your own Microsoft 365 security tenant.
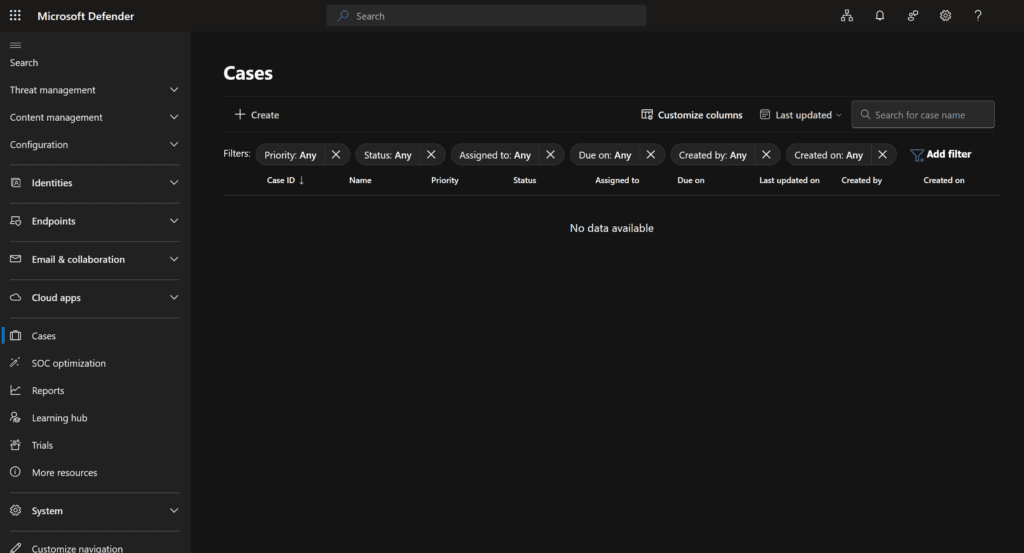
Step 1: Access the case management dashboard
Log in to the Microsoft Defender portal at https://security.microsoft.com.
Navigate to “Cases” on the left-hand navigation pane. Click and open “Cases” You will now see a dedicated case queue.
This is where you can filter, search, and sort existing cases (or create a new one).
Step 2: Create a new case
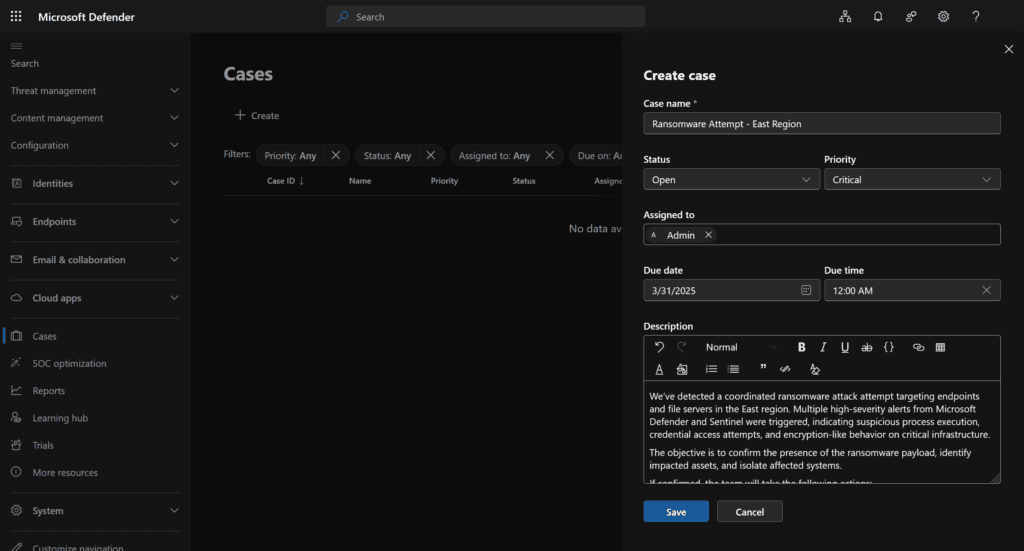
Click the “+ Create case” button.
Fill in the necessary metadata, including:
- Case name (e.g., “Ransomware Attempt – East Region”)
- Description
- Priority
- Owner or team
- Tags or classifications (optional)
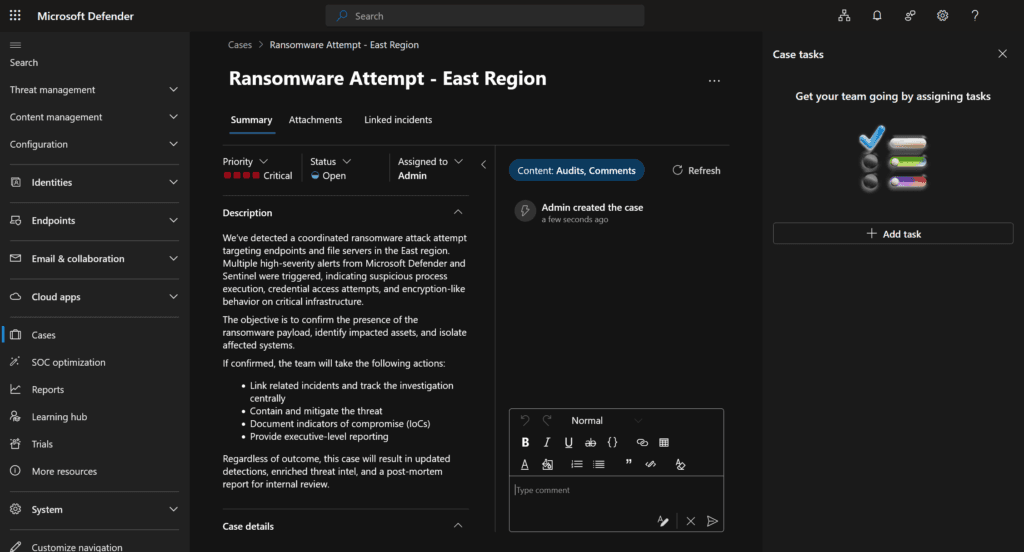
Click “Save” to save your case. It will now appear in the case queue.
Step 3: Link incidents to a case
Open an existing incident that you want to associate with the case. Click on “Linked incidents” then choose “Link incidents”
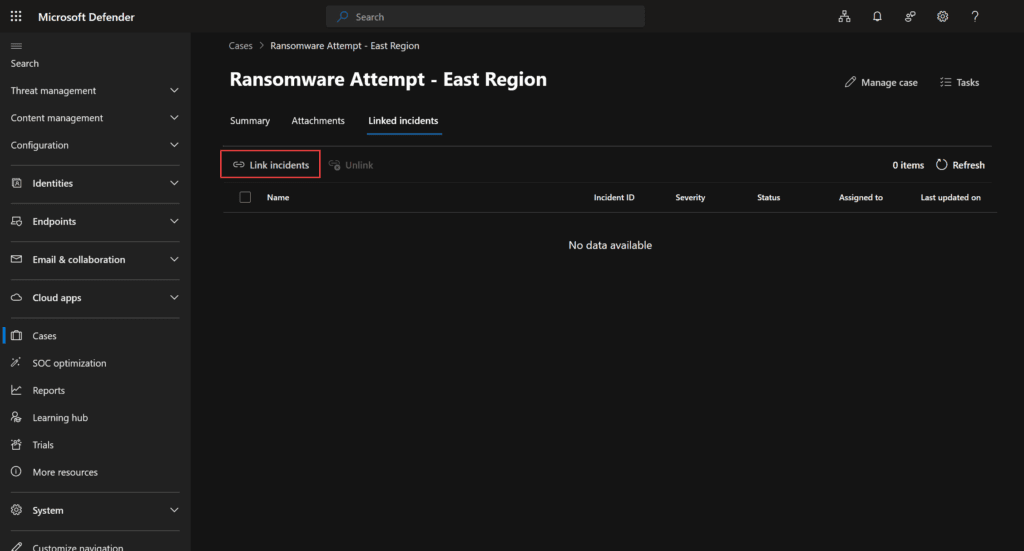
Select the relevant case from the dropdown list or create a new one directly from this screen. Once linked, the incident will now appear in the case overview.
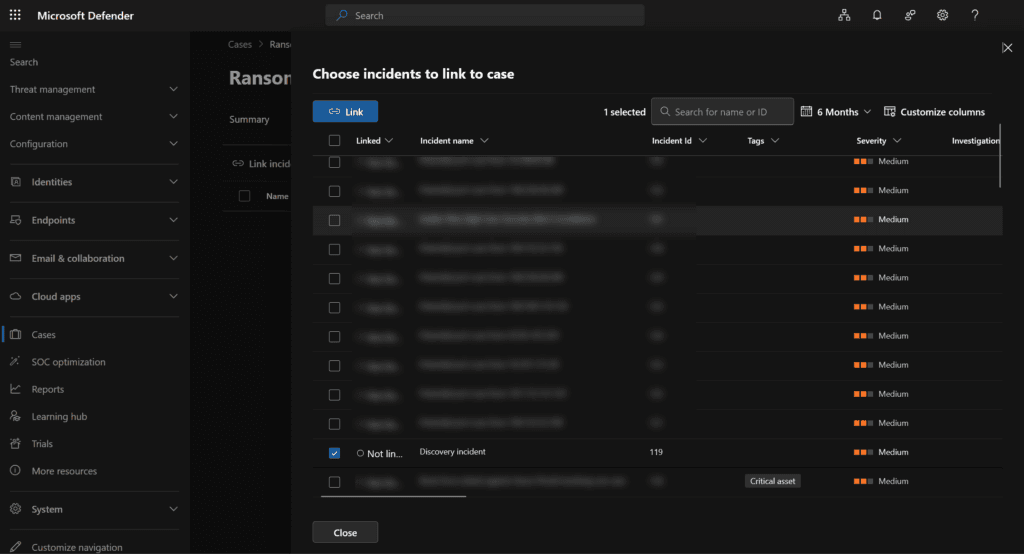
Repeat this for additional incidents that are part of the same investigation. This is especially useful for campaigns involving multiple endpoints, users, or threat vectors.
Step 4: Add and assign tasks
Navigate to your case and go to the “Tasks” tab. Click “Add task” and define a specific investigation or remediation action.
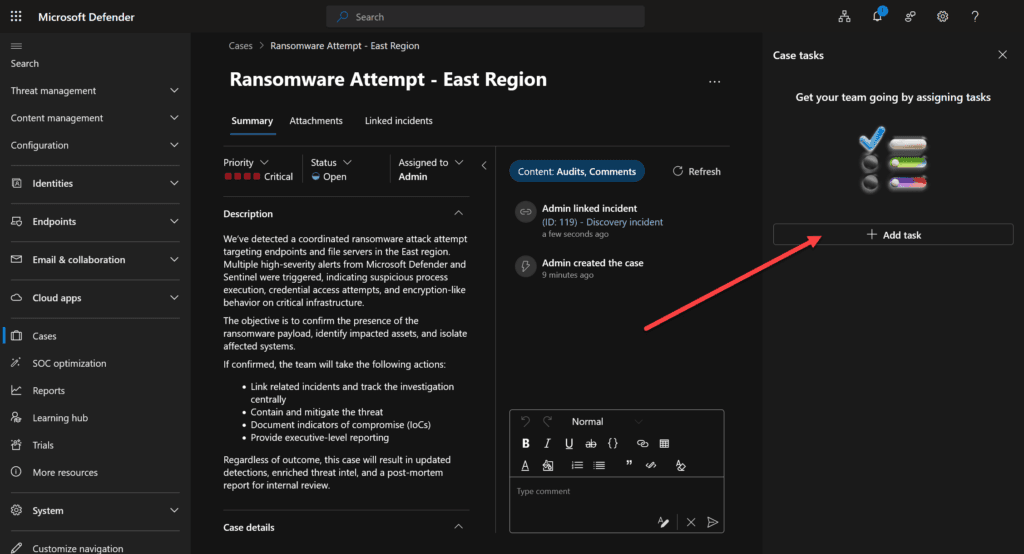
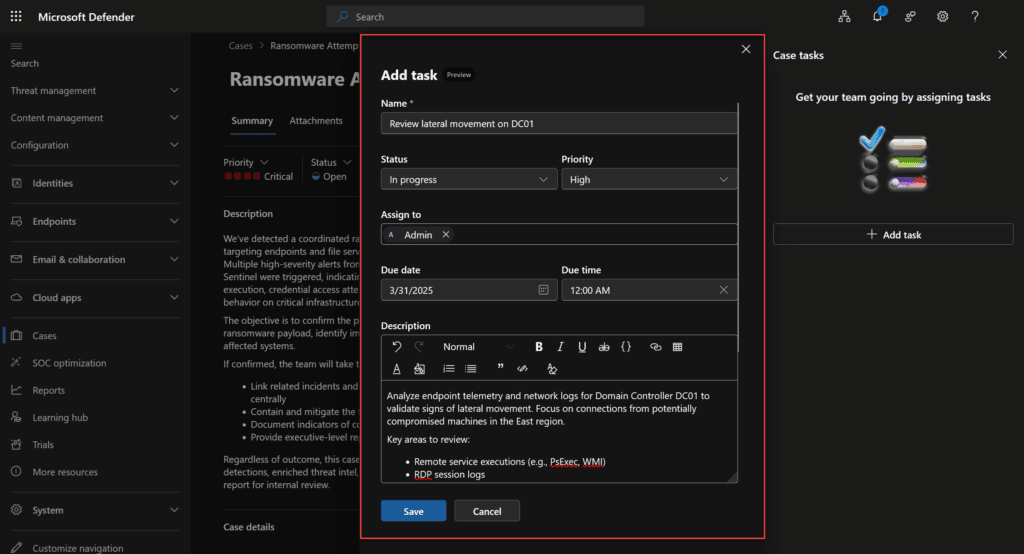
Specify:
- Task title (e.g., “Review lateral movement on DC01”)
- Description
- Assigned analyst
- Due date
You can create multiple tasks per case and monitor their progress in the case overview
Step 5: Define custom case statuses
Go to Settings > Case Management
Create new custom status values to reflect your organization’s process.
For example:
- Triage
- Under Investigation
- Awaiting IR Team
- Resolved – Under Review
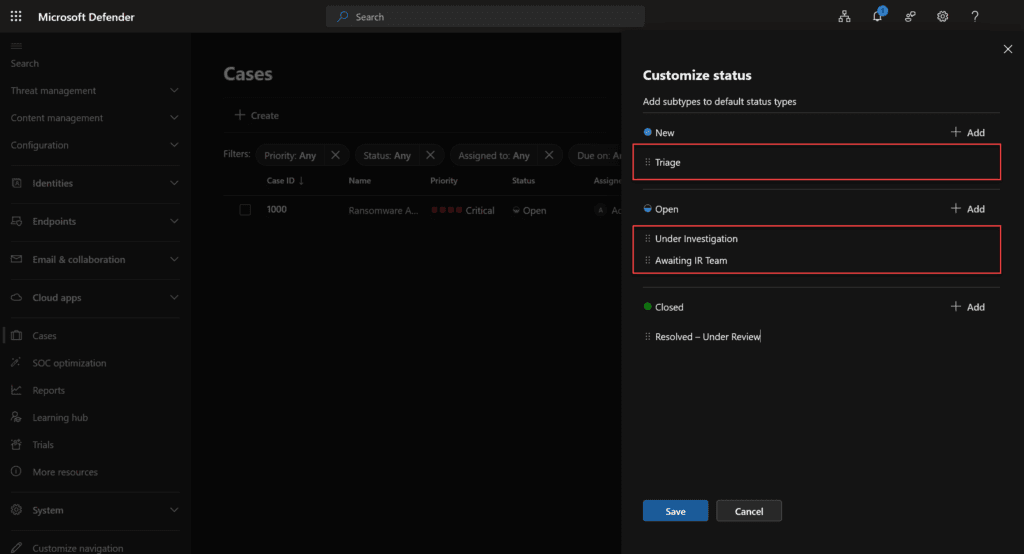
These status values allow you to move a case through predefined lifecycle stages, improving operational clarity.
Step 6: Monitor case progress and close the case
Each case has a built-in activity timeline that logs:
- Linked incidents
- Task updates
- Analyst comments
- Status changes
Use this view during team handovers or incident review meetings to maintain continuity.
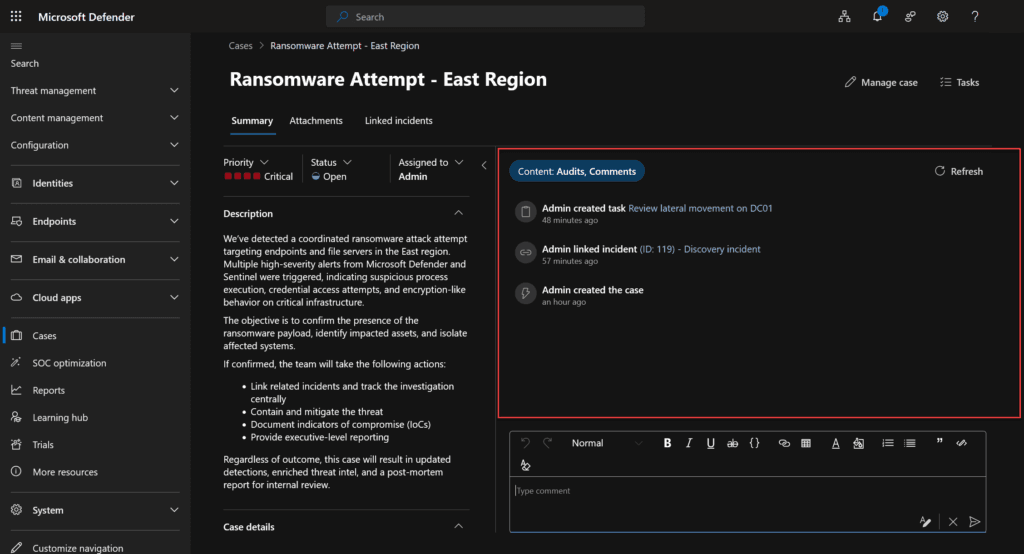
Once all tasks are complete and incidents are resolved, set the case status to “Closed” or your designated final state (incidents that are linked will NOT be closed – be aware of this for now).
Best practices for Microsoft case management
Case Management is not just a tool but a process enabler. The following best practices will help you get the most value out of it:
Group incidents by campaign or kill chain
Instead of handling alerts one by one, group related incidents under a single case. For example, a phishing campaign that affects multiple users can be tracked centrally with linked incidents.
Assign responsibility early
Make sure each case has an owner. Use the task system to assign specific actions with deadlines. This helps avoid duplication and ensures accountability.
Use custom statuses to reflect process maturity
Different organizations have different investigation lifecycles. Customize your case statuses to match internal playbooks or NIST/CSF response phases.
Limit access based on sensitivity
Use RBAC to restrict access to sensitive cases (e.g., involving executives or insider threats). This helps ensure confidentiality and integrity.
Document everything
Encourage analysts to log decisions, comments, and task outcomes in the case timeline. This helps build institutional knowledge and aids in post-incident reviews.
What’s next for Microsoft case management
This initial release is just the first step. Microsoft welcomes feedback from the community as it continues to expand this unified, security-focused case management experience tailored to SecOps workflows.
As Microsoft builds on this foundation, these upcoming capabilities are being prioritized:
- Automation and APIs
- Multi-tenant support
- Adding more evidence types and collection options
- Workflow customization
- Additional integrations within the Defender portal
These enhancements will help case management become even more powerful for security teams of all sizes. Stay tuned for more information in the coming months
Extra resources
Official Case Management Overview – Microsoft Learn
Improve SecOps Collaboration with Case Management
Microsoft Defender XDR Documentation
Final thoughts
Microsoft’s native case management brings much-needed structure to investigations. Personally, I’ve found it incredibly refreshing to have this level of control and clarity built directly into the Defender and Sentinel experience. By combining context-rich incident handling with task assignments and flexible workflows, case management helps transform chaos into coordination.
This new feature feels especially valuable for those of us who live and breathe SecOps every day. Whether you’re a solo analyst or part of a 24/7 SOC, having an integrated way to track progress, collaborate with teammates, and close cases confidently is a major leap forward.
For me, adopting case management isn’t just a helpful improvement — it feels like Microsoft is finally building for the way real security teams operate. Start exploring the new case management feature today. It’s intuitive, powerful, and — in my view — a must-have for any modern security operations environment.