
Every SOC lead has the same automation backlog problem. There is a long list of response actions everyone agrees would help, and a much shorter list of people who actually know Logic Apps well enough to build them. The playbook generator in Microsoft Sentinel is Microsoft’s answer to that gap: describe what you want in plain language, and get back a working, testable, documented playbook without writing Logic Apps JSON by hand.
I have been through the setup a few times now, both in a lab tenant and in a production Defender portal, and this post walks through the whole process end to end: what the feature is, what changed in August 2026, every prerequisite, the full integration profile setup, and a complete demo where I build a read-only VirusTotal URL enrichment playbook from an empty tenant to a live automation rule.
What is the playbook generator?
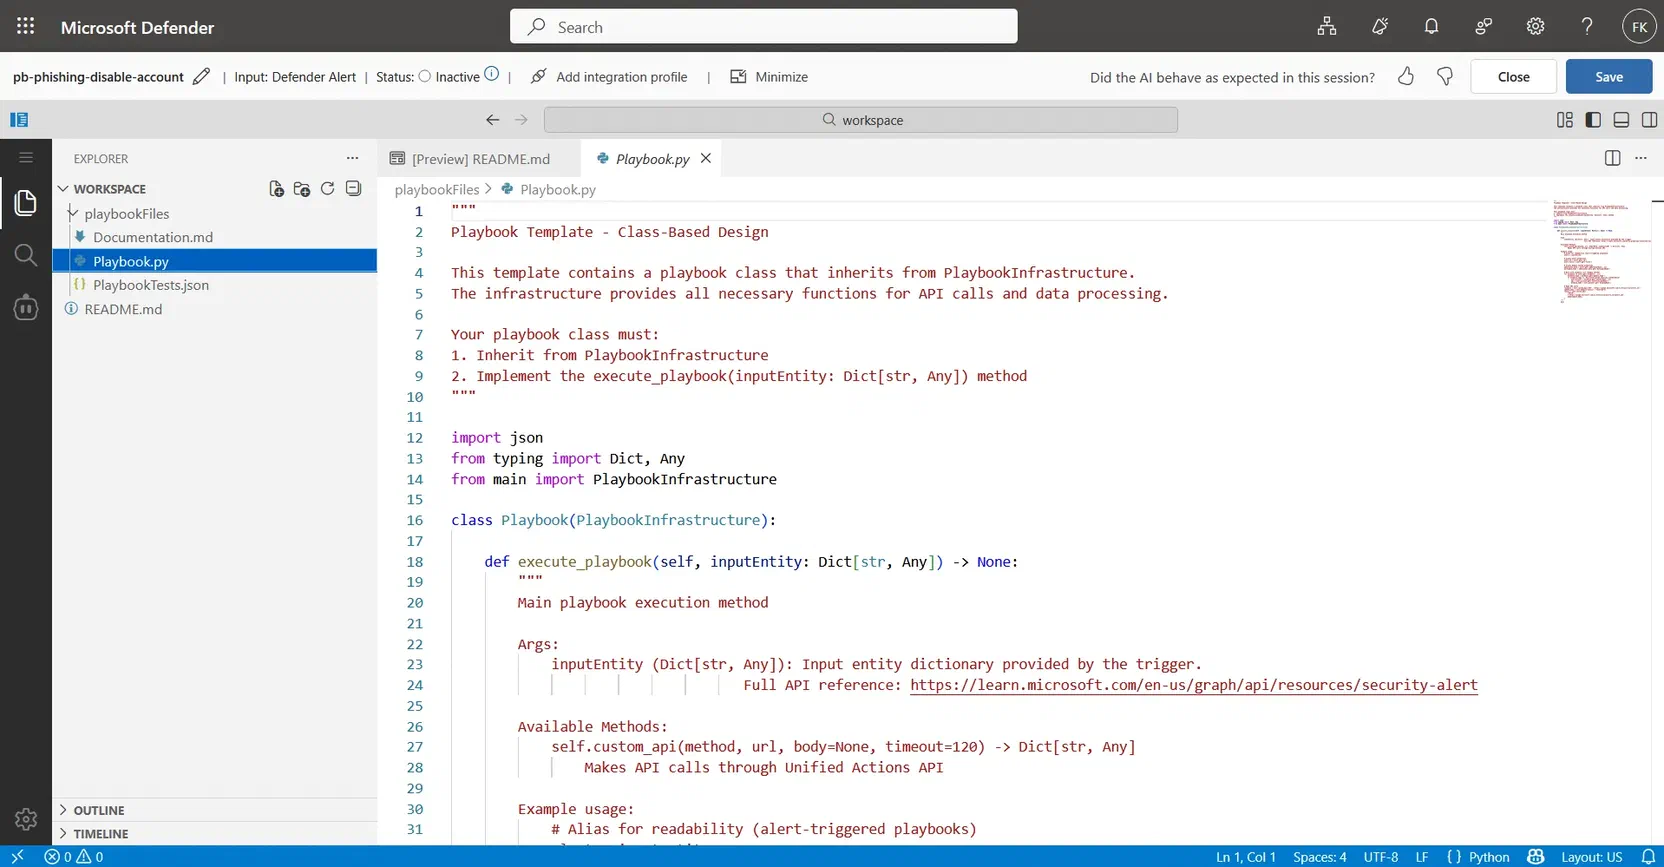
The playbook generator is a SOAR authoring experience built on Cline, an AI coding agent hosted inside an embedded VS Code environment in the Defender portal. Instead of dragging connectors around a Logic Apps canvas, you describe the automation logic in a chat interface, and the generator produces a validated, code-based playbook in Python, complete with:
- The complete playbook code
- Automatically generated tests, run against a real alert you provide
- Documentation and a visual flow diagram
- Entity and data mapping based on the alert schema
Generated playbooks accept alert data as input and can call out to Microsoft Graph, Azure Resource Manager, or any third-party API you configure through an integration profile. You do not need prior coding experience, though it helps to be comfortable with concepts like VS Code and Entra ID app registrations, since you will touch both.
Does it cost SCU?
No. As of the August 2026 documentation update, Microsoft states it plainly: the playbook generator does not require a separate Microsoft Security Copilot license or Security Compute Units. This used to be more confusing than it needed to be. Earlier in 2026, the feature technically did not bill SCUs, but your tenant still needed Security Copilot enabled with capacity provisioned as a prerequisite, a distinction that tripped up a lot of people, myself included the first time I set this up.
That prerequisite is gone now. There is no dedicated Security Copilot workspace to provision, no capacity to configure, no data sharing sliders to set. If your tenant has a Sentinel workspace onboarded to the Defender portal, you meet the environment requirement, full stop.
What changed in August 2026
Microsoft published an update on the Sentinel blog and updated the official documentation on August 7, 2026, confirming that Security Copilot enablement is no longer required to use the playbook generator. The older setup path, provisioning a dedicated Security Copilot workspace purely as a technical gate, has been removed from the documentation entirely, not just deprioritized. The feature is now available to all Microsoft Sentinel customers in the Defender portal out of the box, with no Security Copilot dependency and no additional cost.
The required permissions also simplified as part of this change. The older RBAC requirement (Detection tuning manage, plus Security Copilot read) has been replaced with a single Automation permission, covered in the prerequisites below.
If you went through the old Security Copilot workspace setup before this update, nothing breaks, your existing configuration keeps working. If you never got around to trying the feature because provisioning Security Copilot capacity felt like overkill just to test it, that barrier is gone. The steps below reflect the current, simplified setup.
Prerequisites at a glance
Everything you need before you open the playbook generator for the first time, in one table.
| Category | Requirement | Notes |
|---|---|---|
| Environment | Microsoft Sentinel workspace onboarded to the Microsoft Defender portal | The Azure portal path does not support the playbook generator. If you are still Azure portal-only, onboard to Defender first. |
| License / cost | None beyond your existing Sentinel workspace | No Security Copilot license, no SCUs, no additional cost. Confirmed directly in the Microsoft documentation as of August 2026. |
| Permission: generate and deploy playbooks | Automation Playbooks (Read and Write) in Microsoft Defender unified RBAC | Assign under the Automation permission group. |
| Permission: author automation rules | Microsoft Sentinel Contributor | Scoped to the workspace or resource group where the rules will live. |
| Identity | An Entra ID app registration with a client secret | You create this yourself in step 1, needed for the Graph integration profile. |
| Familiarity (not a hard requirement) | Comfort with VS Code and Entra ID app registration | No coding experience required, but these two concepts come up constantly. |
One operational note that is easy to miss: RBAC assignments can take up to two hours to propagate. If you are demoing this to a customer or a stakeholder, assign the permissions the day before, not five minutes before the call.
Step 1: Register an Entra ID app for Graph access
Integration profiles are what let a generated playbook actually call out to an API. Almost every playbook touches Microsoft Graph at minimum (to update incidents, disable accounts, send notifications), so this is where you start regardless of what the rest of the playbook does.
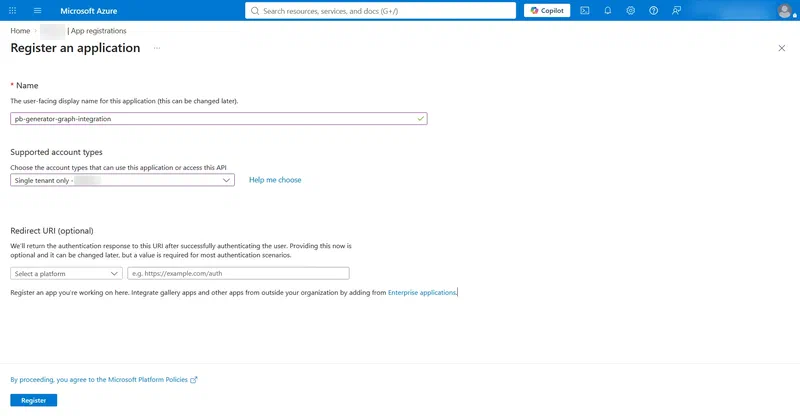
Sign in to the Azure portal and go to Microsoft Entra ID > Manage > App registrations.
Select New registration.
Give it a clear name, for example
pb-generator-graph-integration, so it is recognizable later when you are auditing app registrations. Leave the default account type and redirect URI settings unless you have a specific reason to change them.
- Select Register.
- On the app’s Overview page, copy two values and store them somewhere safe for the next step:
- Application (client) ID
- Directory (tenant) ID
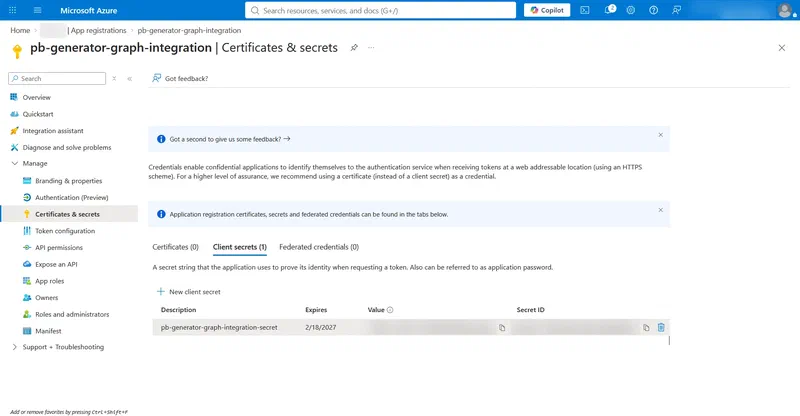
- Go to Manage > Certificates & secrets > Client secrets.
- Select New client secret, give it a descriptive name (include the expiration date in the name, it saves you a lookup later) and an expiration period, then select Add
- Immediately copy the secret Value, not the Secret ID. You cannot retrieve the value again once you leave the page. If you lose it, you will need to generate a new secret.
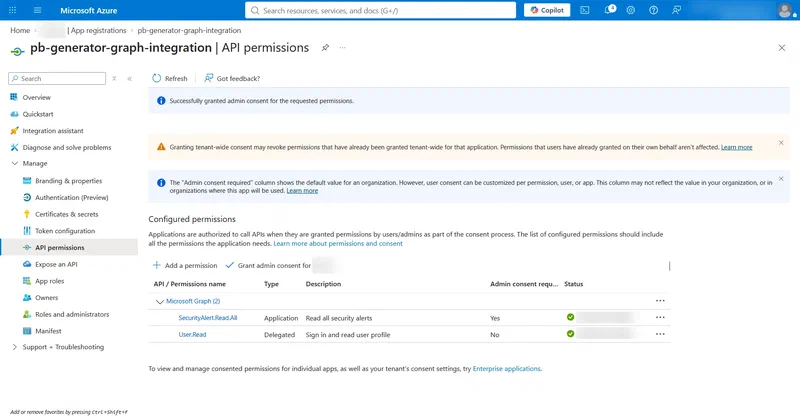
- While you are in the app registration, go to API permissions and add the Microsoft Graph application permissions your playbook will need. At minimum, add
SecurityAlert.Read.All. If your playbook will disable accounts or send notifications, also add the relevant Graph permissions for those actions (User.ReadWrite.All,Mail.Send, and so on), then select Grant admin consent.
Step 2: Create the integration profile
With the app registration in place, connect it to Sentinel as an integration profile.
- In the Defender portal, go to Microsoft Sentinel > Configuration > Automation
- Select the Integration Profiles tab
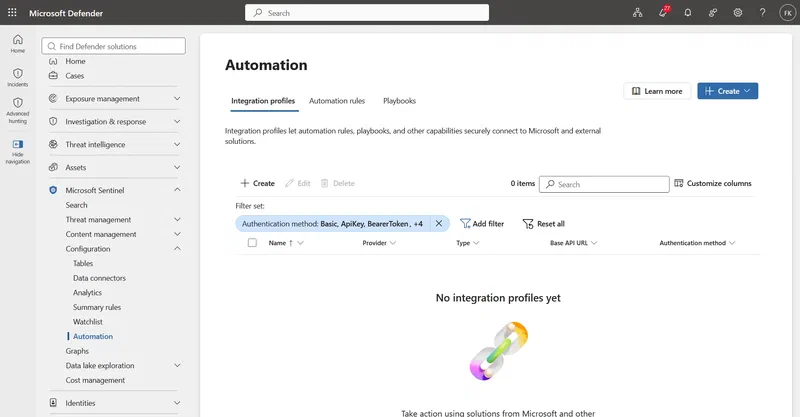
- Select Create. This opens the wizard on the Provider step
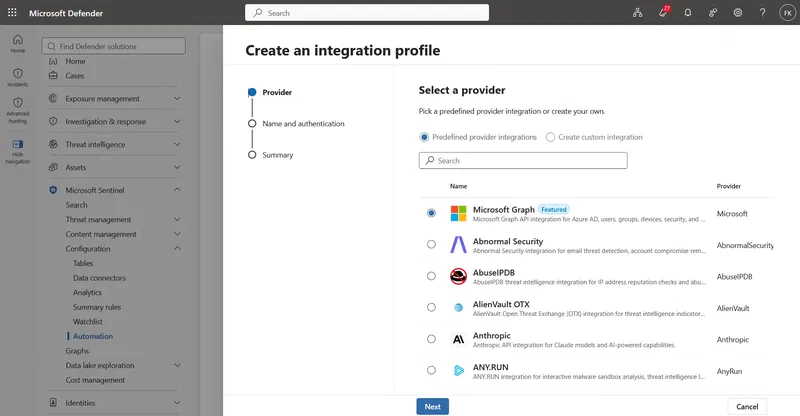
- Under Select a provider, leave Predefined provider integrations selected and search for or scroll to Microsoft Graph, marked as Featured in the list. Select it, then select Next.
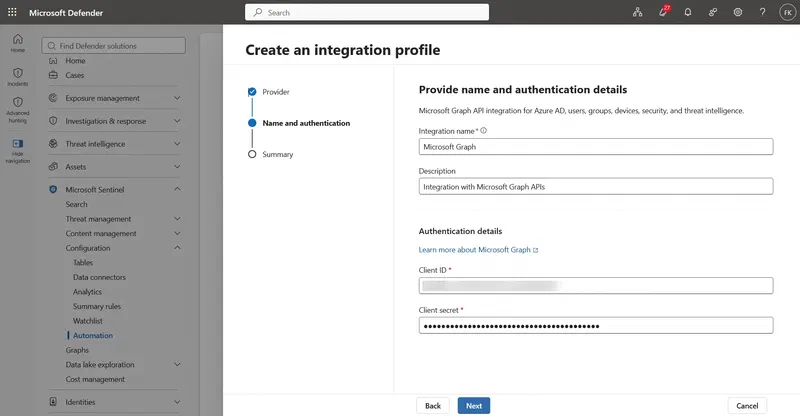
- Fill in the fields below:
| Field | Value |
|---|---|
| Integration name | Something descriptive, for example “Graph Integration” |
| Description | Short description, for example “Integration with Microsoft Graph APIs” |
| Client ID | The Application (client) ID from step 1 |
| Client secret | The client secret value from step 1 |
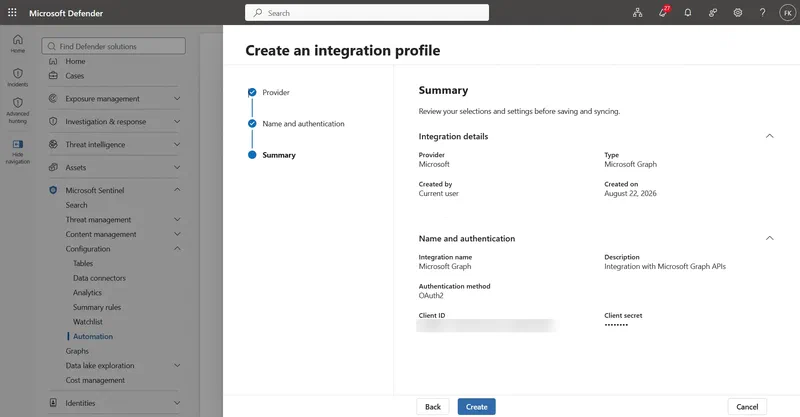
- Select Next to reach the Summary step, review the details, and select Create
If your playbook needs to reach beyond Graph, for example a ticketing system, a chat platform, or a threat intel enrichment API, check the predefined provider list first, plenty of common services (AbuseIPDB, AlienVault OTX, and more) are already in there and only ask for a name and credentials, no base URL or auth method to configure.
If you ever need a service that is not in the predefined list, switch to Create custom integration instead, that is where you would manually enter a base URL and pick an authentication method from scratch.
Repeat this same wizard for each service before you start generating the playbook. One thing worth planning for either way: you cannot change the API URL or authentication method after a profile is created, only the name and description, so pick the right provider (or double-check a custom base URL) before you finish the wizard.
Step 3: Start the playbook generator
- In the Defender portal, go to Microsoft Sentinel > Configuration > Automation > Playbooks
- Select Create > Playbook Generator
- Give the playbook a clear, descriptive name. I use a naming convention like
pb-<trigger>-<action>, for examplepb-phishing-disable-account, so the purpose is obvious later in a list of dozens of playbooks
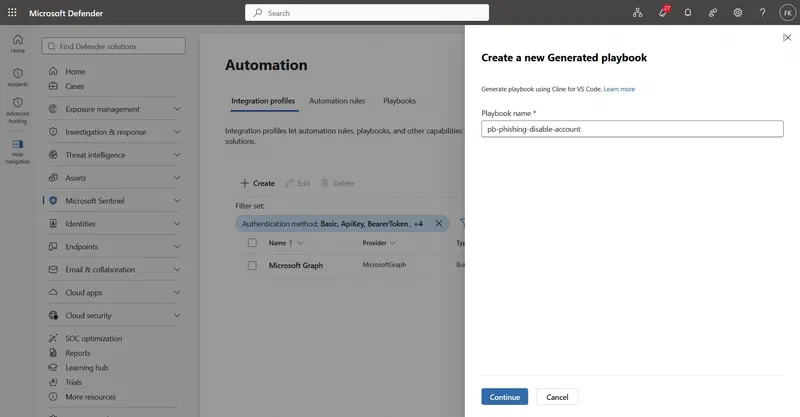
- Select Continue to continue
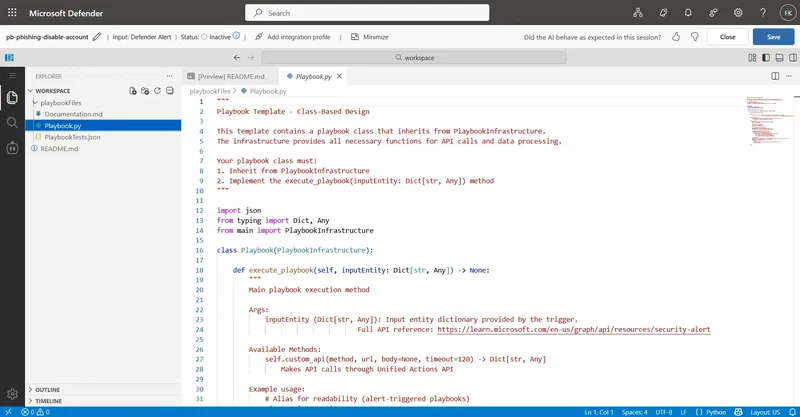
An embedded Visual Studio Code environment opens inside the Defender portal, with Cline ready in the chat pane. This is the whole authoring experience, you never leave the browser tab.
Step 4: Work the plan in Plan mode
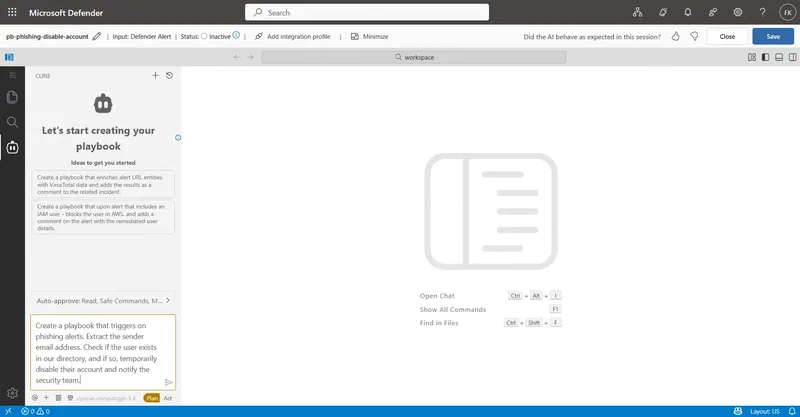
The session always starts in Plan mode. This is the most important step to get right, a vague prompt produces a vague plan, and you end up going back and forth far more than necessary.
In the chat interface, describe your playbook requirements in one message. Be explicit about four things:
- What data to process: which alert type, which entities on it
- What actions to perform: the actual response steps
- What conditions to evaluate: branching logic, if any
- Expected outcomes: what “done” looks like
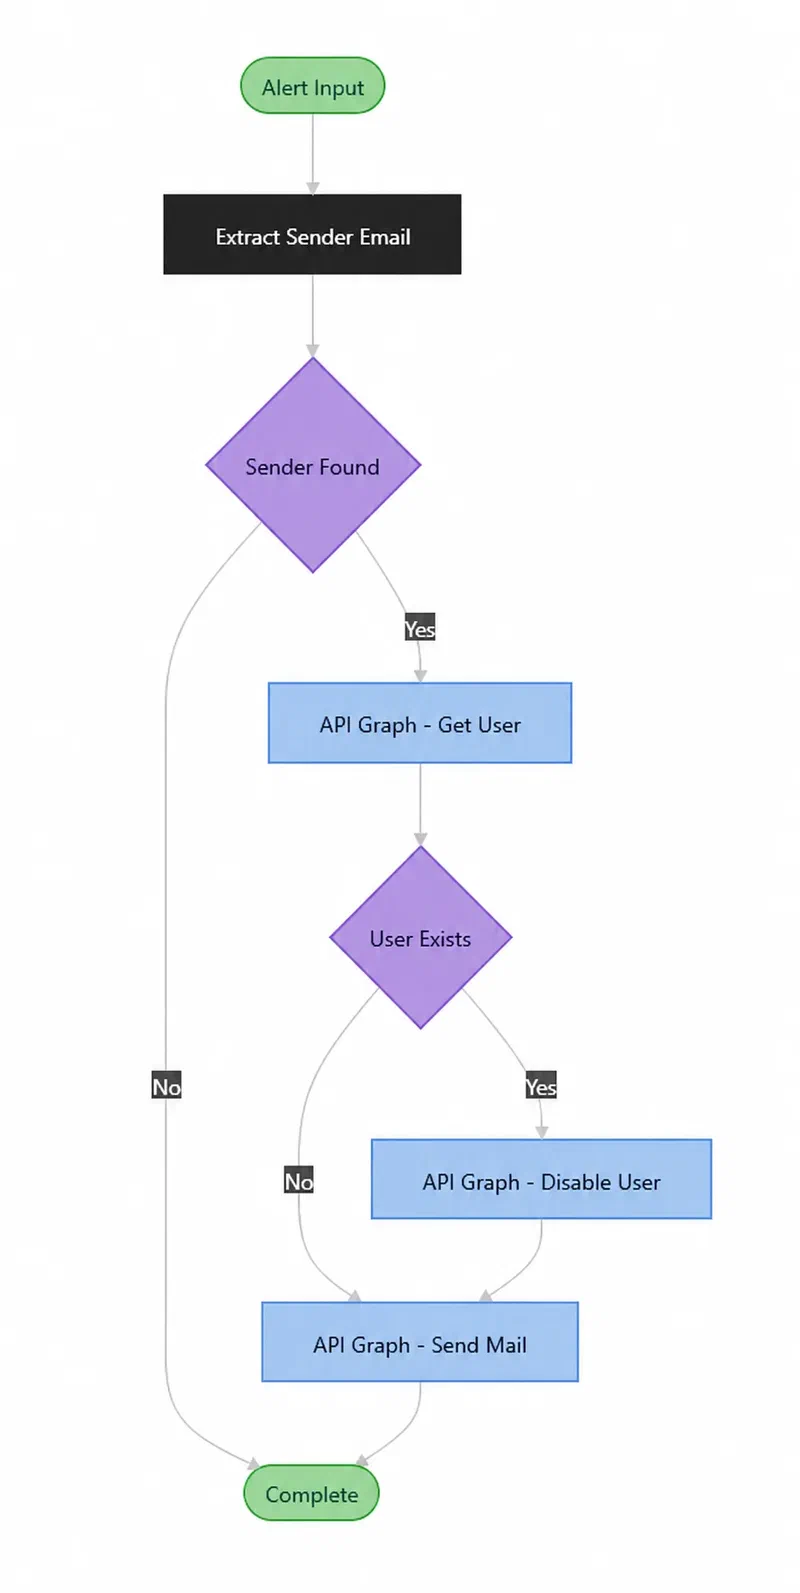
I use just a random simple example prompt to the generation in my example showcase: “Create a playbook that triggers on phishing alerts. Extract the sender email address. Check if the user exists in our directory, and if so, temporarily disable their account and notify the security team.”
- If the generator needs to fetch external API documentation to write accurate code, it asks for approval first. Approve the request, this is how it learns the correct Graph or third-party API call shape rather than guessing.
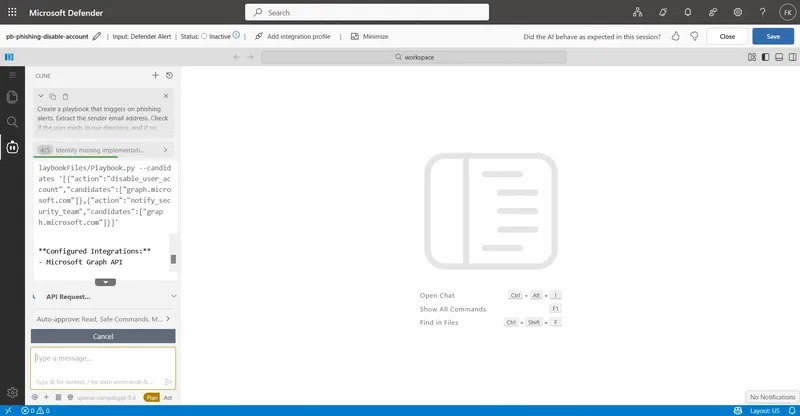
- The generator analyzes your prompt and does one or more of the following:
- Asks clarifying questions if something is ambiguous
- Requests API documentation if it cannot resolve the API shape from a web search
- Flags missing integration profiles
- Produces a preliminary plan and a visual flow diagram
- If it flags a missing integration profile:
- Select Save and exit the VS Code environment. This preserves your conversation so far
- Go create the missing profile under the Integration Profiles tab, exactly as in step 2
- Return to the playbook and continue where you left off
- Review the plan and flow diagram carefully. This is your last checkpoint before any code gets written. If something is off, describe the change in the chat rather than editing anything manually, the generator revises the plan for you.
- When you are satisfied, follow the on-screen instruction to switch to Act mode
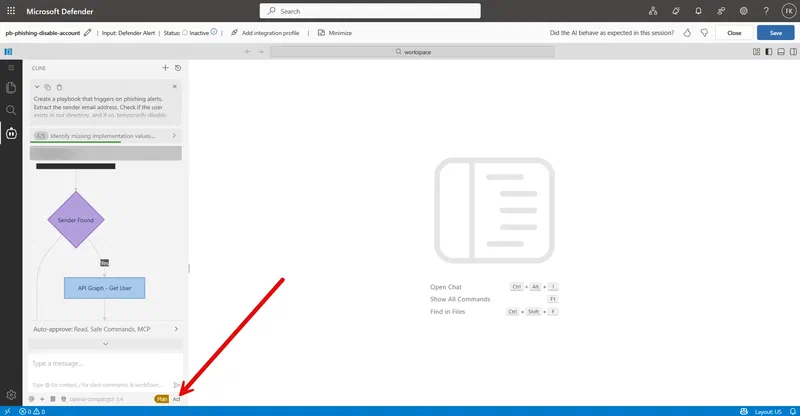
Step 5: Generate the code in Act mode
- After switching to Act mode, the generator delivers:
- The complete playbook code, in Python
- Code validation
- Comprehensive documentation, including a visual flow diagram and a plain-language description of what the playbook does
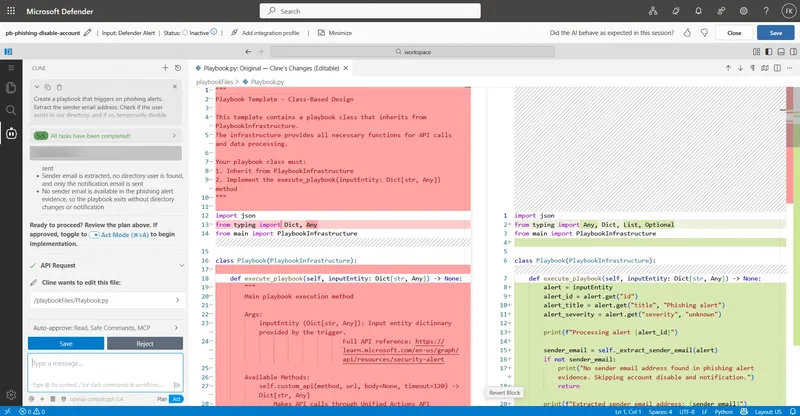
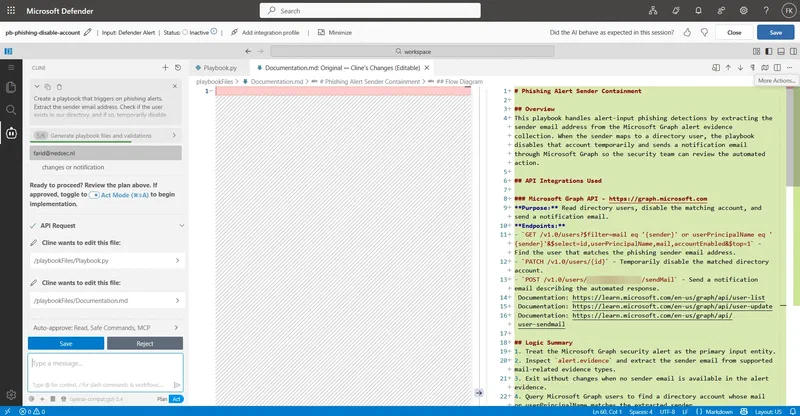
- It then asks for a real Alert ID (get the alert ID from advanced hunting for example – not the Sentinel/XDR alert ID from the portal) to test against. Use an actual alert from your environment, ideally a low-impact one the first time through. Before it runs the test, the generator outlines exactly what changes it is about to apply to your environment and asks for your approval. Read this carefully if the playbook has side effects like disabling an account or blocking an IAM user, this is your chance to catch a misunderstanding before it touches anything real.
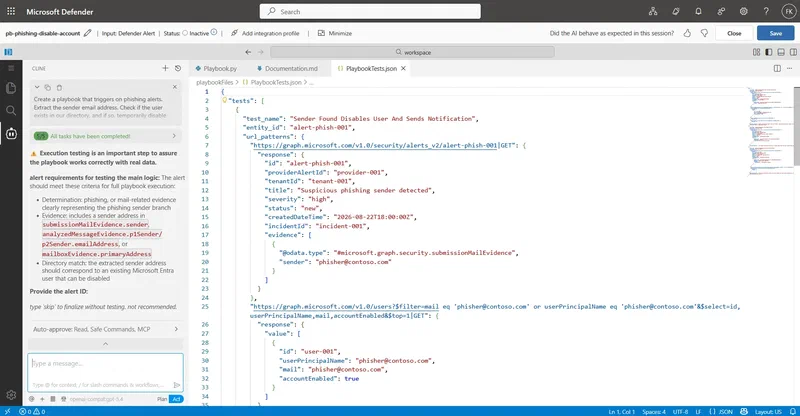
- The generator may request approval at intermediate steps of code generation. To skip repeated approval prompts, select the Edit checkbox under Auto-approve. I leave auto-approve off for the first run of any new playbook. Once I trust its behavior on a given automation pattern, I turn it on for iteration speed.
Step 6: Validate and save
Manually review the generated code and documentation. The generator does not run automatic code validation beyond the test you just performed, correctness is on you.
To preview the generated documentation in Markdown format, press
Ctrl+Shift+Von Windows or Linux,Cmd+Shift+Von macOS.Select Save at the top left of the editor. One easy mistake here: selecting Save inside the chat only saves the current conversational step and confirms your approval for it, it does not save the entire playbook. Use the Save button in the editor itself.
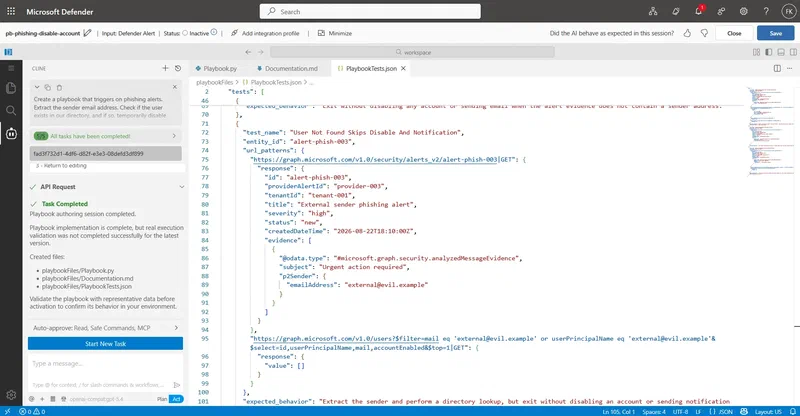
- The playbook is created in a disabled state by default. Close the editor when you are done.
Step 7: Enable the playbook
- On the Automation page, go to the Active Playbooks tab
- Find your newly created playbook in the list
- Switch its status to Activate
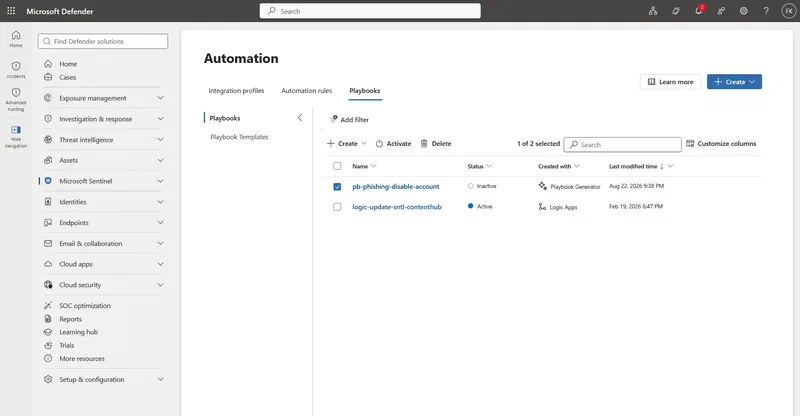
Nothing runs automatically yet, even after activation, until you connect it to a trigger in the next step.
Step 8: Create the enhanced alert trigger
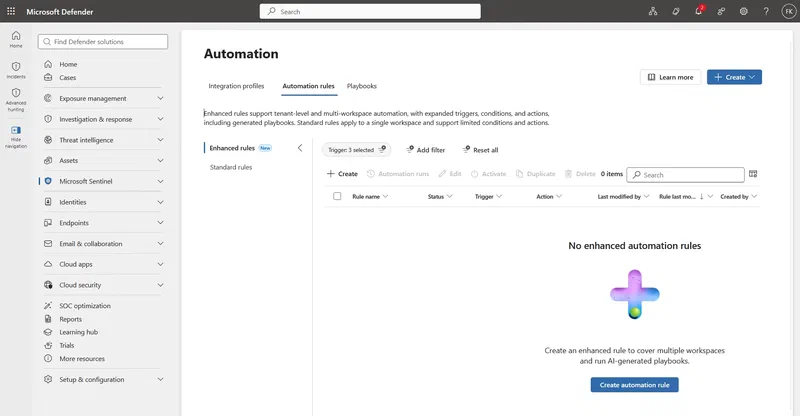
- Go to the Automation Rules tab
- Select Create to define a new rule using the enhanced trigger
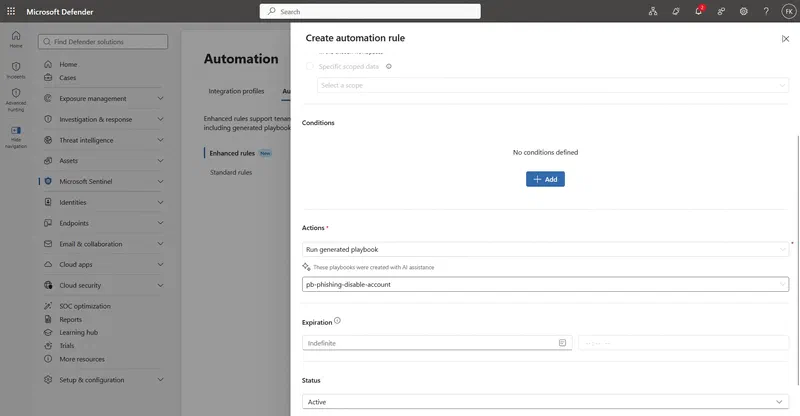
- Configure the trigger:
| Setting | What it does |
|---|---|
| Conditions | Criteria such as alert title, severity, or provider that decide when the rule fires |
| Workspaces | The workspaces this rule applies to. Ones you lack permission on appear grayed out |
| Actions | Select Run Generated Playbook and choose your newly enabled playbook |
- Select Save.
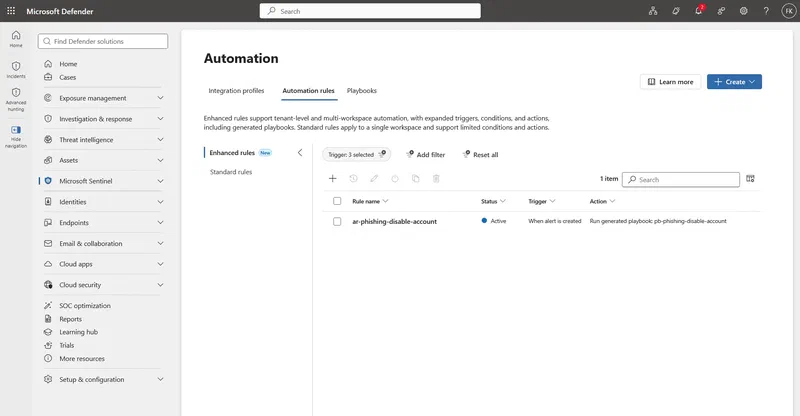
Enhanced Alert Trigger rules run at the tenant level and can cover multiple workspaces and alert sources in a single rule, a meaningful step up from the old alert-triggered playbook model inside analytics rules. These rules live in a separate Automation Rules table from Standard Alert Trigger rules, there is currently no automatic migration between the two, so if you are moving an existing use case over, you rebuild the trigger logic here rather than porting it.
Step 9: Monitor execution
- Open the incident that contains the relevant alert
- Select the Activities tab
- Find the row labeled run playbook to see execution status and detail
One gap worth flagging if you build monitoring dashboards: automation rule run results for generated playbooks show up in the incident Activities tab, but are not written to the Sentinel Health Table. If your existing playbook health reporting depends on that table, generated playbooks will not appear there, and you will want to track them separately or via the incident activity feed instead.
Demo: building a VirusTotal URL enrichment playbook end to end
To make the steps above concrete, here is the full run I did in my lab tenant, from an empty Automation tab to a live rule enriching alerts with VirusTotal data. This is a good first playbook for anyone trying the generator for the first time: it is read-only, has no side effects on identities or devices, and it is genuinely one of the most common SOC enrichment tasks there is, so the value is obvious the moment you see it work.
Scenario: when an alert contains a URL entity, look that URL up on VirusTotal and add the verdict as a comment on the incident, so an analyst gets threat context without leaving Sentinel.
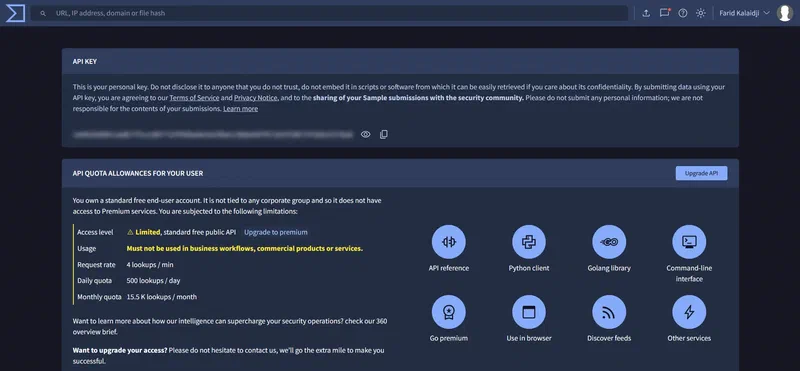
Prerequisites specific to this playbook: a VirusTotal API key (the free public API tier is enough for testing, get one from your VirusTotal account under API Key) and a second integration profile for VirusTotal, in addition to the Graph profile from step 2.
Creating the VirusTotal integration profile:
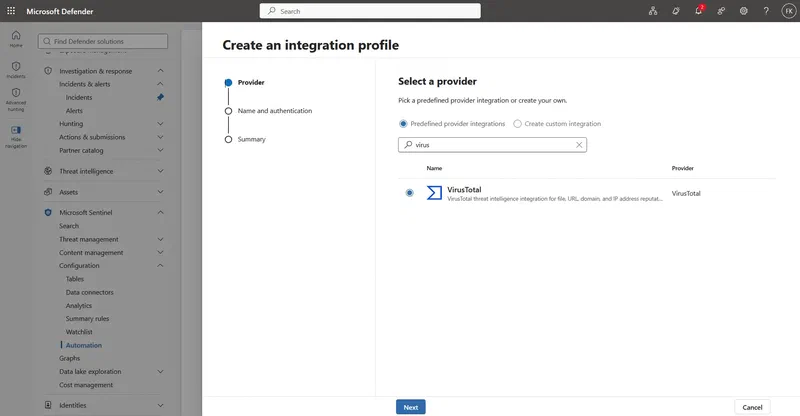
VirusTotal is one of the predefined providers in the wizard, so this is the fastest profile you will set up in this whole guide, just a name and an API key, no base URL or auth method to configure.
- In the Defender portal, go to Microsoft Sentinel > Configuration > Automation > Integration Profiles > Create
- On the Provider step, search for VirusTotal in the predefined provider list, select it, and select Next.
- On the Name and authentication step, fill in:
| Field | Value |
|---|---|
| Integration name | VirusTotal |
| API key | Your VirusTotal API key |
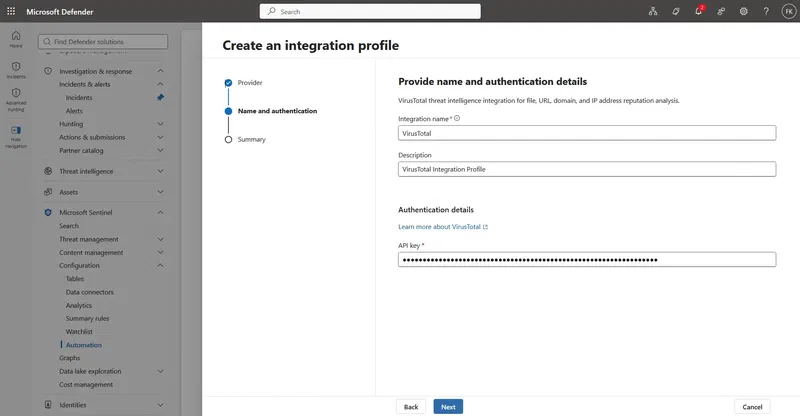
- Select Next, review the Summary step, and select Create.
Because VirusTotal is predefined, Sentinel already knows the base URL and how to authenticate against it, you only supply the credential. This is worth knowing before you set up any other third-party service: check the predefined list first, since a growing number of common threat intel and enrichment providers only need a name and an API key rather than the full custom integration flow.
Name and start: I created a new playbook named pb-url-enrichment-virustotal and selected Continue to open the VS Code environment.
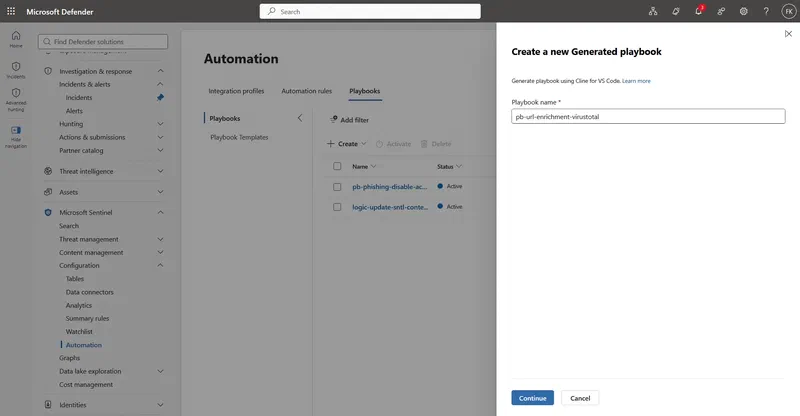
The Plan mode prompt:
“Create a playbook that triggers on alerts containing a URL entity. Look up the URL using the VirusTotal integration and retrieve the analysis stats, including malicious and suspicious detection counts. Add a comment to the related incident summarizing the VirusTotal verdict, including the detection counts and a link to the full VirusTotal report.”
What came back: The generator confirmed it found the VirusTotal integration profile and asked one clarifying question, whether to submit the URL for a fresh scan if VirusTotal had no existing analysis on file, or only report on existing data. I chose to check existing analysis first and only trigger a new scan if nothing was on file, since that keeps the playbook fast for URLs VirusTotal already knows about. It then produced a flow diagram: alert trigger, extract URL entity, VirusTotal lookup, conditional branch on analysis availability, incident comment action.
Reviewing the plan: The proposed flow matched what I asked for, so no revisions needed. I switched to Act mode.
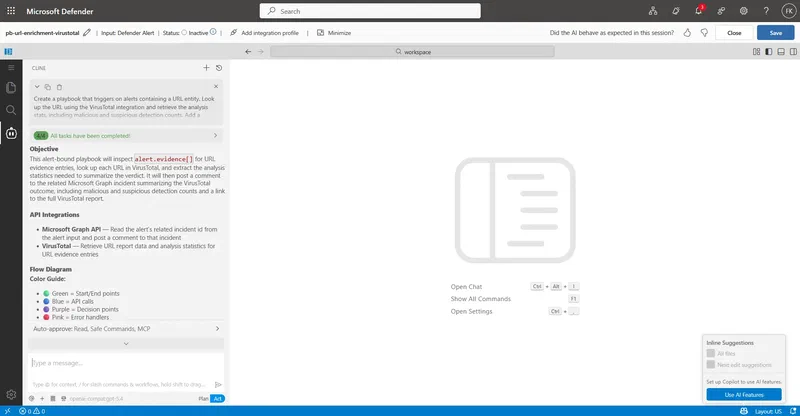
Act mode and testing: The generator produced the Python code, ran its own validation pass, and generated documentation with the same flow diagram rendered from the actual code path. It then asked for an Alert ID. I pointed it at a real alert in my lab workspace that had a URL entity attached. Before executing, it listed the exact change it was about to make, posting one incident comment with the VirusTotal verdict, and asked for approval. Since this playbook has no destructive side effects, I approved without hesitation.
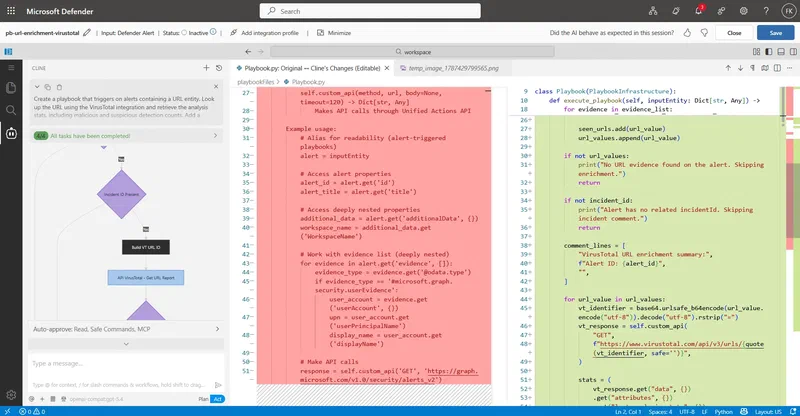
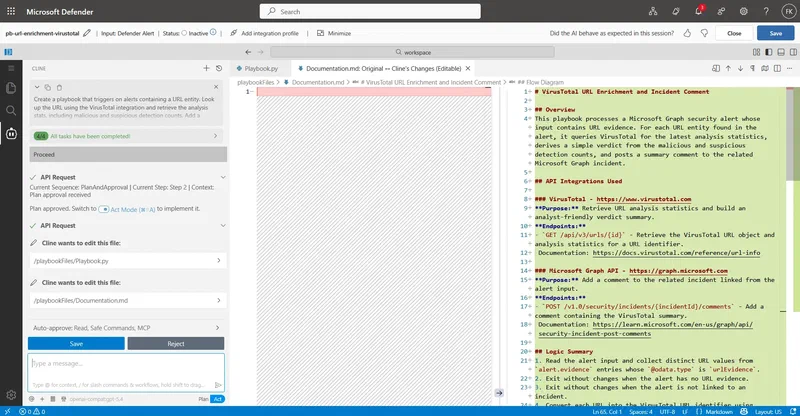
Result: The test run queried VirusTotal, retrieved the detection stats, and posted a comment on the incident with the malicious and suspicious counts plus a link to the full report. The generator confirmed the test passed. I reviewed the generated Python briefly (the VirusTotal API call, the header-based authentication, the comment formatting) before moving on.
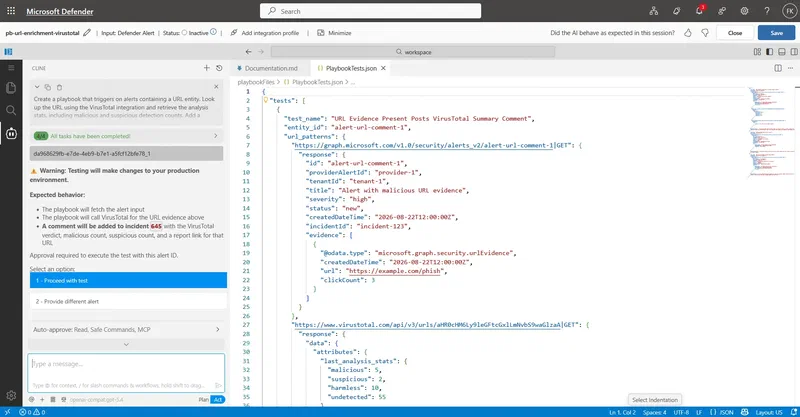
Save and enable: I saved the playbook from the editor’s Save button (not the chat), which left it in a disabled state as expected. I then went to Active Playbooks and switched it to Activate.
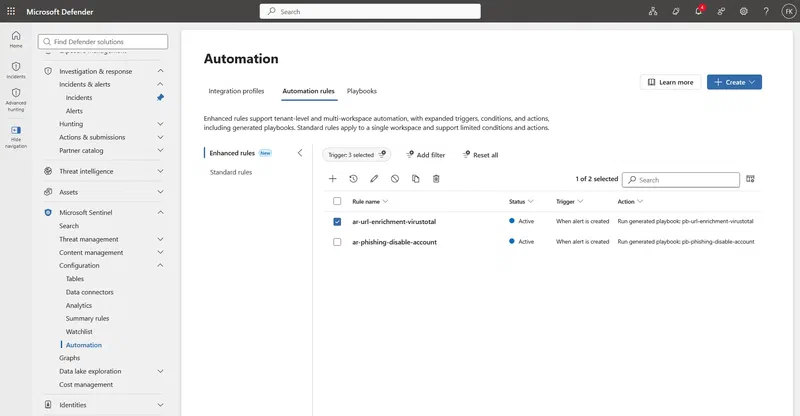
The automation rule: In Automation Rules, I created a new rule with the enhanced trigger: condition set to alert entities contains a URL type, workspace scoped to my lab workspace, action set to Run Playbook targeting pb-url-enrichment-virustotal.
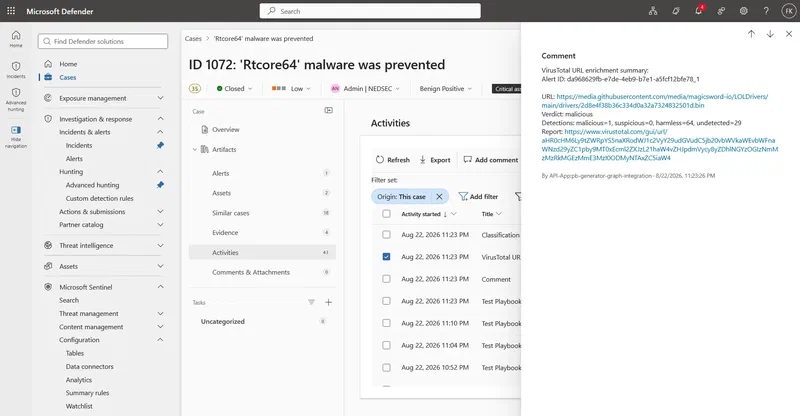
Live verification: I triggered a new test alert containing a known URL entity and confirmed in the incident’s Activities tab that the run playbook entry appeared with a successful status, and the VirusTotal comment was visible on the incident.
Total time from opening the Automation tab to a live, working rule: around 15 minutes, most of which was creating the VirusTotal API key and the integration profile. If you already have the Graph profile from earlier in this guide, adding a second read-only integration like this one is fast.
More example prompts to try
A few prompts that map well to common SOC automation requests, beyond the VirusTotal example above:
- “Create a playbook that triggers on phishing alerts, extracts the sender email address, checks if the user exists in our directory, and if so, temporarily disables their account and notifies the security team.”
- “Create a playbook that blocks an AWS IAM user, assigns the alert to John, and adds a remediation comment when a high severity alert includes an IAM user entity.”
- “Create a playbook that triggers on impossible travel alerts, extracts the affected user, revokes their active sign-in sessions via Graph, and posts a comment with the two sign-in locations and timestamps involved.”
- “Create a playbook that triggers on malware alerts with a device entity, isolates the device, and notifies the on-call channel with the device name, alert severity, and a link to the incident.”
The pattern that works best is the same across all of them: name the trigger condition, the entity to act on, the action to take, and how to record what happened. The more precisely you name the entity field (sender email, device name, IAM user), the fewer clarifying questions you get back. Note that the phishing, IAM block, and device isolation examples above all involve a real side effect, unlike the VirusTotal demo, so test those against a low-impact alert first and review the approval prompt in Act mode carefully before confirming.
Limitations to know before you build
Worth reading before you commit a production use case to this feature:
- Language: only Python is supported for playbook authoring
- Input: playbooks currently accept alerts as the only input type, no scheduled or manual triggers yet
- Editing: one user can edit a given playbook at a time, though different users can work on different playbooks simultaneously
- External libraries: not currently supported
- Code validation: no automatic validation beyond the test run you perform, review manually
- Scale limits per tenant: up to 100 playbooks, up to 500 integrations, up to 500 active automation rules
- Playbook size: up to 5,000 lines per playbook
- Runtime: 10 minutes maximum per execution
- AI interactions: 8M tokens per day per tenant
- Playbook nesting: not supported. A generated playbook cannot invoke another playbook, so orchestration across multiple playbooks needs a different pattern for now
- Graph and ARM integrations: not enabled by default, you have to create them manually even though they are the most common target
- Enhanced Alert Trigger rules: no priority ordering or expiration dates yet, and only one action per rule
None of these are dealbreakers for typical detection-to-response automation, but the 10-minute runtime and single-action-per-rule limits are worth designing around if you are used to building more complex multi-step Logic Apps.
Why this matters for MSSPs and MDR providers
For a multi-tenant MDR operation, the interesting part of this feature is not that it writes code, it is that it lowers the skill floor for building tenant-specific response automation without pulling in a developer every time. A L2 analyst who can clearly describe a response workflow can now get a working, tested playbook without touching Logic Apps designer or writing Python from scratch.
The August 2026 change matters here specifically because it removes a real adoption barrier: provisioning Security Copilot capacity purely to unlock an automation feature was a hard sell across a customer base where Copilot adoption timelines vary a lot. With that dependency gone, this becomes something you can realistically standardize as part of an automation intake process rather than a feature that only shows up in tenants that already invested in Security Copilot.
The generated documentation and flow diagrams are also worth calling out for anyone running a service with change management requirements. Having an auto-generated description and visual flow per playbook makes it much easier to keep an automation runbook current without a separate manual documentation pass every time something changes.
Resources
Microsoft documentation
- Generate playbooks using AI in Microsoft Sentinel
- Create and manage Microsoft Sentinel playbooks
- Automate and run Microsoft Sentinel playbooks
Tech Community blogs
- Introducing the next generation of SOC automation: Sentinel playbook generator, original announcement, June 2026
- AI-powered playbook generator, now available to more customers, Security Copilot requirement removed, August 2026
Final thoughts
The playbook generator is one of those features where the interesting part is not the AI, it is what the AI removes from your path: the Logic Apps designer, the connector hunting, the JSON debugging that used to gatekeep SOAR maturity behind whoever on the team happened to know Logic Apps well. Combined with the August 2026 change dropping the Security Copilot dependency, there is very little reason left not to try this in a lab tenant this week.
Start small. Pick one repetitive triage action your analysts do by hand today, describe it precisely in Plan mode, and see what comes out the other side. The limitations around runtime and single actions per rule mean this fits enrichment and single-step response actions best right now, not full incident orchestration, but that is exactly where most automation backlogs live anyway.
Got questions about setting this up in a multi-tenant MDR environment, or ran into something not covered here? Leave a comment or reach out via the contact page.


Comments
Comments need JavaScript to load.
Leave a comment
Comments are moderated and appear after approval. Plain text only; links are shown but not clickable.